在本教程中,我们将使用 javascript、html 和 css(非常适合问卷和测验)构建一个多步骤表单。
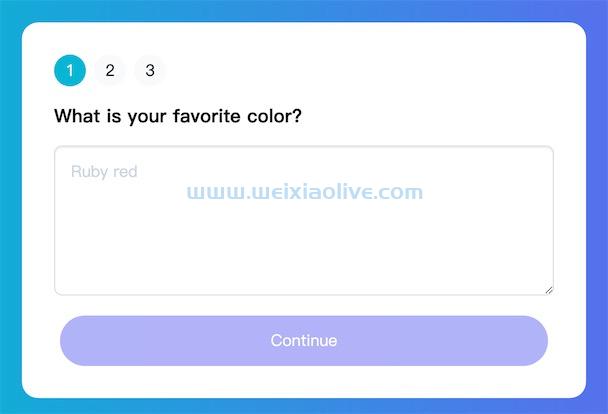
填写长表格可能很乏味!作为设计师,我们可以通过关注多步骤形式中的单个组件来增强体验。这种设计模式促进了一种更加用户友好的方式来捕获用户数据,同时有时会要求大量数据。
我们的多步骤表单的目标是减少使用更扩展的表单来捕获用户数据的负担,同时确保提交适当的数据。
我们的多步骤表格演示
回答测验问题,看看我们的表格如何使整个过程更加愉快!请记住,提交表单时,数据当前没有任何反应。
See the Pen How to Build a Multi Step Form Wizard with JavaScript by Envato Tuts+ (@tutsplus) on CodePen.
1.从 HTML 开始
我们的 HTML 标记将有效地为我们提供基于选项卡的布局。我们将拥有三个按钮、一个表单和一些状态指示器,以便用户确定他们当前处于哪一步。
<div class="container">
  <div class="tab-status">
    <span class="tab active">1</span>
    <span class="tab">2</span>
    <span class="tab">3</span>
  </div>
  <form action="#">
    <div role="tab-list">
      <div role="tabpanel" id="color" class="tabpanel">
        <h3>What is your favorite color?</h3>
        <textarea name="color" class="form-input" placeholder="Ruby red"></textarea>
      </div>
      <div role="tabpanel" id="hobbies" class="tabpanel hidden">
        <h3>What are your hobbies?</h3>
        <textarea name="hobbies" class="form-input" placeholder="Mountain climbing, Guitar, Skateboarding"></textarea>
      </div>
        <div role="tabpanel" id="occupation" class="tabpanel hidden">
        <h3>What is your occupation?</h3>
        <textarea name="occupation" class="form-input" placeholder="Web Designer"></textarea>
      </div>
    </div>
      <div class="pagination">
        <a class="btn hidden" id="prev">Previous</a>
        <a class="btn" id="next">Continue</a>
        <button class="btn btn-submit hidden" id="submit">Submit</button>
      </div>
    </form>
</div>
我将从三个问题开始,但您可以将其扩展到包括您喜欢的任何问题。最后,JavaScript 代码是动态的,这意味着您可以轻松添加和删除其他问题。
2.使用 CSS 样式化表单
如果没有 CSS,多步骤方法就不会像我们希望的那样传达。这是我用来设置 HTML 样式的 CSS。
:root {
  --color-1: #6366f1;
  --color-1-hover: #4338ca;
  --color-2: #06b6d4;
  --color-2-hover: #0891b2;
  --text-color: #312e81;
  --status-btn-bg: #f8fafc;
  --status-btn-bg-hover: #f1f5f9;
}

body {
  background: linear-gradient(to left, var(--color-1), var(--color-2));
}

.container {
  margin: 10rem auto;
  max-width: 500px;
  background: white;
  border-radius: 1rem;
  padding: 2rem;
}

.form-input {
  width: 100%;
  border: 1px solid #ddd;
  border-radius: .5rem;
  box-shadow: inset 0px 1px 2px rgba(0, 0, 0, .1);
  padding: 1rem;
  box-sizing: border-box;
  color: var(--text-color);
  transition: ease-in-out .3s all;
}

.form-input::placeholder {
  color: #cbd5e1;
}

.form-input:focus {
  outline: none;
  border-color: var(--color-1);
}

.btn:focus-within,
.form-input:focus-within {
  box-shadow: #f8fafc 0px 0px 0px 2px, #c7d2fe 0px 0px 0px 6px, #0000 0px 1px 2px 0px;
}

textarea.form-input {
  min-height: 150px;
}

.btn {
  border: 0;
  background: var(--color-1);
  padding: 1rem;
  border-radius: 25px;
  color: white;
  cursor: pointer;
}

.btn[disabled] {
  opacity: .5;
  pointer-events: none;
}

.btn:hover {
  background: var(--color-1-hover);
  transition: ease-in-out .3s all;
}

.btn-submit {
  background-color: var(--color-2);
}

.btn-submit:hover {
  background-color: var(--color-2-hover);
}

.pagination {
  margin-top: 1rem;
  display: flex;
  align-items: center;
  justify-content: center;
}

.pagination .btn {
  width: 100%;
  text-align: center;
  margin: 0 6px;
}

.tab-status {
  display: flex;
  align-items: center;
}

.tab-status span {
  appearance: none;
  background: var(--status-btn-bg);
  border: none;
  border-radius: 50%;
  width: 2rem;
  height: 2rem;
  margin-right: .5rem;
  display: flex;
  align-items: center;
  justify-content: center;
}

.tab-status span.active {
  background-color: var(--color-2);
  color: white;
}

.hidden {
  display: none;
}
3.在 javaScript 上
让我们从声明一些变量开始。前三个将针对我之前提到的按钮。然后,我们将选项卡面板和选项卡定位为JavaScript 中称为nodeList的元素集合。这是将其称为Array的一种奇特方式。
我创建了一个isEmpty函数来帮助快速确定表单输入的字符串值是否为空。
最后,当单击Next和Previous按钮时,该currentStep变量将发生变化。
const previousButton = document.queryselector('#prev')
const nextButton = document.querySelector('#next')
const submitButton = document.querySelector('#submit')
const tabTargets = document.querySelectorAll('.tab')
const tabPanels = document.querySelectorAll('.tabpanel')
const isEmpty = (str) => !str.trim().length
let currentStep = 0
下一个和上一个按钮
我们的“下一个”和“上一个”按钮将是用户浏览问卷的方式。我们将利用该currentStep变量动态呈现适当的步骤和活动选项卡。因为它返回一个数字值,所以我们可以动态地定位 NodeList。
// Next: Change UI relative to the current step and account for button permissions
nextButton.addEventListener('click', (event) => {
  // Prevent default on links
  event.preventDefault()

  // Hide current tab
  tabPanels[currentStep].classList.add('hidden')
  tabTargets[currentStep].classList.remove('active')

  // Show next tab
  tabPanels[currentStep + 1].classList.remove('hidden')
  tabTargets[currentStep + 1].classList.add('active')
  currentStep += 1
})
单击Next按钮后,将指示 HTML/CSS 忙碌,隐藏活动选项卡和选项卡面板,并在向导中显示以下问题。
我们将扩展此操作以调用更多函数。一个功能将负责更新状态指示器,另一个将在用户继续之前验证用户输入的响应。
动态更新状态
要更新状态,我们需要执行检查currentStep变量状态的条件操作。
使用该tabTargets变量,我们可以确定该方法有多少个选项卡.length()。该length()方法动态返回 HTML 中的选项卡数。
下面,我在代码中添加了注释,以更好地表示每个条件语句之后发生的情况。
function updateStatusDisplay() {
  // If on the last step, hide the next button and show submit
  if (currentStep === tabTargets.length - 1) {
    nextButton.classList.add('hidden')
    previousButton.classList.remove('hidden')
    submitButton.classList.remove('hidden')
    validateEntry()

    // If it's the first step, hide the previous button
  } else if (currentStep == 0) {
    nextButton.classList.remove('hidden')
    previousButton.classList.add('hidden')
    submitButton.classList.add('hidden')
    // In all other instances, display both buttons
  } else {
    nextButton.classList.remove('hidden')
    previousButton.classList.remove('hidden')
    submitButton.classList.add('hidden')
  }
}
我们将动态显示和隐藏与表单向导的开始、中间和结束相关的控件。
验证用户输入
为了使多步骤问卷/测验/表格正常工作,我们希望确保数据得到充分提交。
本教程仅涉及您可以在前端验证的内容的表面,但现在,我们只是检查每个问题是否存在一个值。
要扩展此功能,您可能会检查其他标准,例如答案的长度,是否有任何垃圾邮件/代码条目可能会损害网站等等。我还建议添加服务器端验证,以免有害代码进入任何数据库。
function validateEntry() {
  // Query for the current panel's Textarea input
  let input = tabPanels[currentStep].querySelector('.form-input')

  // Start by disabling the continue and submit buttons
  nextButton.setAttribute('disabled', true)
  submitButton.setAttribute('disabled', true)

  // Validate on initial function fire
  setButtonPermissions(input)

  // Validate on input
  input.addEventListener('input', () => setButtonPermissions(input))

  // Validate if blurring from input
  input.addEventListener('blur', () => setButtonPermissions(input))
}

function setButtonPermissions(input) {
  if (isEmpty(input.value)) {
    nextButton.setAttribute('disabled', true)
    submitButton.setAttribute('disabled', true)
  } else {
    nextButton.removeAttribute('disabled')
    submitButton.removeAttribute('disabled')
  }
我添加了两个一起工作的函数,以帮助验证每个问题是否存在一个值。
我们将首先验证最初调用该函数的时间,然后添加几个事件***器函数以在您与表单交互时动态设置按钮权限。
这将禁用或启用与变量值相关的Next按钮和Submit按钮,currentStep并查看每个表单字段中是否存在文本。
我们将这两个函数添加到原始nextButton函数中,并在每次点击后调用它们。
// Next: Change UI relative to the current step and account for button permissions
nextButton.addEventListener('click', (event) => {
  event.preventDefault()

  // Hide current tab
  tabPanels[currentStep].classList.add('hidden')
  tabTargets[currentStep].classList.remove('active')

  // Show next tab
  tabPanels[currentStep + 1].classList.remove('hidden')
  tabTargets[currentStep + 1].classList.add('active')
  currentStep += 1

  validateEntry()
  updateStatusDisplay()
})
我们之前的按钮类似于下面的按钮逻辑,但数学略有不同。
// Previous: Change UI relative to the current step and account for button permissions
previousButton.addEventListener('click', (event) => {
  event.preventDefault()

  // Hide current tab
  tabPanels[currentStep].classList.add('hidden')
  tabTargets[currentStep].classList.remove('active')

  // Show the previous tab
  tabPanels[currentStep - 1].classList.remove('hidden')
  tabTargets[currentStep - 1].classList.add('active')
  currentStep -= 1

  nextButton.removeAttribute('disabled')
  updateStatusDisplay()
})
我们不需要validateEntry()在上一次单击按钮时调用该函数,因为它假定表单字段中已经存在一个值。
最后
下面是最终结果(查看 JS 选项卡以查看所有代码)。JavaScript 代码可以针对可重用性进行更多优化。尽管如此,它仍然足以帮助您学习如何构建一个简单的表单进行导航,并且在关注特定问题并简单地回答它时,它使用户的生活更轻松。
- 动态更新状态
- 验证用户输入




![如何删除Word中的空白页[4种简单方法] 如何删除Word中的空白页[4种简单方法]](https://www.weixiaolive.com/en/zb_users/upload/2023/07/20230702124855168827333590644.png)




















发表评论