个性化网站是网络开发中比较有趣的方面之一。在本教程中,我们将介绍两种将自定义鼠标光标添加到您的网站的方法。首先使用纯 css 方法,然后使用更具交互性的 javascript 方法。
1.使用 CSS 添加自定义光标
在此演示中,我们仅使用 CSS 在页面上实现了两个不同的光标。将鼠标悬停在笔上以查看会发生什么:
See the Pen Custom Cursors with CSS by Envato Tuts+ (@tutsplus) on CodePen.
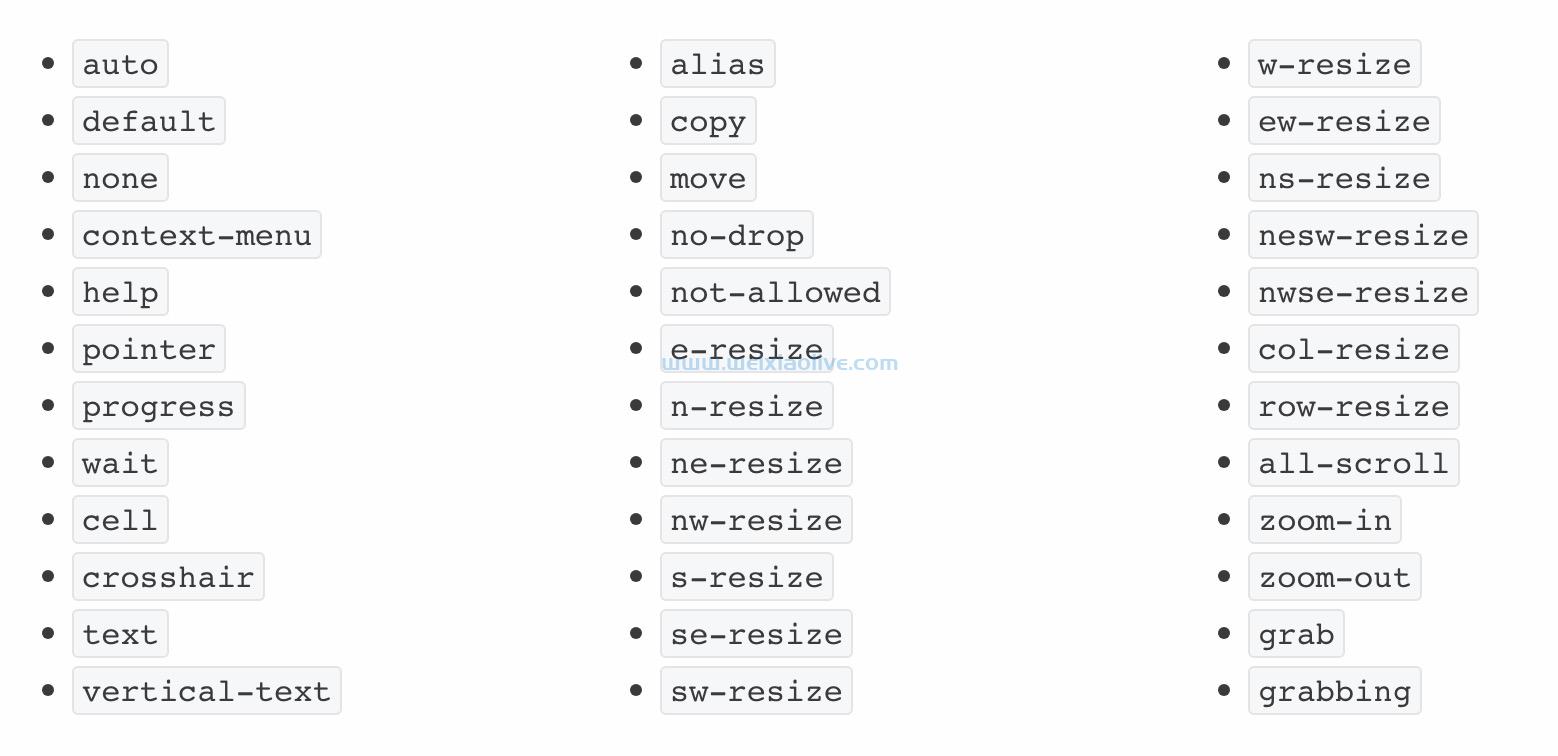
CSS 属性cursor 允许我们将光标更改为内置关键字,还允许我们将图像设置为光标。
我们的 CSS 代码看起来像这样:
main {
cursor: url("data:image/svg+xml,%3csvg
xmlns='https://www.w3.org/2000/svg'
height='16' width='16' style='
fill-rule:evenodd;
text-rendering:geometricPrecision;
image-rendering:optimizeQuality;
clip-rule:evenodd;
shape-rendering:geometricPrecision'
xml:space='preserve'
viewBox='0 0 7.5 7.5'%3E%3Cpath
d='M0 3.8a3.7 3.7 0 1 1 7.5 0 3.7 3.7 0 0 1-7.5 0zm.5 0a3.3 3.3 0 1 0 6.6 0 3.3 3.3 0 0 0-6.6 0zm2.9 0c0 .2.2.3.4.3a.4.4 0 1 0-.4-.3z'
style='fill:currentColor;stroke:currentColor;stroke-width:.0419595'/%3E%3C/svg%3E") 8 8,
pointer;
}
.hover-container {
cursor: url(https://cur.cursors-4u.net/nature/nat-11/nat1021.cur), default;
}
我们使用以下值来设置光标的样式:
url(): url 函数用于设置光标的图像文件,只要格式合适,最大为 128px x 128px。在我们的主要元素中,我们将光标设置为.svg我们在悬停容器元素中使用.cur文件的时间。
Coordinates : x 和 y 坐标值放在 url 函数之后,以指定光标应该从哪个点开始。默认情况下,光标图像位于鼠标光标所在位置的左上角。在我们的主要元素中,我们将 x 和 y 坐标设置为8 8以确保我们的圆形光标位于鼠标所指位置的中点。
Fallback:回退值是我们游标属性末尾的最后一个关键字。后备设置为内置光标关键字值之一,并在无法加载 url 中的图像时使用。
这就是使用 CSS 设置自定义光标的全部内容!
粗略浏览
为了真正说明问题,这里收集了各种用作光标的 SVG 图标。所有这些都可以作为图形包从Envato Elements获得。单击每个以获取更多详细信息!
See the Pen CSS Grid Layout: Mouse Cursors by Envato Tuts+ (@tutsplus) on CodePen.
2.使用 JavaScript 添加自定义光标
如果我们希望我们的光标与我们的网页有更多的交互性,我们可以使用 javaScript 来设置它。将鼠标悬停在笔上以查看光标如何变化:
See the Pen Custom Cursors with JavaScript by Envato Tuts+ (@tutsplus) on CodePen.
为此,首先我们需要一个 html 元素作为我们的交互式光标。
<div id="custom-cursor">
</div>
接下来,我们为自定义光标元素 CSS 设置样式。我们可以将任何图像或样式属性传递给光标元素,使其看起来完全符合我们的要求。在本教程中,我们将设计一个简单的圆圈,并使用::after伪元素在中间形成一个点。这是 CSS 样式:
1    #custom-cursor {
2      width: 2px;
3      height: 2px;
4      border-radius: 50%;
5      background-color: white;
6      position: fixed;
7      pointer-events: none;
8      top: 0;
9    }
10
11    #custom-cursor::after {
12      content: "";
13      border-radius: 50%;
14      position: absolute;
15      top: -8px;
16      left: -8px;
17      border: 1px solid white;
18      width: 16px;
19      height: 16px;
20    }
我们的自定义光标具有position: fixed和pointer-events: none属性很重要。这是为了确保光标始终通过鼠标移动定位在页面上,并且我们无法与光标元素进行交互。
色彩飞溅
我们可以使用该mix-blend-mode属性为我们的光标添加一些颜色乐趣。这将根据光标悬停在其上的背景为光标提供倒置的颜色效果。
1    #custom-cursor {
2      width: 2px;
3      height: 2px;
4      border-radius: 50%;
5      background-color: white;
6      position: fixed;
7      top: 0;
8      mix-blend-mode: difference;
9    }
这是我们目前所拥有的:
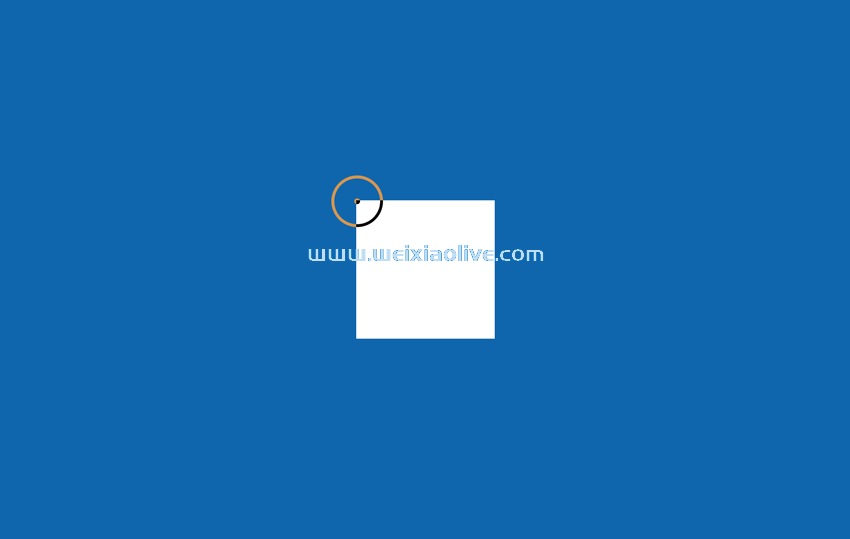
隐藏原始光标
接下来我们想隐藏我们的常规光标,只在页面悬停时显示自定义光标元素:
1    body {
2      cursor: none;
3    }
4
5    body:hover #custom-cursor {
6      opacity: 1;
7    }
8
9    #custom-cursor {
10      width: 2px;
11      height: 2px;
12      border-radius: 50%;
13      background-color: white;
14      position: fixed;
15      top: 0;
16      mix-blend-mode: difference;
17      opacity: 0;
18    }
添加 JavaScript 魔法
现在我们已经完成了样式设置,让我们使用 JavaScript 设置光标功能。
我们的功能将处理基于鼠标移动的自定义光标定位以及光标与页面上元素的交互。
更新光标位置的代码是:
1    const customCursor = document.getElementById('custom-cursor');
2
3    const updateCursorPosition = (event) => {
4      customCursor.style.top = `${event.clientY}px`;
5      customCursor.style.left = `${event.clientX}px`;
6    }
7
8    window.addEventListener('mousemove', (event) => {
9      updateCursorPosition(event)
10    })
每当鼠标移动时,我们使用clientX和值来设置光标坐标。clientY
我们还可以在光标与元素交互时更新光标样式。当鼠标悬停在 hover-container 元素上时,我们将向光标元素添加一个缩放类。
让我们更新我们的 CSS 以包含缩放类的样式:
1    #custom-cursor {
2      width: 2px;
3      height: 2px;
4      border-radius: 50%;
5      background-color: white;
6      position: fixed;
7      top: 0;
8      opacity: 0;
9      pointer-events: none;
10      mix-blend-mode: difference;
11      transition: transform 500ms;
12    }
13
14    #custom-cursor.zoom {
15      transform: scale(3);
16    }
.matches()当悬停容器悬停时,我们可以使用该函数来定位(这样我们就不必将另一个事件***器附加到元素)。
最终的 JavaScript 代码如下所示:
1    const customCursor = document.getElementById('custom-cursor');
2    const hoverContainer = document.queryselector('.hover-container');
3
4    const updateCursorPosition = (event) => {
5      customCursor.style.top = `${event.clientY}px`;
6      customCursor.style.left = `${event.clientX}px`;
7    }
8
9    window.addEventListener('mousemove', (event) => {
10      updateCursorPosition(event)
11
12      if (hoverContainer.matches(':hover')) {
13        customCursor.classList.add('zoom')
14      } else {
15        customCursor.classList.remove('zoom')
16      }
17    })
结论
因此,除了我们简单的 CSS 光标之外,我们还构建了一个交互式自定义光标的轻量级版本,仅使用普通 JavaScript。
- 粗略浏览
- 色彩飞溅
- 隐藏原始光标
- 添加 JavaScript 魔法




![如何删除Word中的空白页[4种简单方法] 如何删除Word中的空白页[4种简单方法]](https://www.weixiaolive.com/en/zb_users/upload/2023/07/20230702124855168827333590644.png)













发表评论