逻辑属性定义了一种新方法,它改变了我们在 css 中使用布局的方式。除了许多其他优势之外,它们使我们能够基于逻辑属性向布局添加 RTL(从右到左)语言支持:flexbox 和 CSS 网格。
但首先让我们简要了解一下 CSS 中的逻辑属性是如何工作的。
1. 逻辑布局和内容方向
CSS 逻辑属性的主要目标是使开发人员能够在 writing-mode or direction 属性更改时轻松翻转布局。假设您有一个 LTR(从左到右)网站,并且您想将其翻译成 RTL 脚本,就像与阿拉伯语或希伯来语一起使用的那些。如果您在 CSS 中一直使用逻辑属性,则只需将 direction: rtl; 规则添加到页面中,布局就会自动翻转。
逻辑属性使用逻辑而非物理方向来定义布局。例如, start 关键字等同 left 于拉丁文等 LTR 脚本,而它等同right 于 RTL 脚本。同样,end等同right于 LTR 和leftRTL 脚本。这就是为什么很容易将 RTL 支持添加到依赖于逻辑维度的布局的原因。
CSS 逻辑属性有三个主要用例:
弹性盒(例如flex-start, flex-end)
CSS 网格(例如grid-row-start, grid-row-end, grid-column-start, grid-column-end)
常用属性的逻辑等价物,如margin、padding、border、text-align等。
现在,让我们看看如何利用逻辑属性为 flexbox 和 CSS 网格添加 RTL 支持。
2.如何为 Flexbox 添加 RTL 支持
以下示例使用 flexbox 创建新闻网站布局(这里是完整教程)。它有一个居中的标题,并包括几张不同大小的卡片。该演示使用两个媒体查询: at800px和1000px. 卡片的排列将取决于您查看演示的视口大小:
See the Pen How to Build a News Website Layout with Flexbox by Envato Tuts+ (@tutsplus) on CodePen.
要创建 CSS 的 RTL 版本,我们只需添加一条规则:
* {direction: rtl;}
而且,正如您在下面看到的那样,演示已完美翻转——不仅是文本,还有布局——在每个视口大小下:
See the Pen Flexbox Layout with RTL support by Envato Tuts+ (@tutsplus) on CodePen.
为什么这么容易做到?
在 CSS 布局中使用物理方向时,它们通常会打乱您的 RTL 工作。但是,如果您查看下面的 CSS,您会发现没有使用物理方向,因此翻转布局如此容易(为了便于阅读,已从代码中删除了字体和颜色等文本装饰规则) :
.header {
padding: 40px 0 20px;
text-align: center;
}
.header h2 a {
border-bottom: 1px solid rgba(255, 255, 255, 0.5);
}
.main {
margin: 0 auto;
max-width: 1040px;
padding: 10px;
}
.column {
flex: 1;
flex-direction: column;
}
.article {
display: flex;
flex: 1;
flex-direction: column;
flex-basis: auto;
margin: 10px;
}
.article-image {
display: block;
padding-top: 75%;
position: relative;
width: 100%;
}
.article-image img {
display: block;
height: 100%;
left: 0;
position: absolute;
top: 0;
width: 100%;
}
.article-image.is-3by2 {
padding-top: 66.6666%;
}
.article-image.is-16by9 {
padding-top: 56.25%;
}
.article-body {
display: flex;
flex: 1;
flex-direction: column;
padding: 20px;
}
.article-title {
flex-shrink: 0;
}
.article-content {
flex: 1;
margin-top: 5px;
}
.article-info {
display: flex;
justify-content: space-between;
margin-top: 10px;
}
@media screen and (min-width: 800px) {
.columns,
.column {
display: flex;
}
}
@media screen and (min-width: 1000px) {
.first-article {
flex-direction: row;
}
.first-article .article-body {
flex: 1;
}
.first-article .article-image {
height: 300px;
order: 2;
padding-top: 0;
width: 400px;
}
.main-column {
flex: 3;
}
.nested-column {
flex: 2;
}
}
Flexbox 负责整个布局,而 flexbox 属性是逻辑属性。在某些情况下,尺寸和对齐属性(如border、margin、padding和 )width可能会导致问题,因为它们依赖于物理方向而不是逻辑方向。例如,演示使用 old-stylepadding-top 属性而不是 brand new padding-block-start,它的逻辑等价物。
但是,由于我们要执行 LTR 到 RTL 的转换,我们只需要翻转水平(左右)轴,而不需要翻转垂直轴(上下)。上面的代码仅包含定义垂直方向的属性,例如padding-top和border-bottom。这些在两种布局中保持不变。
由于代码中没有任何定义水平方向的属性(例如,padding-left会是这样的属性),我们不必调整它们以适应 RTL 脚本。
3. 如何为 CSS Grid 添加 RTL 支持
现在,让我们看看 CSS 网格演示。它定义了一个建立在 CSS 网格之上的不对称布局(这里是完整的教程):
See the Pen Polishing the Broken Grid by Envato Tuts+ (@tutsplus) on CodePen.
让我们在 CSS 中添加相同的direction 规则,看看它如何修改原始布局:
* {
direction: rtl;
}
以下是演示的翻转方式:
See the Pen Flipping the Broken Grid (Step 1) by Envato Tuts+ (@tutsplus) on CodePen.
尽管大多数元素都已按预期翻转,但还是缺少了一些东西。如果你仔细比较这两个演示,你会发现图片和“直布罗陀”标题之间的皇冠徽章已经消失了。
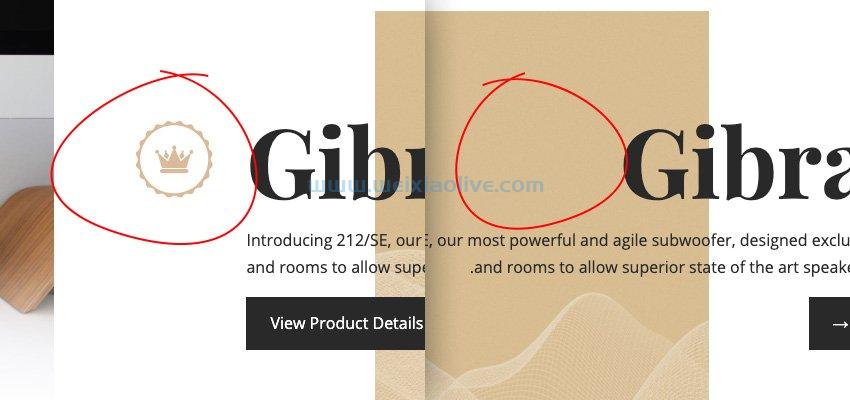
那么,王冠在哪里?
CSS 为我们提供了皇冠为何丢失的答案。它仍然存在,但隐藏在背景中。下面是演示的 CSS 代码(没有颜色、字体和其他文本装饰规则):
blockquote {
margin: 0 0 2em 0;
}
.cta {
padding: 100px 0 100px 20%;
}
.cta h1 {
margin: 0 0 20px 0;
position: relative;
}
.button {
display: inline-block;
padding: .8em 1.5em;
}
.strapline {
margin-top: 100px;
position: relative;
}
.strapline::before {
content: '';
display: block;
background: url(wavy.svg) repeat-x;
background-size: cover;
width: 20%;
height: .5em;
position: absolute;
top: -3em;
left: 40%;
}
.cta h1::before {
content: '';
display: block;
height: 1em;
width: 1em;
background: url(badge.svg) no-repeat center center;
background-size: 80%;
position: absolute;
left: -120px;
top: 0;
}
/* Grid layout */
.grid1 {
display: grid;
grid-template-columns: 3fr 6fr 1fr 5fr 10fr 2fr;
grid-template-rows: 100px auto 15px auto auto;
}
.img1 {
background: url(wooden.jpg);
background-size: cover;
grid-column: 1 / span 2;
grid-row: 2 / span 3;
}
.img2 {
background: url(speaker.jpg);
background-size: cover;
grid-column: 2 / span 2;
grid-row: 3 / span 3;
}
.img3 {
background: url(waves.jpg);
background-size: cover;
grid-column: 5 / span 2;
grid-row: 4 / span 2;
}
.strapline {
grid-column: 3 / span 3;
grid-row: 2 / span 1;
padding: 0 16%;
text-align: center;
margin: 0;
}
.cta-wrapper {
grid-column: 4 / span 2;
grid-row: 4 / span 2;
}
上面的代码使用了许多 CSS 网格属性,例如grid-row、grid-column、grid-template-rows和grid-template-columns。然而,由于 CSS 网格依赖于逻辑维度而不是物理维度,因此与网格相关的属性不会成为问题。
问题源于将项目物理定位在水平(左右)维度中的其他属性:
.cta {
padding: 100px 0 100px 20%;
}
.strapline::before {
left: 40%;
}
.cta h1::before {
left: -120px;
}
为了支持 RTL 脚本,我们需要反转left和right如下:
.cta {
padding: 100px 20% 100px 0;
}
.strapline::before {
right: 40%;
}
.cta h1::before {
right: -120px;
}
如果您查看修改后的 RTL 演示,您会看到表冠重新出现,现在一切都完美对齐:
See the Pen Flipping the Broken Grid (Step 1) by Envato Tuts+ (@tutsplus) on CodePen.
您可能已经注意到,在修改后的 CSS 中,我们使用right了相应的逻辑属性来代替。这是因为逻辑属性还没有准备好生产,因为浏览器支持仍然有些不完整。
然而,这是修改后的 CSS使用属性的逻辑等效项的外观right:
.cta {
padding: 100px 20% 100px 0;
}
.strapline::before {
inset-inline-start: 40%;
}
.cta h1::before {
inset-inline-start: -120px;
}
在 RTL 脚本中相当于rightis inset-inline-start ,因为它是内联轴的开始。但是,在 LTR 脚本中 inset-inline-start等于left,在这种情况下,行从屏幕左侧开始。
因此,如果原始演示使用inset-inline-start逻辑属性而不是物理left方向,我们可以将布局从 LTR 转换为 RTL,而无需调整任何规则。
下面,您可以看到使用逻辑属性的相同 RTL 演示。 为了保持一致性,我也改为top了。inset-block-start
See the Pen Flipping the Broken Grid (Step 2) by Envato Tuts+ (@tutsplus) on CodePen.
结论
CSS 逻辑属性让我们比以往更容易支持从右到左的脚本。我们可以快速为基于 flexbox 和 CSS 网格的页面添加 RTL 支持,因为它们是不依赖于左、右、上、下等物理方向的逻辑布局。
- 为什么这么容易做到?
- 那么,王冠在哪里?




![如何删除Word中的空白页[4种简单方法] 如何删除Word中的空白页[4种简单方法]](https://www.weixiaolive.com/en/zb_users/upload/2023/07/20230702124855168827333590644.png)

