MVC 是 Web 开发中非常流行的范例,并且已经存在了很长一段时间。react框架是模型-视图-控制器三位一体的强大部分,因为它只专注于视图。React 是用javascript编写的,由 Facebook 和 Instagram 开发团队创建。
由于 React 框架构建视图层代码的方式,React被用于整个 Web 以创建易于维护的r api d Web 应用程序。
React 能做什么?
构建闪电般快速、响应迅速的同构 Web 应用程序,与框架无关。React 不对它所在的技术栈做任何假设。
与 React 的数据 流绑定被设计为单向反应数据流。这减少了样板要求,并且比传统方法更易于使用。
你好世界
为了让我们开始,这里是从官方示例中获取的一个简单的 React 示例:
var HelloMessage = React.createClass({
  render: function() {
    return <div>Hello {this.props.name}</div>;
  }
});

React.render(
  <hellomessage name="John"></hellomessage>,
  document.getElementById('container')
);
这个例子将把“Hello John”渲染到一个<div>容器中。注意第 3 行和第 8 行使用的类似 XML/ html的语法。这称为jsx。
什么是jsx?
JSX 是一种类似于 XML/HTML 的语法,用于从 JavaScript 代码中呈现 HTML。React将JSX 转换为浏览器的原生 javaScript,并且使用提供的工具,您可以将现有站点的 HTML 代码转换为 JSX!
JSX 使代码混合变得容易,因为它感觉就像在 JavaScript 中编写原生 HTML。结合node,这使得工作流程非常一致。
JSX 不需要使用 React——你可以使用普通的 JS——但它是一个非常强大的工具,可以很容易地定义树结构并分配属性,所以我强烈推荐使用它。
要在 React 中呈现 HTML 标签,只需使用带有一些 JSX 的小写标签名称,如下所示:
//className is used in JSX for class attribute
var fooDiv = <div classname="foo"></div>;
// Render where div#example is our placeholder for insertion
ReactDOM.render(fooDiv, document.getElementById('example'));
安装反应
有几种使用 React 的方法。官方推荐的方式是来自 npm 或 Facebook CDN,但您也可以从 git 克隆并构建自己的。您还可以使用入门套件或使用 Yeoman 的脚手架生成器来节省时间。我们将涵盖所有这些方法,以便您全面了解。
使用 Facebook CDN
要获得最快的启动方式,只需包含来自 fb.me CDN 的 React 和 React Dom 库,如下所示:
<!-- The core React library -->
<script src="https://fb.me/react-0.14.0.js"></script>
<!-- The ReactDOM Library -->
<script src="https://fb.me/react-dom-0.14.0.js"></script>
从 NPM 安装
React 手册建议将 React 与 CommonJS 模块系统一起使用,例如browserify或webpack。
React 手册还建议使用react和react-domnpm 包。要将这些安装在您的系统上,请在项目目录中的 bash 终端提示符处运行以下命令,或者cd先创建一个新目录并添加到该目录。
$ npm install --save react react-dom
$ browserify -t babelify main.js -o bundle.js
您现在将能够在node_modules目录中看到 React 安装。
从 Git 源安装
依赖项
您需要拥有 Node V4.0.0+ 和 npm v2.0.0+。node version您可以使用和 npm检查您的节点版本npm version
通过 NVM 更新节点
我建议使用 nvm - 节点版本管理器来更新和选择您的节点版本。只需运行以下命令即可轻松获取 nvm:
curl -o- https://raw.githubusercontent.com/creationix/nvm/v0.29.0/install.sh | bash
此脚本将 nvm 存储库克隆到~/.nvm并将源代码行添加到您的配置文件(~/.bash_profile或~/.zshrc)~/.profile。
如果您希望手动安装nvm,可以通过git以下方式进行:
git clone https://github.com/creationix/nvm.git ~/.nvm && cd ~/.nvm && git checkout `git describe --abbrev=0 --tags`
要使用此方法激活 nvm,您需要使用以下命令从 shell 获取它:
. ~/.nvm/nvm.sh
注意:将此行分别添加到您的~/.bashrc、~/.profile或~/.zshrc文件中,以便在登录时自动获取它。
使用 NVM
现在安装了 nvm 后,我们可以获得所需的任何节点版本,并且可以检查已安装版本的列表node list以及node ls-remote. 我们需要一个高于 4.0.0 的版本才能使用 React。
安装最新版本并将其设置为默认版本,如下所示:
$ nvm install 4.2.1
$ nvm alias default 4.2.1
default -> 4.2.1 (-> v4.2.1)
$ nvm use default
Now using node v4.2.1 (npm v2.14.7)
节点已更新,并且 npm 包含在交易中。您现在可以开始安装了。
从 Git 源代码构建 React
使用 git 将存储库克隆到react系统上命名的目录中:
git clone https://github.com/facebook/react.git
一旦你克隆了 repo,你现在可以使用它grunt来构建 React:
# grunt-cli is needed by grunt; you might have this installed already but lets make sure with the following
$ sudo npm install -g grunt-cli
$ npm install
$ grunt build
至此,一个build/目录已经填充了你使用 React 所需的一切。查看/examples目录以查看一些基本示例!
使用入门工具包
首先下载入门工具包。
解压缩 zip 并在根目录中创建一个helloworld.html,添加以下内容:
<meta charset="UTF-8">
<title>Hello React!</title>
<script src="build/react.js"></script>
<script src="build/react-dom.js"></script>
<script src="https://cdnjs.cloudflare.com/ajax/libs/babel-core/5.8.23/browser.min.js"></script>


<div id="example"></div>
<script type="text/babel">
  ReactDOM.render(
    <h1>Hello, world!</h1>,
    document.getElementById('example')
  );
</script>
在这个例子中,React 使用Babel通过<script type="text/babel">.
使用单独的 JavaScript 文件
在 处创建一个新文件src/helloworld.js并将以下代码放入其中:
ReactDOM.render(
  <h1>Hello, world!</h1>,
  document.getElementById('example')
);
现在你需要做的就是在你的 HTML 中引用它,所以打开helloworld.html并加载你刚刚使用script带有text/babeltype 属性的标签创建的脚本,如下所示:
<script type="text/babel" src="src/helloworld.js"></script>


Refresh the page and you will see the `helloworld.js` being rendered by babel.

Note: Some browsers (for example chrome) will fail to load the file unless it's served via HTTP, so ensure you're using a local server. I recommend the [browsersync project](http://www.browsersync.io/).

### Offline transformation
You can also use the command-line interface (CLI) to transform your JSX via using the babel command-line tools. This is easily acquired via the npm command:

<pre class="brush: shell noskimlinks noskimwords">$ sudo npm install --global babel
</pre>

The `--global` or `-g` flag for short will install the babel package globally so that it is available everywhere. This is a very good practice with using Node for multiple projects and command-line tools.

Now that babel is installed, let's do the translation of the `helloworld.js` we just created in the step before.
At the command prompt from the root directory where you unzipped the starter kit, run:

<pre class="brush: shell noskimlinks noskimwords">$ babel src --watch --out-dir build
</pre>

Now the file `build/helloworld.js` will be auto-generated whenever you make a change! If you are interested, read the [Babel CLI documentation](http://babeljs.io/docs/usage/cli/) to get a more advanced knowledge.

Now that babel has generated the `build/helloworld.js`, which contains just straight-up JavaScript, update the HTML without any babel-enabled script tags.

<pre class="brush: html noskimlinks noskimwords">


    <meta charset="UTF-8">
    <title>Hello React!</title>
    <script src="build/react.js"></script>
    <script src="build/react-dom.js"></script>
    <!-- No need for Babel! -->


    <div id="example"></div>
    <script src="build/helloworld.js"></script>


</pre>

So to recap, with babel we can load JSX directly inside  a `script` tag via the `text/babel` type attribute. This is good for development purposes, but for going to production we can provide a generated JavaScript file which can be cached on the user's local machine.

Generation of this copy is done on the command line, and as this is a repetitive task I highly recommend automating the process via using the `--watch` flag. Or you can go a step further and utilize `webpack` and `browsersync` to fully automate your development workflow. To do that in the easiest path possible, we can automate the setup of a new project with a Yeoman generator.

## Installing With Yeoman Scaffolding
Yeoman is a very useful tool for starting projects quickly and with an optimal workflow and tool configuration. The idea is to let you spend more time on development than configuration of the project's work area, and to minimize repetitive tasks (be aware of this—RSI is the number one reason coders stop coding). So as a best practice, saving time with tools and implementing D.R.Y (Don't Repeat Yourself) in your day-to-day life will boost your health and efficiency, and let you spend more time doing actual code rather than configuration.

There are a lot of scaffoldings out there, coming in many flavours for different scales of project. For this first example we will be using the `react-fullstack` scaffolding from the Yeoman generators; you can see a [demo](http://demo.reactstarterkit.com/) of what the end result looks like.

Note: This is a fullstack configuration, which is probably overkill for any small projects. The reason I select this scaffolding is to give you a fully set-up environment, so you can see how the starter kit fleshes out into a larger app. There's a header and footer, and you can see where a user login and register feature will go, although they are not coded yet in the example.

### Usage
To use yeoman, first install it, and if you do not have yeoman's required counterparts `gulp`, `bower` and `grunt-cli`, install them as so:

<pre class="brush: shell noskimlinks noskimwords">$ sudo npm install -g yo bower grunt-cli gulp
</pre>

Now install the React scaffolding with:

<pre class="brush: shell noskimlinks noskimwords">$ sudo npm install -g generator-react-fullstack
</pre>

Now create a directory for your project and `cd` to it:

<pre class="brush: shell noskimlinks noskimwords">$ mkdir react-project
$ cd react-project
</pre>

Finally use the `yo` command with the React-fullstack scaffolding generator to create your react app inside the directory:

<pre class="brush: shell noskimlinks noskimwords">$ yo react-fullstack
</pre>

Yeoman will now create the directories and files required; you will be able to see updates about this in the command line.

With the scaffolding now set up, let's build our project:

<pre class="brush: shell noskimlinks noskimwords">$ npm start
</pre>

By default we start in *debug* mode, and to go live we just add the `-- release` flag, e.g. `npm run start -- release`.

You will now see the build starting and webpack initializing. Once this is done, you will see the webpack output telling you detailed information about the build and the URLs to access from.


Access your app via the URLs listed at the end of the output, with your browser by default at http://localhost:3000. To access the browser sync admin interface, go to http://localhost:3001.


Note: You may need to open the port on your server for the development port. For ubuntu / debian users with `ufw`, do the following:

<pre class="brush: bash noskimlinks noskimwords">$ ufw allow 3001/tcp
$ ufw allow 3000/tcp
</pre>

## Converting Your Existing Site to JSX
Facebook provides an [online tool](http://facebook.github.io/react/html-jsx.html) if you need to just convert a snippet of your HTML into JSX.

For larger requirements there is a tool on `npm` for that named `htmltojsx`. Download it with:

<pre class="brush: bash noskimlinks noskimwords">npm install htmltojsx
</pre>

Using it via the command line is as simple as:

<pre class="brush: bash noskimlinks noskimwords">$  htmltojsx -c MyComponent existing_code.htm
</pre>

Because `htmltojsx` is a node module, you can also use it directly in the code, for example:

<pre class="brush: js noskimlinks noskimwords">var HTMLtoJSX = require('htmltojsx');
var converter = new HTMLtoJSX({
  createClass: true,
  outputClassName: 'HelloWorld'
});
var output = converter.convert('<div>Hello world!</div>');
</pre>


## List Example

Let's start working on creating a basic to-do list so you can see how React works. Before we begin, please configure your IDE. I recommend using Atom.

At the bash prompt, install the linters for React via apm:

<pre class="brush: shell noskimlinks noskimwords">apm install linter linter-eslint react
Installing linter to /Users/tom/.atom/packages ✓
Installing linter-eslint to /Users/tom/.atom/packages ✓
Installing react to /Users/tom/.atom/packages ✓
</pre>

Note: the latest version of `linter-eslint` was making my macbook Pro very slow, so I disabled it.

Once that is done, we can get going on creating a basic list within the scaffolding we made in the prior step with Yeoman, to show you a working example of the data flow.

Make sure your server is started with `npm start`, and now let's start making some changes.

First of all there are three jade template files provided in this scaffolding. We won't be using them for the example, so start by clearing out the `index.jade` file so it's just an empty file. Once you save the file, check your browser and terminal output.

The update is displayed instantly, without any need to refresh. This is the webpack and browsersync configuration that the scaffolding has provided coming into effect.

Next open the components directory and create a new directory:

<pre class="brush: bash noskimlinks noskimwords">$ cd components
$ mkdir UserList
</pre>

Now, inside the `UserList` directory, create a `package.json` file with the following:

<pre class="brush: json noskimlinks noskimwords">{
  "name": "UserList",
  "version": "0.0.0",
  "private": true,
  "main": "./UserList.js"
}
</pre>

Also, still inside the `UserList` directory, create the `UserList.js` file and add the following:

<pre class="brush: javascript noskimlinks noskimwords">//Import React
import React, { PropTypes, Component } from 'react';

//Create the UserList component
class UserList extends Component {

    //The main method render is called in all components for display
    render(){

      //Uncomment below to see the object inside the console
      //console.log(this.props.data);

      //Iterate the data provided here
      var list = this.props.data.map(function(item) {
        return </pre>
{item.first} {item.last}
}); //返回显示返回(
{列表}
); } } //使其可供应用程序的其余部分访问 export default UserList; 现在完成,我们需要为这个列表添加一些数据。我们将在 `components/ContentPage/ContentPage.js` 中执行此操作。打开该文件并将内容设置为如下:
/*! React Starter Kit | MIT License | http://www.reactstarterkit.com/ */

import React, { PropTypes, Component } from 'react';
import styles from './ContentPage.css';
import withStyles from '../../decorators/withStyles';
import UserList from '../UserList'; //Here we import the UserList component we created

@withStyles(styles)

class ContentPage extends Component {

  static propTypes = {
    path: PropTypes.string.isRequired,
    content: PropTypes.string.isRequired,
    title: PropTypes.string,
  };

  static contextTypes = {
    onSetTitle: PropTypes.func.isRequired,
  };

  render() {

    //Define some data for the list
    var listData = [
      {first:'Peter',last:'Tosh'},
      {first:'Robert',last:'Marley'},
      {first:'Bunny',last:'Wailer'},
    ];

    this.context.onSetTitle(this.props.title);

    return (
      <div classname="ContentPage">
        <div classname="ContentPage-container">
          {
            this.props.path === '/' ? null : <h1>{this.props.title}</h1>
          }
          <div dangerouslysetinnerhtml="{{__html:" this.props.content=""></div>

          //Use the UserList component as JSX
          <userlist data="{listData}"></userlist>

        </div>
      </div>
    );
  }

}

export default ContentPage;
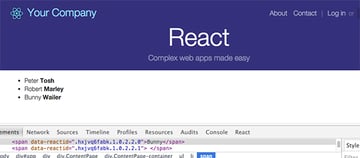
现在,当我们保存时,webpack 将重新构建,browsersync 将在您的浏览器中显示更改。查看源代码以了解它是如何呈现的。## 总结 我们使用 Yeoman 脚手架生成器 `react-fullstack` 来启动基于入门套件的 React Web 应用程序。有关文件和目录布局的进一步说明,请查看 [react starter kit git repo 中的自述文件](https://github.com/kriasoft/react-starter-kit/blob/master/README.md)。从这里我们编辑了 `index.jade` 文件,所以它被清空并开始创建我们自己的显示视图,创建一个名为 `UserList` 的新组件。在 `components/UserList/UserList.js` 中,我们定义了列表的渲染方式:
var list = this.props.data.map(function(item) {
        return
{item.first} {item.last}
}); 这里需要注意的是,React 要求所有迭代的项目都具有在 `key` 属性下提供的唯一标识符。为了显示列表,我们将它包含在 `ContentPage.js` 文件中,并使用 `import UserList from '.../UserList';` 并定义一些测试数据:
var listData = [
  {first:'Peter',last:'Tosh'},
  {first:'Robert',last:'Marley'},
  {first:'Bunny',last:'Wailer'},
];
在 `ContentPage.js` 中,我们使用 JSX ` ` 调用 `UserList` 组件。现在 `UserList` 组件可以通过 `this.props.data` 访问 `data` 属性。每当我们传递一个带有组件属性的值时,都可以通过 `this.props` 访问它。您还可以通过在其类中使用 `propTypes` 静态变量来定义必须提供的数据类型。### 扩展组件与 React.createClass 语法 最后,需要注意的重要一点是,这个示例使用了扩展组件。这对于在语义上构建代码有很多好处。但是您可能希望访问更简单的方法,就像许多其他示例一样。因此,您可以使用以下语法创建一个 React 类,而不是之前在本教程中看到的 `class ComponentName extends Component`:
var MyListItem = React.createClass({
  render: function() {
    return
{this.props.data.text}
; } });
var MyNewComponent = React.createClass({
render: function() {
return (
{this.props.results.map(function(result) {
return ; })}
); } });
好了,这就是我们对 React 的介绍。您现在应该对以下内容有一个很好的理解: * 获取 React * 如何将 Babel 与 React 一起使用 * 使用 JSX * 通过扩展方法创建组件 * 使用您的组件并为其传递数据 在接下来的部分中,我们将讨论如何使用JSX 进一步,如何将数据库用作持久数据源,以及 React 如何与其他流行的 Web 技术(如php、Rails、python和 .NET)一起使用。
- 什么是jsx?
- 依赖项
- 通过 NVM 更新节点
- 使用 NVM
- 从 Git 源代码构建 React
- 使用单独的 JavaScript 文件




![如何删除Word中的空白页[4种简单方法] 如何删除Word中的空白页[4种简单方法]](https://www.weixiaolive.com/en/zb_users/upload/2023/07/20230702124855168827333590644.png)

