下面是有关如何使用 php 和 mysql 构建购物车的教程。我将逐步介绍整个过程,希望对你学习PHP开发有所帮助。
步骤1:
让我们首先看一下文件夹结构:

结构
reset.css:您可以从此链接 重置它
style.css:我们自己的 CSS 文件,我们将使用它来设置 html 标记的样式
connection.php:将进行数据库连接的文件
index.php:我们购物车的模板
cart.php:我们可以从购物车中更改产品的文件(添加、删除)
products.php:产品列表页面
步骤2:
我们将从编写 HTML 标记开始,然后设置样式。所以打开 index.php 并复制/粘贴下面的代码:
<!DOCTYPE html PUBLIC "-//W3C//DTD XHTML 1.0 Strict//EN"
"http://www.w3.org/TR/xhtml1/DTD/xhtml1-strict.dtd">

<html xmlns="http://www.w3.org/1999/xhtml">
<head>

    <meta http-equiv="Content-Type" content="text/html; charset=utf-8" />
    <link rel="stylesheet" href="css/reset.css" />
    <link rel="stylesheet" href="css/style.css" />

    <title>Shopping cart</title>

</head>

<body>

    <div id="container">

        <div id="main">

        </div><!--end main-->

        <div id="sidebar">

        </div><!--end sidebar-->

    </div><!--end container-->

</body>
</html>
如您所见,我们的页面有两列:主列和侧边栏。让我们继续讨论 CSS。打开 style.css 文件并输入以下代码:
body {
    font-family: Verdana;
    font-size: 12px;
    color: #444;
}


#container {
    width: 700px;
    margin: 150px auto;
    background-color: #eee;
    overflow: hidden; /* Set overflow: hidden to clear the floats on #main and #sidebar */
    padding: 15px;
}

#main {
    width: 490px;
    float: left;
}
#sidebar {
    width: 200px;
    float: left;
}
现在我们的产品页面应该是这样的:

步骤3:
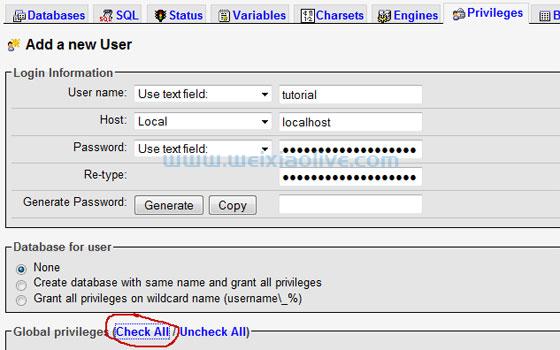
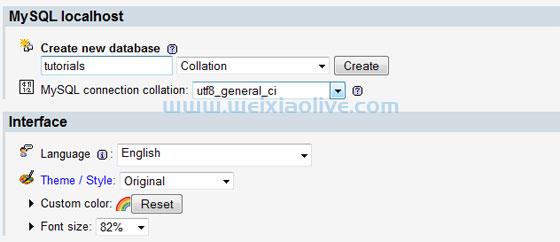
在继续进行 PHP/Mysql 部分之前,我们需要创建一个数据库。所以打开 phpMyAdmin 并按照以下步骤操作:
转到 权限 选项卡,单击添加新用户按钮,并使用以下设置: 用户名:tutorial; 主机:本地主机; 密码:supersecretpassword;. 现在确保设置了全局权限;然后继续下一步。
创建一个名为 tutorials的新数据库。
创建一个名为 products的新表并将字段数 设置 为 4。现在填充这些字段,以便您拥有 :名称 - 使其成为长度为 100 的 VARCHAR; 描述 - 长度为 250 的 VARCHAR; 价格 - 确保将其设置为 DECIMAL(2,6)。
用一些示例产品填充您的表格。
为了节省时间,我导出了我的产品表,这样您就可以简单地运行以下查询:
CREATE TABLE IF NOT EXISTS `products` (
  `id_product` int(11) NOT NULL AUTO_INCREMENT,
  `name` varchar(100) NOT NULL,
  `description` varchar(250) NOT NULL,
  `price` decimal(6,2) NOT NULL,
  PRIMARY KEY (`id_product`)
) ENGINE=MyISAM  DEFAULT CHARSET=latin1 AUTO_INCREMENT=7 ;

INSERT INTO `products` (`id_product`, `name`, `description`, `price`) VALUES
(1, 'Product 1', 'Some random description', '15.00'),
(2, 'Product 2', 'Some random description', '20.00'),
(3, 'Product 3', 'Some random description', '50.00'),
(4, 'Product 4', 'Some random description', '55.00'),
(5, 'Product 5', 'Some random description', '54.00'),
(6, 'Product 6', 'Some random description', '34.00');

步骤4:
在我们从数据库中移动和选择数据之前,我将我的 index.php 设为 产品列表和购物车的模板。因此,将以下代码添加到 index.php 页面的顶部:
<?php
session_start();
require("includes/connection.php");
if(isset($_GET['page'])){
    $pages=array("products", "cart");
    if(in_array($_GET['page'], $pages)) {
        $_page=$_GET['page'];
    } else {
        $_page="products";
    }
} else {
    $_page="products";
}
?>
session_start() - 这是供以后使用;它将允许我们实际使用会话(在任何其他数据发送到浏览器之前写入 session_start 至关重要)。
在第二行,我们包含 connection.php ,它将建立与数据库的连接(我们将在一秒钟内处理)。include 还有一件事:和 之间的区别 require 是,如果你使用 require 并且找不到文件,脚本执行将结束。如果您使用 include,脚本将继续工作。
无需为站点中的每个文件复制整个 HTML 代码(指向 CSS 和 JS 的链接),您可以将它们全部与单个文件相关联。所以首先,我要检查是否有一个名为“page”的 GET 变量。如果不是,我将创建一个名为$_page的新变量。如果首先设置名为“page”的 GET 变量,我想确保我要包含的文件是有效页面。
为了完成这项工作,我们需要包含该文件;将此行添加到 id 属性设置为main 的 div 之间 的index.php文件中:
现在这里是完整的 index.php:
<?php
session_start();
require("includes/connection.php");
if(isset($_GET['page'])){
    $pages=array("products", "cart");
    if (in_array($_GET['page'], $pages)) {
        $_page=$_GET['page'];
    } else {
        $_page="products";
    }
} else {
    $_page="products";
}

?>
<!DOCTYPE html PUBLIC "-//W3C//DTD XHTML 1.0 Transitional//EN" "http://www.w3.org/TR/xhtml1/DTD/xhtml1-transitional.dtd">
<html xmlns="http://www.w3.org/1999/xhtml">
<head>
    <meta http-equiv="Content-Type" content="text/html; charset=utf-8" />
    <link rel="stylesheet" href="css/reset.css" />
    <link rel="stylesheet" href="css/style.css" />
    <title>Shopping Cart</title>
</head>

<body>
    <div id="container">
        <div id="main">
            <?php require($_page.".php"); ?>
        </div><!--end of main-->
        <div id="sidebar">
        </div><!--end of sidebar-->
    </div><!--end container-->
</body>
</html>
让我们创建与 MySQL 的连接。打开 connections.php 并输入以下内容:
<?php
    $server="localhost";
    $user="tutorial";
    $pass="supersecretpassword";
    $db="tutorials";

    $mysqli = new mysqli($server, $user, $pass, $db);
    if($mysqli->connect_error) {
        die("Sorry, can't connect to the mysql.");
    }
?>
步骤5:
现在是时候为产品页面编写标记了。所以继续打开它并输入以下内容:
<h1>Product List</h1>
<table>
    <tr>
        <th>Name</th>
        <th>Description</th>
        <th>Price</th>
        <th>Action</th>
    </tr>
    <tr>
        <td>Product 1</td>
        <td>Some random description</td>
        <td>15 $</th>
        <td><a href="#">Add to cart</a></td>
    </tr>
     <tr>
        <td>Product 2</td>
        <td>Some random description</td>
        <td>25 $</th>
        <td><a href="#">Add to cart</a></td>
    </tr>
</table>
我们来看一下页面:

如您所见,它非常丑陋。因此,让我们通过添加这个额外的 CSS 来设置样式。
a {color: #48577D; text-decoration: none;}

a:hover {text-decoration: underline;}

h1, h2 {margin-bottom: 15px}

h1 {font-size: 18px;}
h2 {font-size: 16px}
#main table {
    width: 480px;
}

#main table th {
    padding: 10px;
    background-color: #48577D;
    color: #fff;
    text-align: left;
}

#main table td {
    padding: 5px;
}
#main table tr {
    background-color: #d3dcf2;
}
好的:让我们看看它现在的样子:

看起来好多了,不是吗?下面是完整的style.css 代码:
body {
    font-family: Verdana;
    font-size: 12px;
    color: #444;
}

a {color: #48577D; text-decoration: none;}

a:hover {text-decoration: underline;}

h1, h2 {margin-bottom: 15px}

h1 {font-size: 18px;}
h2 {font-size: 16px}

#container {
    width: 700px;
    margin: 150px auto;
    background-color: #eee;
    padding:15px;
    overflow: hidden;
}

#main {
    width: 490px;
    float: left;
}

#main table {
    width: 480px;
}

#main table th {
    padding: 10px;
    background-color: #48577D;
    color: #fff;
    text-align: left;
}

#main table td {
    padding: 5px;
}

#main table tr {
    background-color: #d3dcf2;
}

#sidebar {
    width: 200px;
    float: left;
}
步骤6:
在我们从数据库中提取产品之前,让我们从我们的表中删除最后两个表行(我们使用它们只是为了看看我们的表会是什么样子)。删除这个:
 <tr>
    <td>Product 1</td>
    <td>Some random description</td>
    <td>15 $</th>
    <td><a href="#">Add to cart</a></td>
</tr>
 <tr>
    <td>Product 2</td>
    <td>Some random description</td>
    <td>25 $</th>
    <td><a href="#">Add to cart</a></td>
</tr>
伟大的!现在用以下 PHP 代码替换表行:
<?php
$sql="SELECT * FROM products ORDER BY name ASC";
$result = $mysqli->query($sql);

while ($row = $result->fetch_assoc()) {
?>
    <tr>
        <td><?php echo $row['name'] ?></td>
        <td><?php echo $row['description'] ?></td>
        <td><?php echo $row['price'] ?>$</td>
        <td><a href="index.php?page=products&action=add&id=<?php echo $row['id_product'] ?>">Add to cart</a></td>
    </tr>
<?php
}
?>
所以首先我们使用SELECT检索产品,然后我们循环遍历数据库中的每一行并将其显示到页面中的表格行中。
您可以看到锚链接指向同一页面(当用户单击锚链接时,产品将被添加到购物车/会话中)。我们只是传递了一些额外的变量,比如产品的id 。
如果将其中一个 添加到购物车 链接悬停,您可以看到,在页面底部,产品的 ID 作为查询字符串参数传递。

步骤7:
让我们通过在页面顶部添加以下代码来使锚链接起作用:
<?php
if(isset($_GET['action']) && $_GET['action']=="add"){
    $id=intval($_GET['id']);
    if(isset($_SESSION['cart'][$id])) {
        $_SESSION['cart'][$id]['quantity']++;
    } else {
        $stmt = $mysqli->prepare("SELECT * FROM products WHERE id_product = ?");
        $stmt->bind_param("i", $id);
        $stmt->execute();
        $result = $stmt->get_result()->fetch_assoc();
        if(isset($result['id_product']) && $result['id_product']) {
            $_SESSION['cart'][$result['id_product']] = array(
                "quantity" => 1,
                "price" => $result['price']
            );
        } else {
            $message="This product id is invalid!";
        }
    }
}
?>
如果设置了名为action的 GET 变量 并且其值为 add,我们将执行代码。
我们确保 通过 变量传递的id是一个整数。$_GET
如果产品的 id 已经在 $_SESSION 变量中,我们只需将数量增加 1。
如果 id 不在会话中,我们需要确保 通过 变量传递的id在数据库中存在。$_GET如果是,我们获取价格并创建它的会话。如果没有,我们设置一个名为的变量 $message 来存储错误消息。
让我们检查 $message 变量是否已设置并将其显示在页面上(在 H1 页面标题下键入此代码):
<?php
    if(isset($message)) {
        echo "<h2>$message</h2>";
    }
?>
在这里您可以看到完整的 products.php 页面。
<?php
if(isset($_GET['action']) && $_GET['action']=="add") {
    $id=intval($_GET['id']);
    if(isset($_SESSION['cart'][$id])) {
        $_SESSION['cart'][$id]['quantity']++;
    } else {
        $stmt = $mysqli->prepare("SELECT * FROM products WHERE id_product = ?");
        $stmt->bind_param("i", $id);
        $stmt->execute();
        $result = $stmt->get_result()->fetch_assoc();
        if(isset($result['id_product']) && $result['id_product']) {
            $_SESSION['cart'][$result['id_product']] = array(
                "quantity" => 1,
                "price" => $result['price']
            );
        } else {
            $message="This product id is invalid!";
        }
    }
}

?>
<h1>Product List</h1>
<?php
    if(isset($message)) {
        echo "<h2>$message</h2>";
    }
?>
<table>
    <tr>
        <th>Name</th>
        <th>Description</th>
        <th>Price</th>
        <th>Action</th>
    </tr>
    <?php
        $sql="SELECT * FROM products ORDER BY name ASC";
        $result = $mysqli->query($sql);

        while ($row = $result->fetch_assoc()) {
    ?>
            <tr>
                <td><?php echo $row['name'] ?></td>
                <td><?php echo $row['description'] ?></td>
                <td><?php echo $row['price'] ?>$</td>
                <td><a href="index.php?page=products&action=add&id=<?php echo $row['id_product'] ?>">Add to cart</a></td>
            </tr>
    <?php
        }
    ?>
</table>
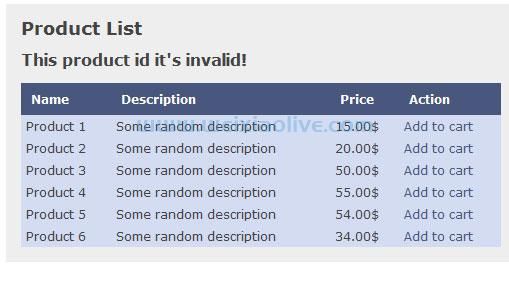
如果产品 ID 无效,则会显示以下错误消息。
步骤8:
让我们回到 index.php 文件并构建侧边栏。添加以下代码:
<h1>Cart</h1>
<?php
if(isset($_SESSION['cart'])) {
    $arrProductIds=array();
    foreach ($_SESSION['cart'] as $id => $value) {
        $arrProductIds[] = $id;
    }
    $strIds=implode(",", $arrProductIds);
    $stmt = $mysqli->prepare("SELECT * FROM products WHERE id_product IN (?)");
    $stmt->bind_param("s", $strIds);
    $stmt->execute();
    $result = $stmt->get_result();
    while ($row = $result->fetch_assoc()) {
    ?>
        <p><?php echo $row['name'] ?> x <?php echo $_SESSION['cart'][$row['id_product']]['quantity'] ?></p>
    <?php
    }
?>
    <hr />
    <a href="index.php?page=cart">Go to cart</a>
<?php
} else {
    echo "<p>Your Cart is empty. Please add some products.</p>";
}
?>
首先,我们检查会话购物车是否已设置。如果不是,我们会显示消息,提醒用户购物车是空的。
接下来,我们从会话中选择所有产品并显示它。
看看下面的图片:

由于 index.php 文件是所有文件的模板,侧边栏也将在 cart.php中可见 。很酷,对吧?
步骤9:
最后,打开 cart.php 并开始输入以下代码:
<h1>View cart</h1>
<a href="index.php?page=products">Go back to products page</a>
<form method="post" action="index.php?page=cart">
    <table>
        <tr>
            <th>Name</th>
            <th>Quantity</th>
            <th>Price</th>
            <th>Items Price</th>
        </tr>
        <?php
            $arrProductIds=array();
            foreach ($_SESSION['cart'] as $id => $value) {
                $arrProductIds[] = $id;
            }
            $strIds=implode(",", $arrProductIds);
            $stmt = $mysqli->prepare("SELECT * FROM products WHERE id_product IN (?)");
            $stmt->bind_param("s", $strIds);
            $stmt->execute();
            $result = $stmt->get_result();
            $totalprice=0;
            while ($row = $result->fetch_assoc()) {
                $subtotal=$_SESSION['cart'][$row['id_product']]['quantity']*$row['price'];
                $totalprice+=$subtotal;
            ?>
                <tr>
                    <td><?php echo $row['name'] ?></td>
                    <td><input type="text" name="quantity[<?php echo $row['id_product'] ?>]" size="5" value="<?php echo $_SESSION['cart'][$row['id_product']]['quantity'] ?>" /></td>
                    <td><?php echo $row['price'] ?>$</td>
                    <td><?php echo $_SESSION['cart'][$row['id_product']]['quantity']*$row['price'] ?>$</td>
                </tr>
            <?php
            }
        ?>
            <tr>
                <td colspan="4">Total Price: <?php echo $totalprice ?></td>
            </tr>
    </table>
    <br />
    <button type="submit" name="submit">Update Cart</button>
</form>
<br />
<p>To remove an item, set it's quantity to 0. </p>
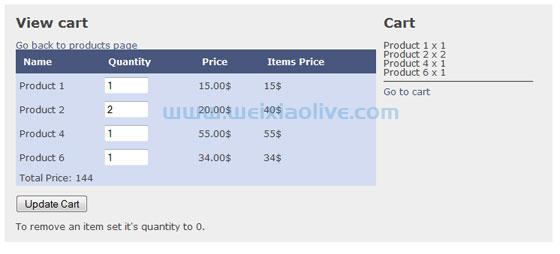
代码类似于 index.php 和 products.php中的代码,所以我不打算再次解释所有内容。您应该注意到,它不是在表单中显示数量,而是在输入框中显示(以便我们可以更改数量)。此外,该表被包装在一个表单标签中。为了获得商品的总价,我们将特定产品(来自会话)的数量乘以其价格。这是在foreach 循环中完成的。
注意: 输入是一个数组,key是商品的id,quantity是数量值。
步骤10:
我们需要做的最后一步是使表单工作。所以将这段代码添加到 cart.php 页面的顶部。
if(isset($_POST['submit'])){

    foreach($_POST['quantity'] as $key => $val) {
        if($val==0) {
            unset($_SESSION['cart'][$key]);
        }else{
            $_SESSION['cart'][$key]['quantity']=$val;
        }
    }

}
首先,我们检查表单是否已提交。如果它已提交并且输入的值为零,我们将取消设置该会话。
如果该值是零以外的任何其他值,我们会将数量设置为该值。
这是完整的 cart.php 文件。
<?php
if (isset($_POST['submit'])) {
    foreach($_POST['quantity'] as $key => $val) {
        if($val==0) {
            unset($_SESSION['cart'][$key]);
        }else{
            $_SESSION['cart'][$key]['quantity']=$val;
        }
    }
}
?>

<h1>View cart</h1>
<a href="index.php?page=products">Go back to the products page.</a>
<form method="post" action="index.php?page=cart">
    <table>
        <tr>
            <th>Name</th>
            <th>Quantity</th>
            <th>Price</th>
            <th>Items Price</th>
        </tr>
        <?php
            $arrProductIds=array();
            foreach ($_SESSION['cart'] as $id => $value) {
                $arrProductIds[] = $id;
            }
            $strIds=implode(",", $arrProductIds);
            $stmt = $mysqli->prepare("SELECT * FROM products WHERE id_product IN (?)");
            $stmt->bind_param("s", $strIds);
            $stmt->execute();
            $result = $stmt->get_result();
            $totalprice=0;
            while ($row = $result->fetch_assoc()) {
                $subtotal=$_SESSION['cart'][$row['id_product']]['quantity']*$row['price'];
                $totalprice+=$subtotal;
            ?>
                <tr>
                    <td><?php echo $row['name'] ?></td>
                    <td><input type="text" name="quantity[<?php echo $row['id_product'] ?>]" size="5" value="<?php echo $_SESSION['cart'][$row['id_product']]['quantity'] ?>" /></td>
                    <td><?php echo $row['price'] ?>$</td>
                    <td><?php echo $_SESSION['cart'][$row['id_product']]['quantity']*$row['price'] ?>$</td>
                </tr>
            <?php
            }
        ?>
        <tr>
            <td colspan="4">Total Price: <?php echo $totalprice ?></td>
        </tr>
    </table>
    <br />
    <button type="submit" name="submit">Update Cart</button>
</form>
<br />
<p>To remove an item set its quantity to 0. </p>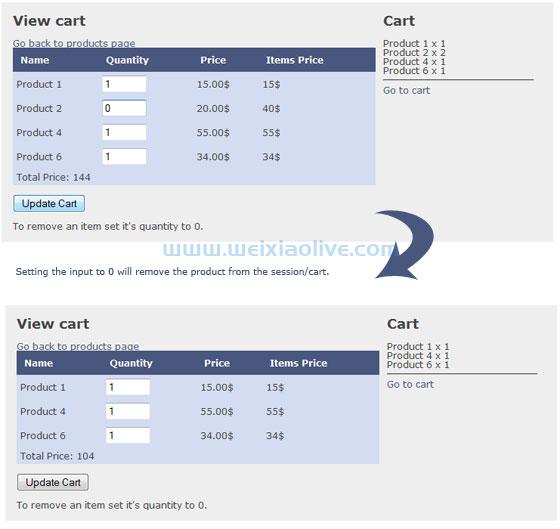
我希望以上教程对你有帮助!




![如何删除Word中的空白页[4种简单方法] 如何删除Word中的空白页[4种简单方法]](https://www.weixiaolive.com/en/zb_users/upload/2023/07/20230702124855168827333590644.png)
















发表评论