使用 html 和 css 构建网站的公认方法是在 HTML 文件中编写结构并在 CSS 文件中实现样式。但是,如果您可以在 HTML 文件中使用类添加样式怎么办?碰巧,你可以,这就是我们要做的,这要感谢 TailwindCSS。
介绍 TailwindCSS
根据 TailwindCSS 文档:
“Tailwind CSS 是一个高度可定制的低级 CSS 框架,它为您提供构建定制设计所需的所有构建块,而无需您必须努力覆盖任何令人讨厌的固执风格。”
使用 Tailwind CSS,您不必创建自己的样式。您可以利用它在您的标记中提供的类来实现您想要的自定义设计。它还使您能够扩展这些样式。
“简而言之,Tailwind 是一个 CSS 框架,但它不同于 Bootstrap 和 Foundation 之类的框架。它只提供了您设计自己的网页所需的原始基础知识” – Adi Purdila
在本教程中,您将在我们构建响应式表单时学习如何开始使用 TailwindCSS。你可以在 GitHub 上fork 存储库,或者在 CodePen 上进行演示:
See the Pen Build a simple form using TailwindCSS by Envato Tuts+ (@tutsplus) on CodePen.
1.开始使用 NPM 或 Yarn
我们将使用几个工作流程开始;你可以选择任何你喜欢的。对于包管理器用户,首先在终端中创建一个工作目录。
mkdir tutsplus-tailwindcss-form-demo && $_
## For NPM
npm init -y
## For Yarn
yarn init -y
这将创建一个目录并导航到它。-y 然后我们使用默认设置(因此是标志)初始化 npm 或 yarn,具体取决于您使用的设置 。
完成后,我们需要安装 tailwind 和另外两个包:autoprefixer 和 postcss-cli。
# Using npm
npm install tailwindcss autoprefixer postcss-cli
# Using Yarn
yarn add tailwindcss autoprefixer postcss-cli
接下来,在根目录下创建一个文件:
touchpostcss.config.js
打开文件并添加以下配置片段:
module.exports = {
plugins: [
require('tailwindcss'),
require('autoprefixer'),
]
}
在这里,我们将 TailwindCSS 和 autoprefixer 添加为 PostCSS 插件。
要初始化 Tailwind,我们将执行以下操作:
npx tailwind init
这将在项目的根目录中创建一个名为tailwind.config.js的配置文件:
module.exports = {
theme: {
extend: {}
},
variants: {},
plugins: []
}
创建一个名为css 的文件夹,并在其中创建一个名为 tailwind.css的文件。我们将使用@tailwind指令将一些样式注入到我们的 CSS 中。
@tailwind base;
@tailwind components;
@tailwind utilities;
打开你的 package.json 并使脚本部分看起来像这样:
"scripts": {
"build": "postcss css/tailwind.css -o public/build/tailwind.css"
}
这样,我们就可以运行npm run build以利用 Tailwind CLI 来处理我们的 CSS。处理后的样式将在public/build/tailwind.css文件中输出。继续运行命令查看!
2. 开始使用 CodePen
如果您喜欢使用 CodePen 作为项目的开发环境,那么设置过程非常简单。
转到CodePen并开始一支新的笔。
在 CSS 设置下选择Autoprefixer,然后在外部样式表中搜索tailwindcss:
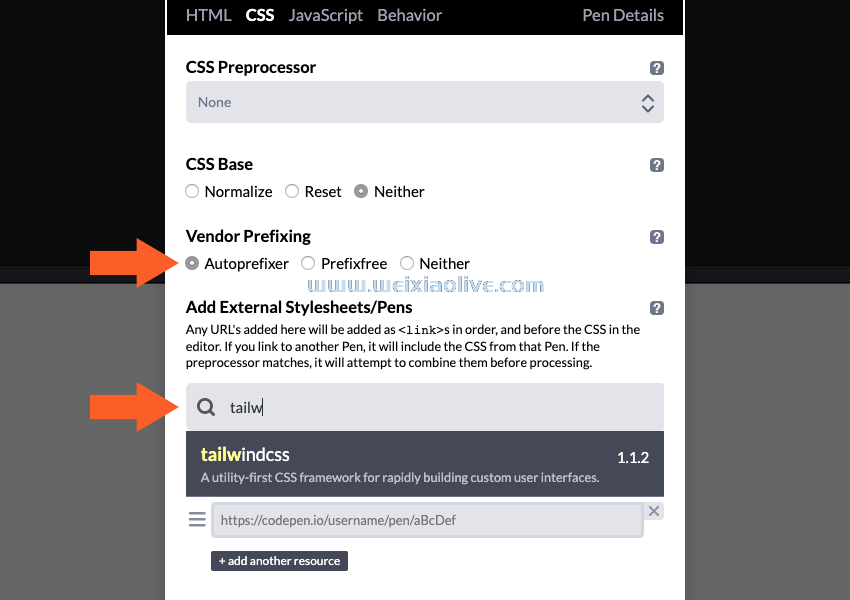
呃,就是这样。
3.设置索引文件
如果您按照我们之前描述的使用包管理器进行开发,您需要 在创建的公共目录中添加一个名为index.html的文件。
<html lang="en">
<head>
<meta charset="UTF-8">
<meta name="viewport" content="width=device-width, initial-scale=1.0">
<meta http-equiv="X-UA-Compatible" content="ie=edge">
<title>TutsPlus TailwindCSS Form Demo</title>
<link rel="stylesheet" href="/build/tailwind.css">
</head>
<body>
</body>
</html>
如果您继续使用 CodePen,您将不需要这些;尽管您需要 <body> 在 HTML 面板中放置一个标签。
在任何一种情况下,我们都希望以准系统开始我们的响应式表单并对其进行样式化,因此起点将如下所示:
<div>
<form>
<div>
<div>
<div>
<label for="company">
Company Name*
</label>
<input id="company" type="text" placeholder="Tutsplus">
<div>
<span>
Please fill out this field.
</span>
</div>
</div>
<div>
<label for="title">
Title*
</label>
<input id="title" type="text" placeholder="Software Engineer">
</div>
</div>
<div>
<div>
<label for="application-link">
Application Link*
</label>
<input id="application-link" type="text" placeholder="https://....">
</div>
</div>
<div>
<div>
<label for="location">
Location*
</label>
<div>
<select id="location">
<option>Abuja</option>
<option>Enugu</option>
<option>Lagos</option>
</select>
</div>
</div>
<div>
<label for="job-type">
Job Type*
</label>
<div>
<select id="job-type">
<option>Full-Time</option>
<option>Part-Time</option>
<option>Internship</option>
</select>
</div>
</div>
<div>
<label for="department">
Department*
</label>
<div>
<select id="department">
<option>Engineering</option>
<option>Design</option>
<option>Customer Support</option>
</select>
</div>
</div>
</div>
<div>
<div>
<button>
Button
</button>
</div>
</div>
</div>
</form>
</div>
准系统标记将为您提供以下内容:

4.设置前 3 个输入字段的样式
这没什么好看的,所以让我们继续设置前三个输入字段的样式,以了解 Tailwind CSS 的工作原理。
<div class="md:w-1/2 px-3 mb-6 md:mb-0">
<label class="uppercase tracking-wide text-black text-xs font-bold mb-2" for="company">
Company Name*
</label>
<input class="w-full bg-gray-200 text-black border border-gray-200 rounded py-3 px-4 mb-3" id="company" type="text" placeholder="Netboard">
<div>
<span class="text-red-500 text-xs italic">
Please fill out this field.
</span>
</div>
</div>
<div class="md:w-1/2 px-3">
<label class="uppercase tracking-wide text-black text-xs font-bold mb-2" for="title">
Title*
</label>
<input class="w-full bg-gray-200 text-black border border-gray-200 rounded py-3 px-4 mb-3" id="title" type="text" placeholder="Software Engineer">
</div>
</div>
<div class="-mx-3 md:flex mb-6">
<div class="md:w-full px-3">
<label class="uppercase tracking-wide text-black text-xs font-bold mb-2" for="application-link">
Application Link*
</label>
<input class="w-full bg-gray-200 text-black border border-gray-200 rounded py-3 px-4 mb-3" id="application-link" type="text" placeholder="http://....">
</div>
</div>
这可能看起来有点压倒性,因为我们已经以多种方式设置了样式,但我们很快就会回顾所有内容。结果如下所示:

请记住:我们应用了所有样式而没有编写任何 CSS!那么我们究竟做了什么?
样式化标签
<label class="uppercase tracking-wide text-black text-xs font-bold mb-2" for="company">
Company Name*
</label>
对于这个标签:
我们将text-transform样式设置为uppercase.
tracking-wide表示字母间距0.025emwhile给出的 text-black文本colour。#000
text-xs是font-size哪个 等于.75rem 并且 font-bold是font-weight的700。
mb-2其中 mb表示margin-bottom,应用底部边距0.5rem。
样式化输入
我们正在对输入字段和 div 做类似的事情。
<input class="w-full bg-gray-200 text-black border border-gray-200 rounded py-3 px-4 mb-3" id="company" type="text" placeholder="Tutsplus">
w表示,添加的width选项指定元素宽度的范围。在这种情况下,w-full意味着 awidth的100%。
bg用于应用背景样式;这里我们应用背景颜色#edf2f7,我们还添加了文本颜色#000。
我们应用边框样式和边框颜色#edf2f7。
py-3应用一个 padding-top和每个 padding-bottom 。0.75rem
px-4 然后应用一个padding-right和每个padding-left。1rem
浏览文档,您可以看到每个类是如何适应的。
5.为剩余元素设置样式
向其他元素添加一些类将使响应式表单变得更加清晰。
<div class="-mx-3 md:flex mb-2">
<div class="md:w-1/2 px-3 mb-6 md:mb-0">
<label class="uppercase tracking-wide text-black text-xs font-bold mb-2" for="location">
Location*
</label>
<div>
<select class="w-full bg-gray-200 border border-gray-200 text-black text-xs py-3 px-4 pr-8 mb-3 rounded" id="location">
<option>Abuja</option>
<option>Enugu</option>
<option>Lagos</option>
</select>
</div>
</div>
<div class="md:w-1/2 px-3">
<label class="uppercase tracking-wide text-black text-xs font-bold mb-2" for="job-type">
Job Type*
</label>
<div>
<select class="w-full bg-gray-200 border border-gray-200 text-black text-xs py-3 px-4 pr-8 mb-3 rounded" id="job-type">
<option>Full-Time</option>
<option>Part-Time</option>
<option>Internship</option>
</select>
</div>
</div>
<div class="md:w-1/2 px-3">
<label class="uppercase tracking-wide text-black text-xs font-bold mb-2" for="department">
Department*
</label>
<div>
<select class="w-full bg-gray-200 border border-gray-200 text-black text-xs py-3 px-4 pr-8 mb-3 rounded" id="department">
<option>Engineering</option>
<option>Design</option>
<option>Customer Support</option>
</select>
</div>
</div>
</div>
<div class="-mx-3 md:flex mt-2">
<div class="md:w-full px-3">
<button class="md:w-full bg-gray-900 text-white font-bold py-2 px-4 border-b-4 hover:border-b-2 border-gray-500 hover:border-gray-100 rounded-full">
Button
</button>
</div>
</div>
表单传播以覆盖浏览器。我们将约束包含的 div 并使用 svg 文件来设置背景样式以添加一点视觉效果。
为此,您需要在公共目录中创建一个名为assets的文件夹,并在其中创建另一个名为svg的文件夹。然后创建一个名为architect.svg的文件并将其粘贴到其中。
<svg xmlns="http://www.w3.org/2000/svg" width="100" height="199" viewBox="0 0 100 199">
<g fill="#000">
<path d="M0 199V0h1v1.99L100 199h-1.12L1 4.22V199H0zM100 2h-.12l-1-2H100v2z">
正如我上面提到的,我们需要做的额外事情是为包含的 div 元素和 body 标签添加背景样式、填充和 flex。所以最后,我们的 HTML 正文如下所示:
<body class="bg-gray-100 flex bg-local" style="background: url('./assets/svg/architect.svg')">
<div class="bg-gray-100 mx-auto max-w-6xl bg-white py-20 px-12 lg:px-24 shadow-xl mb-24">
<form>
<div class="bg-white shadow-md rounded px-8 pt-6 pb-8 mb-4 flex flex-col">
<div class="-mx-3 md:flex mb-6">
<div class="md:w-1/2 px-3 mb-6 md:mb-0">
<label class="uppercase tracking-wide text-black text-xs font-bold mb-2" for="company">
Company Name*
</label>
<input class="w-full bg-gray-200 text-black border border-gray-200 rounded py-3 px-4 mb-3" id="company" type="text" placeholder="Netboard">
<div>
<span class="text-red-500 text-xs italic">
Please fill out this field.
</span>
</div>
</div>
<div class="md:w-1/2 px-3">
<label class="uppercase tracking-wide text-black text-xs font-bold mb-2" for="title">
Title*
</label>
<input class="w-full bg-gray-200 text-black border border-gray-200 rounded py-3 px-4 mb-3" id="title" type="text" placeholder="Software Engineer">
</div>
</div>
<div class="-mx-3 md:flex mb-6">
<div class="md:w-full px-3">
<label class="uppercase tracking-wide text-black text-xs font-bold mb-2" for="application-link">
Application Link*
</label>
<input class="w-full bg-gray-200 text-black border border-gray-200 rounded py-3 px-4 mb-3" id="application-link" type="text" placeholder="http://....">
</div>
</div>
<div class="-mx-3 md:flex mb-2">
<div class="md:w-1/2 px-3 mb-6 md:mb-0">
<label class="uppercase tracking-wide text-black text-xs font-bold mb-2" for="location">
Location*
</label>
<div>
<select class="w-full bg-gray-200 border border-gray-200 text-black text-xs py-3 px-4 pr-8 mb-3 rounded" id="location">
<option>Abuja</option>
<option>Enugu</option>
<option>Lagos</option>
</select>
</div>
</div>
<div class="md:w-1/2 px-3">
<label class="uppercase tracking-wide text-black text-xs font-bold mb-2" for="job-type">
Job Type*
</label>
<div>
<select class="w-full bg-gray-200 border border-gray-200 text-black text-xs py-3 px-4 pr-8 mb-3 rounded" id="job-type">
<option>Full-Time</option>
<option>Part-Time</option>
<option>Internship</option>
</select>
</div>
</div>
<div class="md:w-1/2 px-3">
<label class="uppercase tracking-wide text-black text-xs font-bold mb-2" for="department">
Department*
</label>
<div>
<select class="w-full bg-gray-200 border border-gray-200 text-black text-xs py-3 px-4 pr-8 mb-3 rounded" id="department">
<option>Engineering</option>
<option>Design</option>
<option>Customer Support</option>
</select>
</div>
</div>
</div>
<div class="-mx-3 md:flex mt-2">
<div class="md:w-full px-3">
<button class="md:w-full bg-gray-900 text-white font-bold py-2 px-4 border-b-4 hover:border-b-2 border-gray-500 hover:border-gray-100 rounded-full">
Button
</button>
</div>
</div>
</div>
</form>
</div>
</body>

完成所有这些后,您应该得到这个结果!
下一步是什么?
在本教程中,您了解了 TailwindCSS 在创建响应式表单时的功能。我希望它可以帮助您了解以这种方式使用样式类的强大功能。
- 样式化标签
- 样式化输入




![如何删除Word中的空白页[4种简单方法] 如何删除Word中的空白页[4种简单方法]](https://www.weixiaolive.com/en/zb_users/upload/2023/07/20230702124855168827333590644.png)

