在创建单页应用程序时,我们应该使用某种框架来为我们完成一些工作,以便我们可以专注于实际功能。
angularJS非常适合这里,因为动态依赖注入和双向数据绑定等功能非常棒。有时我们还需要某种服务器。如果您选择了 php,那么Laravel可能是您的最佳选择,因为它易于使用且功能强大。
在本教程的这一部分,我们将使用AngularJS构建应用程序的前端。Angular 是一个非常独特的框架。他们没有抽象 html 或提供某种 dom 操作方式,而是扩展了 HTML 以处理它肯定不是为处理动态数据而设计的事实。
正因为如此,Angular 可能需要比其他框架更多的学习,但这确实值得花时间。
准备
在开始编写前端之前,我们必须稍微修改一下 Laravel 部分。转到app/views,删除那里的示例内容并创建名为home.php. 现在让我们创建布局。
从DOCTYPE和html 标签开始:
| <!DOCTYPE html><html ng-app="app"> |
正如你所看到的,我们已经在使用一些 AngularJS 的东西——ng-app指令。这告诉 Angular 使用app为这个应用程序命名的模块(我们稍后会定义它)。之后,添加head带有标题和 css 的:
| <title>Customer Management</title> <link rel="stylesheet" href="style.css"> |
现在您可以script使用 Angular、它的路由模块和我们的应用程序添加标签:
<script src="http://code.angularjs.org/1.2.3/angular.js" ></script><script src="http://code.angularjs.org/1.2.3/angular-route.js"> </script><script src="./app.js"> </script> |
该指令告诉 Angular 将请求的模板放入该元素中。
之后我们只需要添加一个路由来显示模板(in app/routes.php)。在控制器的路由之前添加:
| 1 | Route::get('/', function () { return View::make('layout'); }); |
现在,如果您启动服务器(使用),当您在浏览器中导航到http://localhost:8000/php artisan serve时,您应该会看到我们的基本布局:
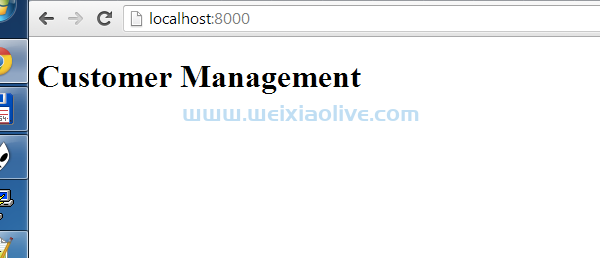
样式
本文不会关注与 CSS 相关的任何内容,但为了让您在开发应用程序时更加美观,我们将为其添加一些样式。转到 public/ 您的应用程序的目录(它位于 旁边 app/)并在style.css其中使用以下代码创建:
body { font-family: Calibri, sans-serif; width: 800px; margin: auto;} a { cursor: pointer; color: blue; text-decoration: none;} table { width: 100%;} table thead tr { background: #ccc;} table tbody tr { background: #ddd;} table tbody tr:nth-child(2n + 1) { background: #eee;} table tr td:nth-child(1) { text-align: center;} table tr td:nth-child(3), table tr td:nth-child(4) { text-align: right;} .error { color: red;} |
现在在浏览器中打开应用程序,布局应该在标题中以更好的字体居中:
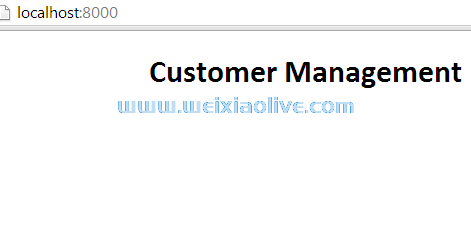
基本应用结构
我们将从模块声明开始。Angular 中的模块与任何 AMD 库中的模块几乎相同,但添加了依赖注入,这非常有用,正如您将看到的。这是我们的应用程序模块的声明:
1 | var app = angular.module('app', [ 'ngRoute' ]); |
语法很简单 - 首先是模块的名称,然后是依赖项数组 - 我们将只使用ngRoute这里来处理导航,这将是下一个。
路由
路由在模块的config()方法中定义:
1 | app.config(function configure($routeProvider) { |
这是依赖注入第一次启动的时候——我们的回调将$routeProvider作为唯一的参数,并且这个模块将由 Angular 注入。
您必须确保参数名称与模块名称完全相同,因为 Angular 使用它们来匹配适当的模块。
现在让我们实际使用$routeProvider来设置路由:
1 2 3 4 5 | $routeProvider .when('/', { controller: 'CustomersController', templateUrl: './templates/customers.html' }) .when('/customer/:id', { controller: 'CustomerController', templateUrl: './templates/customer.html' }) .otherwise({ redirect: '/' }); }); |
正如您所看到的,要定义一个路由,您必须调用when()提供者的方法(注意它们可以被链接起来)。
第一个参数是 URI,第二个参数是带有路由选项的对象。在这里,我们将适当的控制器和模板附加到每个路由。在第二个中,我们也在:id末尾使用来标记我们稍后将使用的路由参数。该otherwise()方法定义了如果访问任何其他 URI 会发生什么。
工厂
在我们编写控制器之前,我们必须创建一个名为factory. factory是一个返回服务的函数,如果您想将任何数据获取/设置功能与控制器分开(这当然是您一直想要做的),这将很有帮助。我们使用factory()模块的方法来定义它:
1 | app.factory('data', function Data($http) { |
第一个参数是服务的名称,第二个参数是返回将使用该工厂创建的服务的函数。
我们将使用该$http模块通过 ajax 访问我们的服务器。它为所有 HTTP 方法提供了快捷方法,并且每个方法都返回一个 Promise(如果你不知道那是什么,请看这里和这里)。
我们必须将服务作为对象返回,其中包含将在我们的控制器中使用的所有方法:
1 | return { |
第一个是GET所有客户,所以我们可以在列表中显示他们:
1 | getCustomers: function getCustomers() { return $http.get('/customers/all'); }, |
第二个将GET只有一个客户由他id:
1 | getCustomer: function getCustomer(id) { return $http.get('/customers?id='+ id); }, |
1 | addCustomer: function addCustomer(data) { return $http.post('/customers', data); }, |
in 第二个参数$http.post()是将发送到服务器的数据。
下一个将提供DELETE给客户id:
1 | removeCustomer: function removeCustomer(id) { return $http.delete('/customers?id='+ id); }, |
现在将很少有类似的交易。一个获得所有这些:
1 | getTransactions: function getTransactions(id) { return $http.get('/transactions?id='+ id); }, |
一个添加新的:
1 | addTransaction: function addTransaction(data) { return $http.post('/transactions', data); }, |
还有一个要删除:
1 | removeTransaction: function removeTransaction(id) { return $http.delete('/transactions?id='+ id); } } }); |
客户控制器
Angular 中的控制器(顾名思义)是一种控制应用程序行为的方法。我们将为每个模板提供一个。首先,我们将为主页制作一个。首先定义它:
1 | app.controller('CustomersController', function CustomersController($scope, Data) { |
这里的第二个参数是控制器的构造函数。它的第一个参数 ( $scope) 是 DOM 和控制器之间的链接。它是 Angular 双向数据绑定的核心。第二个是我们之前创建的工厂的服务。
获取列表
现在我们将使用我们的服务从服务器获取客户列表:
1 | Data.getCustomers().success(parseCustomers); |
Angular 中的所有 Promise 都提供了success()和error()方法,可用于添加适当的回调。现在让我们定义将解析传入数据以将其显示在页面上的函数:
1 | function parseCustomers(data) { $scope.customers = data; } |
是的,这就是向模板提供数据所需的全部内容。不需要任何innerHTML/ appendChild()-ish 代码。
添加新客户
我们还需要提供添加和删除客户的功能。首先让我们在我们将保存新客户数据的范围内创建一个对象:
1 | $scope.newCustomer = { name: '', email: '' }; |
这样我们可以避免在用户添加客户时访问 DOM。现在将实际添加客户的功能:
1 | $scope.addCustomer = function addCustomer() { |
由于用户全名将显示在表格中,因此它的输入将是相同的,因此我们必须将其拆分以获取名字和姓氏:
1 | var names = $scope.newCustomer.name.split(' '); |
现在我们使用来自工厂的数据调用适当的函数$scope:
1 | Data.addCustomer({ first_name: names[0], last_name: names[1], email: $scope.newCustomer.email }) |
之后,我们将成功和错误***器添加到返回的承诺中:
1 | .success(customerAddSuccess).error(customerAddError); } |
我们先定义成功回调:
1 | function customerAddSuccess(data) { |
该data参数包含响应的文本。我们必须清除$scope.error变量:
1 | $scope.error = null; |
将新添加的客户推送到$scope.customers:
1 | $scope.customers.push(data); |
并设置$scope.newCustomer为其初始状态以清除输入:
1 | $scope.newCustomer = { name: '', email: '' }; } |
错误回调只会将$scope.error变量设置为从服务器接收到的文本:
1 | function customerAddError(data) { $scope.error = data; } |
删除客户
删除客户的函数将把他id作为参数:
1 | $scope.removeCustomer = function removeCustomer(id) { |
我们还将显示一个确认框,以便用户有机会取消操作:
1 | if (confirm('Do you really want to remove this customer?')) { |
如果用户确定他想继续,我们删除客户:
1 | Data.removeCustomer(id).success(customerRemoveSuccess); } } |
这里的回调必须删除客户$scope.customers使用从服务器获取的 id:
1 2 3 4 5 6 7 8 | function customerRemoveSuccess(data) { var i = $scope.customers.length; while (i--) { if ($scope.customers[i].id == data) { $scope.customers.splice(i, 1); } } } |
结果
完整的代码应如下所示:
01 02 03 04 05 06 07 08 09 10 11 12 13 14 15 16 17 18 19 20 21 22 23 24 25 26 27 28 29 30 31 32 33 34 35 36 37 38 39 40 41 42 43 44 | app.controller('CustomersController', function CustomersController($scope, Data) { Data.getCustomers().success(parseCustomers);
function parseCustomers(data) { $scope.customers = data; }
$scope.newCustomer = { name: '', email: '' };
$scope.addCustomer = function addCustomer() { var names = $scope.newCustomer.name.split(' '); Data.addCustomer({ first_name: names[0], last_name: names[1], email: $scope.newCustomer.email }) .success(customerAddSuccess).error(customerAddError); }
function customerAddSuccess(data) { $scope.error = null; $scope.customers.push(data); $scope.newCustomer = { name: '', email: '' }; }
function customerAddError(data) { $scope.error = data; }
$scope.removeCustomer = function removeCustomer(id) { if (confirm('Do you really want to remove this customer?')) { Data.removeCustomer(id).success(customerRemoveSuccess); } }
function customerRemoveSuccess(data) { var i = $scope.customers.length; while (i--) { if ($scope.customers[i].id == data) { $scope.customers.splice(i, 1); } } } }); |
客户模板
现在要向我们的用户实际显示数据,我们必须创建一个模板。我们在路由中将其定义为 be ./templates/customers.html,因此在其中创建public/templates目录和customers.html文件。
首先添加标题,以便用户知道他在哪里:
1 | <h2>Customers</h2> |
接下来我们需要一个带有漂亮标题的表格来显示数据:
现在添加 tbody 元素。这就是 Angular 的魔力再次发挥作用的地方。使用ng-repeat指令我们告诉 Angular 重复该元素:
1 | <tr ng-repeat="customer in customers"> |
语法与 javascriptfor...in循环中的一样。现在我们可以访问customer变量来获取我们需要的所有数据。在 Angular 中,您使用双花括号插入变量:
01 02 03 04 05 06 07 08 09 10 11 12 | <tbody> <tr> <td>{{ customer.id }}</td> <td> <a ng-click="removeCustomer({{ customer.id }})">[-]</a> <a href="#/customer/{{ customer.id }}"> {{ customer.first_name }} {{ customer.last_name }} </a> </td> <td>{{ customer.email }}</td> </tr> </tbody> |
还有一个ng-click指令将充当onclick事件回调,我们使用它来添加删除客户的能力。接下来是一个带有输入的页脚,因此用户可以添加新客户:
1 2 3 4 5 6 7 | <tfoot> <tr> <td></td> <td><input ng-model="newCustomer.name" style="width: 99%"></td> <td><input ng-model="newCustomer.email" style="width: 170px"><a ng-click="addCustomer()">[+]</a></td> </tr> </tfoot> |
我们使用该ng-model指令将适当的变量从范围绑定到输入,因此每当输入值发生变化时它们都会更新。
最后要做的是显示错误消息(如果有)。为此,我们将使用ng-show仅在指定表达式为真时才显示元素的指令:
1 2 3 | <p ng-show="error" class="error"> {{ error }} </p> |
而已!现在您可以在浏览器中打开该应用程序,您应该会看到:

您可以通过单击表格右下角的加号来添加新客户。
客户控制器
现在让我们为单客户视图创建一个控制器:
1 | app.controller('CustomerController', function CustomerController($scope, $routeParams, Data) { |
获取数据
我们使用$routeParams模块获取客户的数据,该模块包含:id我们之前指定的所有路由参数:
1 2 3 4 5 | Data.getCustomer($routeParams.id).success(parseCustomer);
function parseCustomer(data) { $scope.customer = data; } |
回调与CustomersController. 现在让我们获取客户的所有交易:
1 2 3 4 5 6 7 8 9 | Data.getTransactions($routeParams.id).success(parseCustomersTransactions);
function parseCustomersTransactions(data) { $scope.transactions = data; $scope.sum = 0; for (var k in data) { $scope.sum += parseFloat(data[k].amount); } } |
回调与上一个略有不同,因为我们还想显示交易金额的总和。我们需要使用parseFloat(),因为 Laravel 将浮点数作为字符串发送。
添加新交易
该代码将与用于创建新客户的代码非常相似:
01 02 03 04 05 06 07 08 09 10 11 12 13 14 15 16 17 18 19 | $scope.newTransaction = { name: '', amount: 0 };
$scope.addTransaction = function addTransaction() { $scope.newTransaction.customer_id = $scope.customer.id; Data.addTransaction($scope.newTransaction).success(transactionAddSuccess).error(transactionAddError); }
function transactionAddSuccess(data) { $scope.error = null; data.amount = parseFloat(data.amount); $scope.transactions.push(data);
$scope.sum += data.amount; $scope.newTransaction = { name: '', amount: 0 }; }
function transactionAddError(data) { $scope.error = data; } |
唯一的区别是我们将客户的 id 添加到数据中,以便服务器知道它是谁的交易。成功回调也进行了一些修改,因为我们必须在将浮点数添加到之前解析浮点数,$scope并且我们必须将金额添加到我们的总和中。
删除交易
函数的代码removeTransaction()几乎与removeCustomer仅在变量名称上有所不同的代码相同:
01 02 03 04 05 06 07 08 09 10 11 12 13 14 15 | $scope.removeTransaction = function removeTransaction(id) { if (confirm('Do you really want to remove this transaction?')) { Data.removeTransaction(id).success(transactionRemoveSuccess); } }
function transactionRemoveSuccess(data) { var i = $scope.transactions.length; while (i--) { if ($scope.transactions[i].id == data) { $scope.sum -= $scope.transactions[i].amount; $scope.transactions.splice(i, 1); } } } |
结果
整个控制器应如下所示:
01 02 03 04 05 06 07 08 09 10 11 12 13 14 15 16 17 18 19 20 21 22 23 24 25 26 27 28 29 30 31 32 33 34 35 36 37 38 39 40 41 42 43 44 45 46 47 48 49 50 51 52 53 | app.controller('CustomerController', function CustomerController($scope, $routeParams, Data) { Data.getCustomer($routeParams.id).success(parseCustomer);
function parseCustomer(data) { $scope.customer = data; }
Data.getTransactions($routeParams.id).success(parseCustomersTransactions);
function parseCustomersTransactions(data) { $scope.transactions = data; $scope.sum = 0; for (var k in data) { $scope.sum += parseFloat(data[k].amount); } }
$scope.newTransaction = { name: '', amount: 0 };
$scope.addTransaction = function addTransaction() { $scope.newTransaction.customer_id = $scope.customer.id; Data.addTransaction($scope.newTransaction).success(transactionAddSuccess).error(transactionAddError); }
function transactionAddSuccess(data) { $scope.error = null; data.amount = parseFloat(data.amount); $scope.transactions.push(data);
$scope.sum += data.amount; $scope.newTransaction = { name: '', amount: 0 }; }
function transactionAddError(data) { $scope.error = data; }
$scope.removeTransaction = function removeTransaction(id) { if (confirm('Do you really want to remove this transaction?')) { Data.removeTransaction(id).success(transactionRemoveSuccess); } }
function transactionRemoveSuccess(data) { var i = $scope.transactions.length; while (i--) { if ($scope.transactions[i].id == data) { $scope.sum -= $scope.transactions[i].amount; $scope.transactions.splice(i, 1); } } } }); |
客户模板
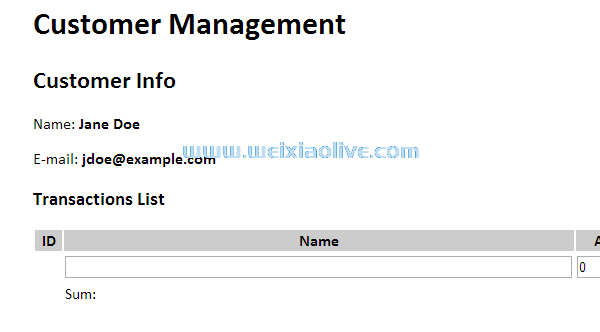
单个客户的模板没有新的 Angular 指令,所以只需创建一个名为customer.htmlin的文件public/templates/并将此代码放在那里:
01 02 03 04 05 06 07 08 09 10 11 12 13 14 15 16 17 18 19 20 21 22 23 24 25 26 27 28 29 30 31 32 33 34 35 36 37 | <h2>Customer Info</h2> <p>Name: <strong>{{ customer.first_name }} {{ customer.last_name }}</strong></p> <p>E-mail: <strong>{{ customer.email }}</strong></p>
<h3>Transactions List</h3> <table> <thead> <tr> <th width="25">ID</th> <th width="*">Name</th> <th width="85">Amount</th> <th width="160">Date</th> </tr> </thead> <tbody> <tr ng-repeat="transaction in transactions"> <td>{{ transaction.id }}</td> <td><a ng-click="removeTransaction({{ transaction.id }})">[-]</a> {{ transaction.name }}</td> <td>${{ transaction.amount.toFixed(2) }}</td> <td>{{ transaction.created_at }}</td> </tr> </tbody> <tfoot> <tr> <td></td> <td><input type="text" ng-model="newTransaction.name" style="width: 99%"></td> <td><input type="text" ng-model="newTransaction.amount" style="width: 85px"></td> <td><a ng-click="addTransaction()">[+]</a></td> </tr> <tr> <td></td><td>Sum:</td><td>${{ sum.toFixed(2) }}</td> </tr> </tfoot> </table> <p ng-show="error" class="error"> {{ error }} </p> |
请注意,我们使用toFixed(2)对浮点数进行舍入,因此它们只有两个小数字段,因为 Laravel 在 JSON 中处理浮点数的方式。
现在您可以打开浏览器并单击您创建的客户之一。您应该看到控制器和模板在运行:
结论
现在,如果您在第一部分之后添加了一些功能,那么将其包含在前端应该只是在这里和那里添加几行代码的问题。
我希望在你阅读完这篇文章并且你的应用程序已经完成并可以运行之后,你会开始思考如何在没有 AngularJS 的情况下创建单页应用程序以及在没有 Laravel 的情况下创建任何 PHP 应用程序。
- 样式
- 路由
- 获取列表
- 添加新客户
- 删除客户
- 结果
- 获取数据
- 添加新交易
- 删除交易
- 结果





![如何删除Word中的空白页[4种简单方法] 如何删除Word中的空白页[4种简单方法]](https://www.weixiaolive.com/en/zb_users/upload/2023/07/20230702124855168827333590644.png)

