在上一篇文章中,我们专注于使用 php 加载和操作图像。我们学习了如何旋转、调整大小、缩放或翻转图像。我们还了解了不同的过滤器和卷积矩阵。这些教程还涵盖了 GD 库的一些实际用途,例如调整目录中所有图像的大小或一次在多个图像上添加水印。
除了使用 GD 来处理常规图像外,我们还可以从头开始创建自己的图像。库中的不同函数可用于绘制椭圆、圆形、矩形、多边形和简单线条等基本形状。通过一些数学运算,这些形状可以创造出漂亮的图案。还有一些函数可用于在渲染图像上绘制文本,这开辟了很多可能性。
本教程将教您如何在 PHP 中绘制基本形状以及如何使用您喜欢的字体呈现文本。
使用GD在PHP中绘制基本形状
我们将在本节中学习基本形状,然后再介绍线条粗细、画笔和线条样式。
画线
imageline($image, $x1, $y1, $x2, $y2, $color)您可以使用该函数在两个给定点之间绘制一条简单的直线。$image参数是一个图像资源,之前将使用类似imagecreatetruecolor()或的函数创建imagecreatefromjpeg()。我们将imagecreatetruecolor()在本教程中使用从头开始创建新图像。$y1如果等于 ,该函数将绘制一条水平线$y2。$x1同样,如果等于,它将画一条垂直线$x2。
画圆和弧
该函数可以以和为圆心imagearc($image, $cx, $cy, $width, $height, $start, $end, $color)绘制圆弧。和参数决定了不同轴上圆弧的大小。和参数以度为单位指定弧的开始和结束角度。如果要绘制从 0 到 360 度的完整弧线,可以使用替代功能。$cx$cy$width$height$start$endimageellipse($image, $cx, $cy, $width, $height, $color)
绘制矩形和多边形
imagerectangle($image, $x1, $y1, $x2, $y2, $color)您可以使用该函数在图像上绘制矩形。$x1和值确定矩形的$y1左上角。和值确定右下角$x2。$y2还有一个imagepolygon($image, $points, $num_points, $color)函数,可以创建具有任意数量的边或点的多边形。该$points参数是一个数组,其中两个元素配对在一起以获取特定点的坐标。
PHP 7 添加了另一个名为imageopenpolygon()的函数,它不会在第一个点和最后一个点之间画一条线。
将其放在一起创建绘图
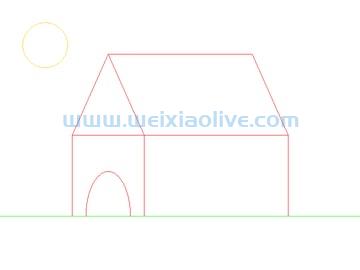
在下面的示例中,我们使用了所有这些函数来创建带有小屋、太阳和地面的线条图。
<?php

header("Content-type: image/png");

$img_width = 800;
$img_height = 600;

$img = imagecreatetruecolor($img_width, $img_height);

$black = imagecolorallocate($img, 0, 0, 0);
$white = imagecolorallocate($img, 255, 255, 255);
$red   = imagecolorallocate($img, 255, 0, 0);
$green = imagecolorallocate($img, 0, 255, 0);
$blue  = imagecolorallocate($img, 0, 0, 255);
$orange = imagecolorallocate($img, 255, 200, 0);

imagefill($img, 0, 0, $white);

imagerectangle($img, $img_width*2/10, $img_height*5/10, $img_width*4/10, $img_height*8/10, $red);
imagerectangle($img, $img_width*4/10, $img_height*5/10, $img_width*8/10, $img_height*8/10, $red);

imagepolygon($img, [$img_width*3/10, $img_height*2/10, $img_width*2/10, $img_height*5/10, $img_width*4/10, $img_height*5/10], 3, $red);
imageopenpolygon($img, [$img_width*3/10, $img_height*2/10, $img_width*7/10, $img_height*2/10, $img_width*8/10, $img_height*5/10], 3, $red);

imageellipse($img, 100, 100, 100, 100, $orange);
imagearc($img, $img_width*3/10, $img_height*8/10, 100, 200, 180, 360, $red);

imageline($img, 0, $img_height*8/10, $img_width, $img_height*8/10, $green);

imagepng($img);

?>
这里重要的是要弄清楚不同坐标的值。我想绘制相对于原始图像大小的所有内容,所以我使用$img_height和$img_width变量来计算不同点的坐标。
控制线条粗细、样式和颜色填充
上面的图像有几个问题,比如非常细的线条和没有着色。所有这些问题都可以使用 和 等功能轻松imagesetthickness()解决imagefilledrectangle()。
线的粗细
该imagesetthickness($image, $thickness)函数设置绘制矩形、多边形、圆弧等时渲染线条的粗细。例如,设置$thickness为 5 将使任何使用imagerectangle()、imagearc()、imagepolygon()等绘制的图形的粗细为 5 个像素。
绘制填充形状
每个绘图函数也有一个填充颜色版本,它用给定的颜色填充特定的图形。例如,imagefilledrectangle()将用给定的颜色填充绘制的矩形。
使用画笔
一个非常有用的 GD 函数是imagesetbrush($image, $brush). 该$brush函数中的参数只是另一种可用于绘制线条的图像资源。例如,您可以使用透明矢量图形的花朵作为画笔,为您的图像添加漂亮的花朵图案。下面给出的代码片段是为了在绘制点时使用云的图像作为画笔而编写的。这在我们的天空中添加了一朵云。
<?php

$img = imagecreatetruecolor($img_width, $img_height);

$clouds = imagecreatefrompng('clouds.png');
$clouds = imagescale($clouds, 250);

imagesetthickness($img, 5);
imagesetbrush($img, $clouds);

imageline($img, $img_width*9/10, 50, $img_width*9/10, 50, IMG_COLOR_BRUSHED);

?>
我在Pixabay上找到了这张 云图,并将其缩小到适合我们项目的大小。
小屋图像的完整代码如下所示。我们只是为每个图形添加了两个版本,一个用于绘制轮廓,另一个用于填充颜色。
<?php

header("Content-type: image/png");
$img_width = 800;
$img_height = 600;

$img = imagecreatetruecolor($img_width, $img_height);

$clouds = imagecreatefrompng('clouds.png');
$clouds = imagescale($clouds, 250);

imagesetthickness($img, 5);
imagesetbrush($img, $clouds);

$black = imagecolorallocate($img, 0, 0, 0);
$white = imagecolorallocate($img, 255, 255, 255);
$red   = imagecolorallocate($img, 255, 0, 0);
$green = imagecolorallocate($img, 0, 255, 0);
$blue  = imagecolorallocate($img, 0, 200, 250);
$orange = imagecolorallocate($img, 255, 200, 0);
$brown = imagecolorallocate($img, 220, 110, 0);

imagefill($img, 0, 0, $white);

imagefilledrectangle($img, 0, 0, $img_width, $img_height*8/10, $blue);

imagefilledrectangle($img, $img_width*2/10, $img_height*5/10, $img_width*4/10, $img_height*8/10, $red);
imagefilledrectangle($img, $img_width*4/10 - 2, $img_height*5/10, $img_width*8/10, $img_height*8/10, $red);

imagefilledpolygon($img, [$img_width*3/10, $img_height*2/10, $img_width*2/10, $img_height*5/10, $img_width*4/10, $img_height*5/10], 3, $red);
imagefilledpolygon($img, [$img_width*3/10, $img_height*2/10, $img_width*7/10, $img_height*2/10, $img_width*8/10, $img_height*5/10, $img_width*4/10, $img_height*5/10], 4, $red);

imagefilledarc($img, 100, 100, 100, 100, 0, 360, $orange, IMG_ARC_PIE);
imagefilledarc($img, $img_width*3/10, $img_height*8/10, 100, 200, 180, 360, $brown, IMG_ARC_PIE);

imagefilledrectangle($img, 0, $img_height*8/10, $img_width, $img_height, $green);

imagerectangle($img, $img_width*2/10, $img_height*5/10, $img_width*4/10, $img_height*8/10, $black);
imagerectangle($img, $img_width*4/10 - 2, $img_height*5/10, $img_width*8/10, $img_height*8/10, $black);

imagepolygon($img, [$img_width*3/10, $img_height*2/10, $img_width*2/10, $img_height*5/10, $img_width*4/10, $img_height*5/10], 3, $black);
imageopenpolygon($img, [$img_width*3/10, $img_height*2/10, $img_width*7/10, $img_height*2/10, $img_width*8/10, $img_height*5/10], 3, $black);

imagearc($img, 100, 100, 100, 100, 0, 360, $black);
imagearc($img, $img_width*3/10, $img_height*8/10, 100, 200, 180, 360, $black);

imageline($img, $img_width*9/10, 50, $img_width*9/10, 50, IMG_COLOR_BRUSHED);

imagerectangle($img, -100, $img_height*8/10, $img_width*11/10, $img_height*11/10, $black);

imagepng($img);
?>
这是上面 PHP GD 代码的最终结果。

在图像上渲染文本
PHP GD 带有四个不同的函数,可以让您在水平或垂直方向上呈现多个字符或仅呈现一个字符。这些函数是 imagechar()、imagecharup()、imagestring()和imagestringup()。它们都接受相同的六个参数,所以我们在这里只讨论imagechar()函数。
$font参数imagechar($image, $font, $x, $y, $string, $color)函数只是渲染文本的大小。它只接受从 1 到 5 的整数值。$string参数是您要呈现的文本。如果将多字符串传递给 char 函数,则只有第一个字符会呈现在图像上。imagecharup()andimagestringup()函数将从下到上垂直渲染文本。
说到渲染文本,我们上面讨论的四个功能非常有限。您会发现即使是最大的字体大小值也太小而无法正常使用。此外,文本只能水平和垂直书写。
幸运的是,GD 还有一个imagettftext($image, $size, $angle, $x, $y, $color, $fontfile, $text)功能,可以用你想要的任何字体呈现文本。该$fontfile参数用于指定要用于显示文本的 TrueType 字体的路径。$x和参数确定渲染文本的$y起始位置。
下面的示例使用所有这些函数来创建一些漂亮的文本效果。
<?php

header("Content-type: image/png");
$img_width = 800;
$img_height = 600;

$img = imagecreatetruecolor($img_width, $img_height);

$black = imagecolorallocate($img, 0, 0, 0);
$white = imagecolorallocate($img, 255, 255, 255);
$red   = imagecolorallocate($img, 255, 0, 0);
$green = imagecolorallocate($img, 0, 255, 0);
$blue  = imagecolorallocate($img, 0, 200, 250);
$orange = imagecolorallocate($img, 255, 200, 0);
$brown = imagecolorallocate($img, 220, 110, 0);

imagefill($img, 0, 0, $white);

imagestringup($img, 5, $img_width*19/20, $img_height*19/20, 'This sentence was written using imagestringup()!', $blue);
imagestring($img, 5, $img_width/20, $img_height/20, 'This sentence was written using imagestring()!', $red);

$passion_one = dirname(__FILE__) . '/PassionOne-Regular.ttf';
imagettftext($img, 32, 0, $img_width/20, $img_height*2/10, $black, $passion_one, 'This is Passion One Font!');

$merriweather = dirname(__FILE__) . '/Merriweather-Regular.ttf';
imagettftext($img, 24, 90, $img_width*9/10, $img_height*19/20, $black, $merriweather, 'This is Merriweather Regular Font!');

$patua_one = dirname(__FILE__) . '/PatuaOne-Regular.ttf';
imagettftext($img, 32, 0, $img_width/20, $img_height*3/10 + 2, $black, $patua_one, 'This is Patua One Font!');
imagettftext($img, 32, 0, $img_width/20, $img_height*3/10, $orange, $patua_one, 'This is Patua One Font!');

$monoton = dirname(__FILE__) . '/Monoton-Regular.ttf';
imagettftext($img, 72, 0, $img_width/20, $img_height*5.5/10 - 5, $brown, $monoton, 'MONOTON');
imagettftext($img, 72, 0, $img_width/20, $img_height*5.5/10 + 5, $orange, $monoton, 'MONOTON');
imagettftext($img, 72, 0, $img_width/20, $img_height*5.5/10, $blue, $monoton, 'MONOTON');

$kaushan = dirname(__FILE__) . '/KaushanScript-Regular.ttf';
imagettftext($img, 84, 0, $img_width/20, $img_height*8/10 - 2, $brown, $kaushan, 'Good Night!');
imagettftext($img, 84, 0, $img_width/20, $img_height*8/10 + 2, $black, $kaushan, 'Good Night!');
imagettftext($img, 84, 0, $img_width/20 - 2, $img_height*8/10, $brown, $kaushan, 'Good Night!');
imagettftext($img, 84, 0, $img_width/20 + 2, $img_height*8/10, $black, $kaushan, 'Good Night!');
imagettftext($img, 84, 0, $img_width/20, $img_height*8/10, $white, $kaushan, 'Good Night!');

imagepng($img);
?>
如您所见,我们在稍微不同的位置渲染了相同字体的相同文本,以创建一些效果,如基本文本阴影。要记住的重要一点是,任何文本函数渲染的文本都会完全隐藏其下方的文本,以防重叠。这是运行上述代码后得到的最终图像

最后的想法
本教程的目的是让您熟悉不同的 GD 函数,以便在 PHP 中从头开始绘制基本形状。借助一些数学知识,您将能够使用这些函数来创建更复杂的形状,例如正多边形、圆角矩形等。
PHP GD 还有几个非常有用的函数用于在图像上呈现文本。使用漂亮的字体将确保渲染的文本在放置在从不同文件路径加载的常规图像上时不会看起来很奇怪。
- 画线
- 画圆和弧
- 绘制矩形和多边形
- 将其放在一起创建绘图
- 线的粗细
- 绘制填充形状
- 使用画笔




![如何删除Word中的空白页[4种简单方法] 如何删除Word中的空白页[4种简单方法]](https://www.weixiaolive.com/en/zb_users/upload/2023/07/20230702124855168827333590644.png)

