Google的 材料设计团队 明确定义了您的 android 应用程序中应该执行的设置:
应用程序设置允许用户指示应用程序应如何运行的偏好。
谷歌还声明你的用户应该从侧面导航或工具栏菜单导航到应用程序设置——使用标记为 Settings的项目。
在您的应用程序中包含设置使您的用户能够控制您的应用程序的某些功能。这让您的用户感到高兴而不是生气——因为他们现在可以控制应用程序的行为方式。
强烈建议授予对应用设置的访问权限。这将为您的用户提供更好的用户体验,从而在 Google Play 商店中获得更好的评价,最终导致更多的应用下载(从而增加收入)。
我假设您必须与设备上的应用程序设置进行交互,例如通过选择默认铃声或控制您在应用程序上的隐私。您已经下载或将在 Google Play 商店中下载的几乎所有最受欢迎的应用程序都包含一个设置屏幕,供您控制应用程序的行为。
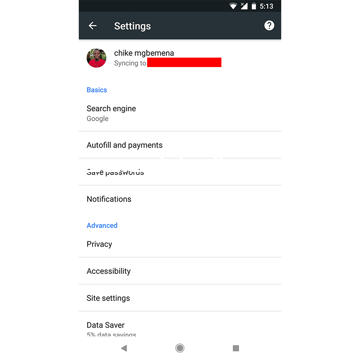
具有设置屏幕的流行应用程序的一个示例是 Google 的 chrome Android 应用程序。在此应用程序的设置屏幕中,用户可以选择默认搜索引擎、更改通知行为、控制用户隐私等。您可以通过从 Google Play 商店下载 Chrome 应用程序自行查看(如果您尚未安装)你的设备)。以下屏幕截图来自 Chrome 应用程序,显示了应用程序的设置屏幕。
在这篇文章中,您将学习如何从头开始创建应用设置屏幕,以及如何读取用户从应用设置中选择的值。 另外,您还将学习如何使用 Android Studio 模板功能通过设置屏幕快速引导您的项目。
可以在我们的 GitHub 存储库中找到本教程的示例项目(在 kotlin 中),这样您就可以轻松地跟进。
先决条件
为了能够遵循本教程,您需要:
对一些Android api(如SharedPreferences)的基本了解
Android Studio 3.0 或更高版本
Kotlin 插件 1.1.51 或更高版本
1. 创建一个Android Studio项目
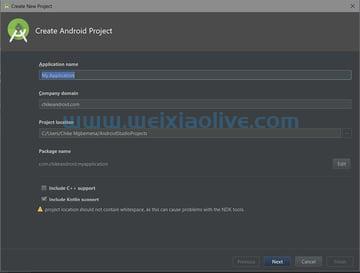
启动 Android Studio 并创建一个新项目(您可以命名它 SettingsScreenDemo),其中包含一个名为 SettingsActivity. 确保还选中 包含 Kotlin 支持 复选框。
2. 创建一个PreferenceFragment
为了支持 API Level 11 (Honeycomb) 及以上,我们可以使用PreferenceFragment. 这个类只是将对象Fragment的层次结构显示Preference为列表。
import android.os.Bundle
import android.preference.PreferenceFragment
import android.support.v7.app.AppCompatActivity

class SettingsActivity : AppCompatActivity() {

    override fun onCreate(savedInstanceState: Bundle?) {
        super.onCreate(savedInstanceState)

        if (fragmentManager.findFragmentById(android.R.id.content) == null) {
            fragmentManager.beginTransaction()
                    .add(android.R.id.content, SettingsFragment()).commit()
        }
    }


    class SettingsFragment : PreferenceFragment() {
        override fun onCreate(savedInstanceState: Bundle?) {
            super.onCreate(savedInstanceState)
            addPreferencesFromResource(R.xml.preferences)
        }
    }
}
在上面的代码中,我们在里面创建了一个嵌套类 (因为 类太小了)。请注意,我们的类扩展了超类并在内部有一个方法。在这个方法中,我们给了它一个首选项 XML的资源 ID ,以便在加载时启动。最后,我们将 Fragment 托管到 Activity 中,只需使用 将 其添加到 UI —在.SettingsFragmentSettingsActivitySetttingsFragmentSettingsFragmentPreferenceFragmentaddPrerenceFromResourceonCreate()R.xml.preferenceFragmentFragmentTransactiononCreate()SettingsActivity
3.创建我们的偏好
创建一个 XML 文件并将其命名为preferences.xml。将此文件保存 在应用项目的res/xml 目录中。请注意,您可以给此文件起任何名称,但强烈建议您使用常规名称“首选项”。此外,您通常应该在应用程序项目中只有一个这样的文件。
<?xml version="1.0" encoding="utf-8"?>
<PreferenceScreen xmlns:android="https://schemas.android.com/apk/res/android">
    <CheckBoxPreference
            android:key="checkbox"
            android:summary="Tap to check if on or off"
            android:title="Checkbox Preference" />
    <RingtonePreference
            android:key="ringtone"
            android:showDefault="true"
            android:showSilent="true"
            android:summary="Pick a ringtone you like"
            android:title="Ringtone Preference" />
    <EditTextPreference
            android:dialogTitle="Enter a text"
            android:key="text"
            android:summary="Click to show a text entry dialog"
            android:title="EditText Preference" />
    <ListPreference
            android:dialogTitle="Select duration"
            android:entries="@array/settings_list_preference_titles"
            android:entryValues="@array/settings_list_preference_values"
            android:key="list"
            android:summary="Click to show a list to choose from"
            android:title="List Preference" />
    <SwitchPreference
            android:key="switch"
            android:title="Switch Preference"
            android:summary="Click to switch on or off"
            android:defaultValue="true"/>
</PreferenceScreen>
我们偏好的根节点。xml文件应该是一个<PreferenceScreen>元素。在这个根元素中,我们现在有了自己的Preference. 以下是与 a 相关的常见属性Preference:
android:key:该属性用于获取SharedPreferences对象中的值。
android:title: 设置Preference. 这是粗体字。
android:summary:设置摘要Preference(这不是必需的d)。这是标题下方的褪色文本。
android:defaultValue: 设置默认值Preference。
我们将 Preference很快介绍上面定义的每一个。请注意,您还可以Preference通过 Android Studio 首选项编辑器添加或自定义一个 - 类似于您已经熟悉的布局资源编辑器。您可以选择在“文本”模式下直接添加/编辑您的偏好 XML 文件,也可以在“设计”模式下使用拖放 UI
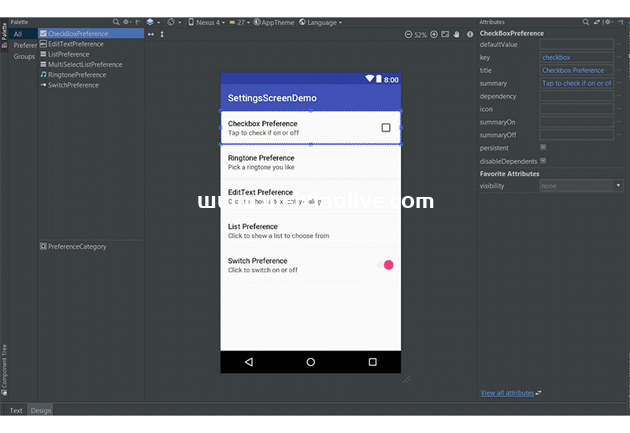 Preference如您所见,在此编辑器中,您可以在调色板部分(左侧)中拖放任何内容。删除后,您应该选择它并在编辑器的属性窗格(右侧)上修改其属性。请注意,默认情况下,我们会获得一些要修改的属性。要查看或修改与选定 关联的所有属性Preference,请确保单击属性窗格底部的查看所有属性链接。这与您已经知道的布局编辑器非常相似。
现在,让我们来看看Preference 我们拥有的每个实体。
复选框首选项
ACheckBoxPreference只是一个CheckBox包含在首选项屏幕中的小部件。如果Preference选中,则返回值“true”,否则返回“false”。换句话说,它根据小部件的状态返回一个布尔值。
<CheckBoxPreference
            android:key="checkbox"
            android:summary="Tap to check if on or off"
            android:title="Checkbox Preference" />
 您可以添加到 a 的其他属性 CheckBoxPreference是:
android:summaryOffPreference:未选中时设置首选项屏幕中的摘要。
android:summaryOnPreference:在选中时设置首选项屏幕中的摘要。
android:disableDependentsState:导致依赖项被禁用的状态(开启为 true,或关闭为 false)。可以是布尔值,例如“true”或“false”。
切换偏好
SwitchPreference执行与CheckBoxPreference. 它提供了两种状态(“开”或“关”)的可切换选项。这使用了一个Switch允许用户向左(“关闭”)和向右(“打开”)滑动的小部件。这Preference也包括 CheckBoxPreference上面描述的属性。此外,它还具有以下属性:
android:switchTextOff:设置处于“关闭”状态时开关本身使用的文本。
android:switchTextOn:设置处于“开”状态时开关本身使用的文本。
<SwitchPreference
            android:key="switch"
            android:title="Switch Preference"
            android:summary="Click to switch on or off"
            android:defaultValue="true"/>

编辑文本首选项
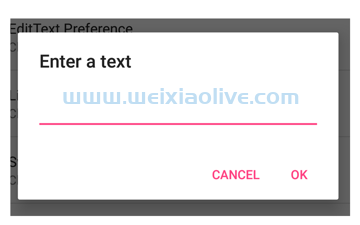
单击此Preference按钮时,将显示一个对话框供用户输入输入文本。它使用EditText小部件——包括您已经熟悉的小部件的所有属性。
<EditTextPreference
            android:dialogTitle="Enter a text"
            android:key="text"
            android:summary="Click to show a text entry dialog"
            android:title="EditText Preference"
            android:inputType="text"/>
请注意,存储在 中的值SharedPreferences是一个字符串。
列表偏好
点击时,这种Preference会在对话框中显示条目列表。在这里,您可以在首选项 XML 中指定一对字符串数组资源。这个字符串数组资源只包含一个字符串集合。此资源位于res/values/arrays.xml。
<?xml version="1.0" encoding="utf-8"?>
<resources>
    <string-array name="settings_list_preference_titles">
        <item>15 minutes</item>
        <item>30 minutes</item>
        <item>1 hour</item>
        <item>3 hours</item>
        <item>6 hours</item>
        <item>Never</item>
    </string-array>
    <string-array name="settings_list_preference_values">
        <item>15</item>
        <item>30</item>
        <item>60</item>
        <item>180</item>
        <item>360</item>
        <item>-1</item>
    </string-array>
</resources>
ListPreference这是我们使用此资源 的示例。
<ListPreference
        android:dialogTitle="Select duration"
        android:entries="@array/settings_list_preference_titles"
        android:entryValues="@array/settings_list_preference_values"
        android:key="list"
        android:summary="Click to show a list to choose from"
        android:title="List Preference" />
android:entries我们分别使用和android:entryValues属性设置条目和条目值。
android:entries: 以列表形式呈现的人类可读数组。
android:entryValues:选择从条目中的条目时找到值的值。
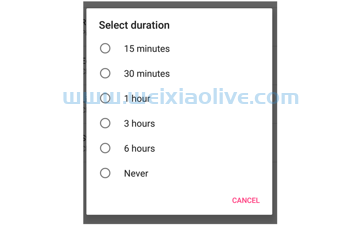
例如,如果我们使用每个持续时间的分钟数作为入口值,当用户选择一个持续时间(例如30分钟)时,对应的整数值将被存储在SharedPreferences (例如30)中。
多选列表首选项
这类似于ListPreference但没有单选按钮,我们有复选框。换句话说,用户可以在对话框中选择多个项目。请注意,结果存储在SharedPreferences. 这可以使用getStringSet().
<MultiSelectListPreference
            android:dialogTitle="Dialog title"
            android:entries="@array/settings_multi_select_list_preference_titles"
            android:entryValues="@array/settings_multi_select_list_preference_values"
            android:key="multi_select_list"
            android:title="Multiselect title" />
铃声偏好
点击a 时RingtonePreference,会显示一个对话框,其中包含设备或模拟器上可用铃声的列表。
<RingtonePreference
            android:key="ringtone"
            android:showDefault="true"
            android:showSilent="true"
            android:summary="Pick a ringtone you like"
            android:title="Ringtone Preference" />
android:showDefault:是否显示默认铃声选项。
android:showSilent: 是否 在列表中显示静音 选项。如果用户不想播放任何铃声,可以选择此选项。
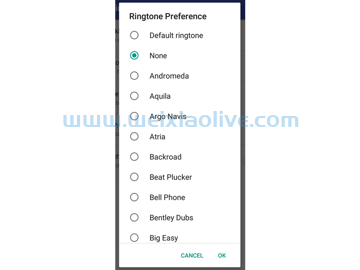
请注意,存储在SharedPreferences 此首选项中的值是一个特殊字符串。这个特殊的字符串是一个指向 ContentProvider.
4.创建设置组
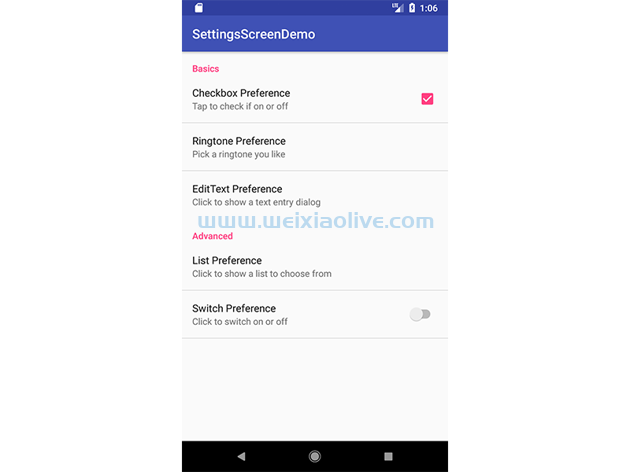
当您拥有一长串首选项或设置时,这会成为一个问题,因为用户可能无法扫描或理解它们。为了解决这个问题,我们可以对我们的偏好进行分组。再看一下我在开始时向您展示的 Chrome 应用程序的屏幕截图 - 请注意,它将首选项分为两类:基本和高级。这使用户更容易理解偏好并且不会使列表看起来过于庞大。
现在让我们看看执行此任务有多简单。
<?xml version="1.0" encoding="utf-8"?>
<PreferenceScreen xmlns:android="http://schemas.android.com/apk/res/android">

    <PreferenceCategory android:title="Basic Settings">
        <CheckBoxPreference
                android:key="checkbox"
                android:summary="Tap to check if on or off"
                android:title="Checkbox Preference"/>
        ...
    </PreferenceCategory>

    <PreferenceCategory android:title="Advanced Settings">
        <ListPreference
                android:dialogTitle="Select duration"
                android:entries="@array/settings_list_preference_titles"
                android:entryValues="@array/settings_list_preference_values"
                android:key="list"
                android:summary="Click to show a list to choose from"
                android:title="List Preference"/>
        ...
    </PreferenceCategory>
</PreferenceScreen>
我们只需将要分组的首选项包围在一个标签中,并使用该属性<PreferenceCategory>为每个组指定一个标题。android:title
5.开始一个意图
请注意,只需单击设置屏幕中的首选项即可打开活动。当您要打开网页时,这可以派上用场。这是执行此操作的代码:
<Preference
        android:summary="Click to start an activity"
        android:title="Preference">
    <intent
            android:action="com.chikeandroid.settingsscreendemo.SETTING_START_ACTIVITY"
            android:targetClass="com.chikeandroid.settingsscreendemo.MyActivity"
            android:targetPackage="com.chikeandroid.settingsscreendemo" />
</Preference>
在这里,我们在<intent>元素内部添加了一个<Preference>元素。
android:action:设置 Intent 的操作(这类似于调用setAction()Intent 对象)。
android:targetClass:设置组件名称的类部分(与调用 setComponent()Intent 对象相同)。
android:targetPackage:设置组件名称的包部分。
android:data:设置要分配的数据(与调用setData()Intent 对象相同)。
例如,要打开网页,您可以使用以下命令:
<Preference android:title="@string/prefs_web_page" >
    <intent android:action="android.intent.action.VIEW"
            android:data="http://www.example.com" />
</Preference>
6. 将偏好摘要绑定到选定的值
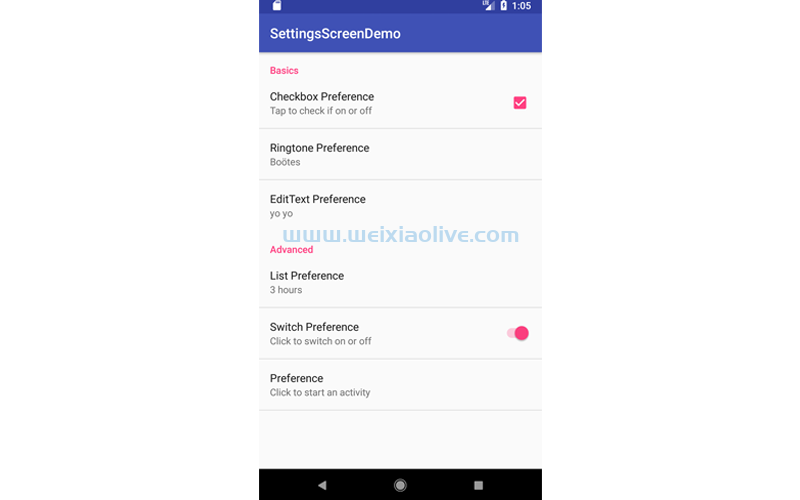
现在让我们看看如何使用用户选择的值更新偏好摘要。
class SettingsActivity : AppCompatActivity() {

    // ...
    class SettingsFragment : PreferenceFragment() {
        override fun onCreate(savedInstanceState: Bundle?) {
            super.onCreate(savedInstanceState)
            addPreferencesFromResource(R.xml.preferences)

            bindPreferenceSummaryToValue(findPreference("ringtone"))
            bindPreferenceSummaryToValue(findPreference("text"))
            bindPreferenceSummaryToValue(findPreference("list"))
        }
    }
    // ...
}
在这个类中,我们创建了一个名为 的辅助方法 bindPreferenceSummaryToValue(),它位于我们的 伴生对象中,用于使用用户选择的值更新偏好摘要文本。我们将一个Preference对象作为参数传递给它。将 使用' 键 findPreference()返回 a 。PreferencePreference
class SettingsActivity : AppCompatActivity() {
    // ...
    companion object {

        /**
         * A preference value change listener that updates the preference's summary
         * to reflect its new value.
         */
        private val sBindPreferenceSummaryToValueListener = Preference.OnPreferenceChangeListener { preference, value ->

            val stringValue = value.toString()

            if (preference is ListPreference) {
                // For list preferences, look up the correct display value in
                // the preference's 'entries' list.
                val listPreference = preference
                val index = listPreference.findIndexOfValue(stringValue)

                // Set the summary to reflect the new value.
                preference.setSummary(
                        if (index >= 0)
                            listPreference.entries[index]
                        else
                            null)

            } else if (preference is RingtonePreference) {
                // For ringtone preferences, look up the correct display value
                // using RingtoneManager.
                if (TextUtils.isEmpty(stringValue)) {
                    // Empty values correspond to 'silent' (no ringtone).
                    preference.setSummary("Silent")

                } else {
                    val ringtone = RingtoneManager.getRingtone(
                            preference.getContext(), Uri.parse(stringValue))

                    if (ringtone == null) {
                        // Clear the summary if there was a lookup error.
                        preference.setSummary(null)
                    } else {
                        // Set the summary to reflect the new ringtone display
                        // name.
                        val name = ringtone.getTitle(preference.getContext())
                        preference.setSummary(name)
                    }
                }
            }
            else {
                // For all other preferences, set the summary to the value's
                // simple string representation.
                preference.summary = stringValue
            }
            true
        }

        private fun bindPreferenceSummaryToValue(preference: Preference) {
            // Set the listener to watch for value changes.
            preference.onPreferenceChangeListener = sBindPreferenceSummaryToValueListener

            // Trigger the listener immediately with the preference's
            // current value.
            sBindPreferenceSummaryToValueListener.onPreferenceChange(preference,
                    PreferenceManager
                            .getDefaultSharedPreferences(preference.context)
                            .getString(preference.key, ""))
        }
    }
}
我们有一个变量sBindPreferenceSummaryToValueListener ,它是 的一个实例 Preference.OnPreferenceChangeListener。这只是一个偏好更改监听器,它将帮助我们将偏好摘要更新为用户选择的值。We check for special cases, like when the selected preference is a RingtonePreferenceor a ListPreference. 对于这些首选项类型,我们会进行一些特殊处理以获取摘要字符串。如果首选项都不是(如EditTextPreference),我们只需将摘要设置为首选项的字符串值。
在 内部,我们通过在对象上调用(在 java 中,它是 )来bindPreferenceSummaryToValue()设置首选项更改***器。 onPreferenceChangeListenersetOnPreferenceChangeListenerPreference
现在再次运行该项目,看看它是如何工作的!
7.检索偏好值
要开始获取设置屏幕的首选项值,我们调用类getDefaultSharedPreference() 内部的 which PreferenceManager- 向其传递Context所需值的首选项对象。请注意,我们从SharedPreferences应用程序的默认值中获取值。
val prefs = PreferenceManager.getDefaultSharedPreferences(this)
prefs.getBoolean("checkbox", false).toString()
prefs.getString("ringtone", "<unset>")
prefs.getString("text", "<unset>")
prefs.getString("list", "<unset>")
您为我们要从中检索值的类型调用相应的 getter 方法 in SharedPreferences。您将键作为第一个参数传递给它,默认值是第二个参数。
8. 奖励:使用 Android Studio 模板
既然您已经了解了在 Android 中从头开始创建设置屏幕所涉及的 API,我将向您展示一个快捷方式,以便下次更快。您可以选择使用模板,而不是从头开始编写设置屏幕。
Android Studio 提供了遵循 Android 设计和开发最佳实践的代码模板。这些现有的代码模板(在 Java 和 Kotlin 中可用)可以帮助您快速启动您的项目。一种这样的模板可用于创建设置屏幕。
要在新项目中使用这个方便的功能,首先启动 Android Studio。
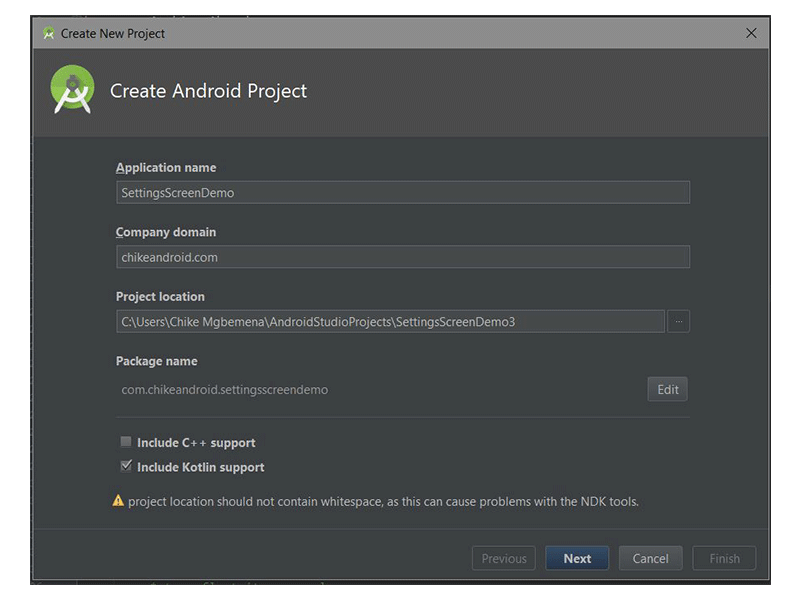
输入应用程序名称,然后单击 下一步 按钮。您可以在 Target Android Devices 对话框中保留默认设置。
再次单击 下一步 按钮。
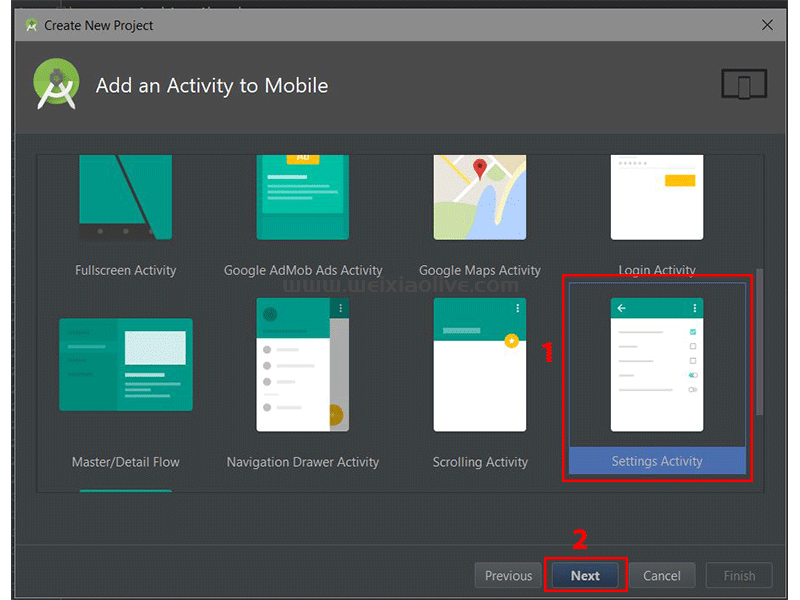 在 Add an Activity to Mobile 对话框中,向下滚动并选择 Settings Activity。 之后单击 下一步 按钮。
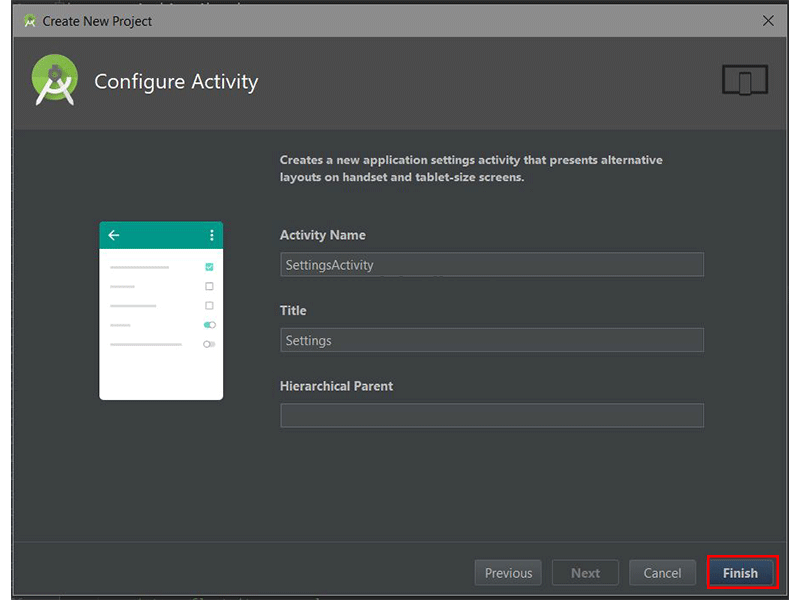 在最后一个对话框中,您可以根据需要重命名 Activity 名称、布局名称或标题。最后,单击 完成 按钮接受所有配置。
Android Studio 现在已经帮助我们创建了一个带有设置活动的项目。真的很酷!强烈建议您探索生成的代码。
您也可以为现有的 Android Studio 项目使用模板。只需转到 File > New > Activity > Settings Activity。
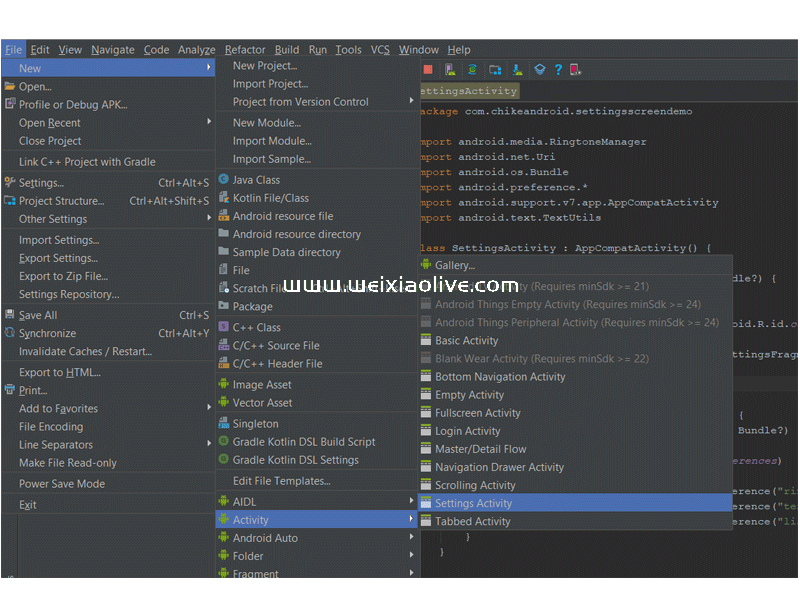 请注意,Android Studio 附带的模板适用于简单的布局和制作基本应用程序,但如果您想真正启动您的应用程序,您可以考虑 Envato Market 提供的一些应用程序模板。
对于经验丰富的开发人员来说,它们可以节省大量时间,帮助他们摆脱从头开始创建应用程序的困难,并将他们的才能集中在创建新应用程序的独特和定制部分上
结论
在本教程中,您学习了如何从头开始在 Android 中创建应用设置。我们还探讨了如何轻松快速地使用 Android Studio 模板来创建应用设置。
- 复选框首选项
- 切换偏好
- 编辑文本首选项
- 列表偏好
- 多选列表首选项
- 铃声偏好




![如何删除Word中的空白页[4种简单方法] 如何删除Word中的空白页[4种简单方法]](https://www.weixiaolive.com/en/zb_users/upload/2023/07/20230702124855168827333590644.png)

