Expo 是一组工具,可以更轻松地编写 react Native 应用程序。在本教程中,我将向您展示如何使用 Expo 快速创建 React Native 应用程序。
借助 Expo,开发人员可以创建 React Native 应用程序,而无需安装和配置软件依赖项(如android Studio、Xcode 或开发和运行 React Native 应用程序所需的所有其他工具)所带来的所有挫败感。
在本教程中,我将向您展示如何使用 Expo 创建一个简单的记忆游戏。在此过程中,您还将学习以下内容:
如何使用 Expo 提供的工具。这包括 CLI、SDK 和 Expo 客户端应用程序。
如何使用 Expo 创建一个 React Native 应用程序。
什么是世博会?
Expo致力于快速开发React Native 应用程序。它就像php开发人员的Laravel或 Symphony ,或 Ruby 开发人员的 Ruby on Rails。Expo 在 React Native api之上提供了一个层,使它们更易于使用和管理。它还提供了一些工具,可以更轻松地引导和测试 React Native 应用程序。最后,它提供的 UI 组件和服务通常仅在您安装第三方 React Native 组件时可用。所有这些都通过 Expo SDK 提供。
世博会的局限性
在您继续之前,重要的是要了解 Expo 的一些限制:
Expo 应用程序不支持后台代码执行。这意味着,例如,您不能运行在应用程序关闭时***位置变化的代码。
Expos 应用程序仅限于 Expo SDK 支持的原生 API。 这意味着,如果您的应用程序有一个非常特定的用例,例如与蓝牙外围设备通信,那么实现此类功能的唯一选择是使用普通的 React Native,或者使用名为 ExpoKit 的库编写本机代码。
Expo 将您锁定在他们的工具集中。这意味着您不能简单地安装和使用大多数 可用于 React Native 开发的优秀工具,例如命令行工具、脚手架和 UI 框架。但好在 Expo SDK 与普通的 React Native 应用程序兼容,因此当您从 Expo 中弹出应用程序时不会有任何问题。
Expo 应用程序的独立二进制文件只能在线构建。Expo 提供了一个名为Exp的命令行工具。这允许开发人员在 Expo 服务器上启动构建过程。完成后,将提供一个 URL 以下载.apk 或.ipa 文件。
即使有这些限制,重要的是要记住,Expo 是一个功能齐全的框架,对常用的 Android 或ios API 有很多支持。这意味着它已经涵盖了应用程序通常需要的大多数功能。因此,通常不需要在 Expo 之外实现本机功能。
应用概览
我们要创建的应用程序是一个记忆游戏。你可能对这种类型的游戏很熟悉——用户必须一次翻两张牌来寻找配对。这是默认屏幕的样子:
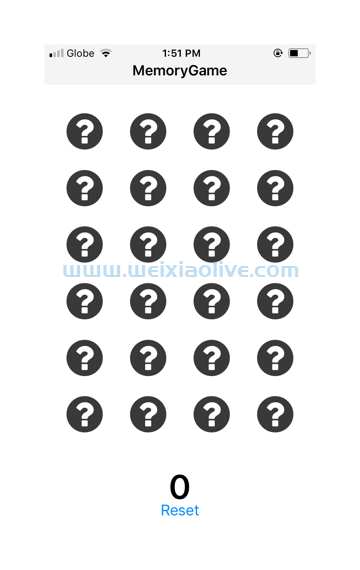
这是打开所有货币对后的样子:

一旦他们解决了游戏,用户可以点击重置 按钮将项目重置为初始状态。这使他们可以重新开始游戏。
安装世博会
与普通的 React Native 不同,您必须安装和配置 Android Studio 或 Xcode 和其他依赖项,使用 Expo 只需几个步骤即可开始开发应用程序:
下载并安装节点.js。Expo 的命令行工具和依赖管理依赖于 node.js 平台。
在您的iOS或Android设备上安装 Expo Client 。这用于在您开发应用程序时预览应用程序。
安装命令行工具。这允许您生成新的 Expo 项目、启动构建过程等等。执行以下命令来安装它:
npm install exp --global
生成新的 Expo 应用程序
安装完所有依赖项后,您现在可以生成一个新的 Expo 应用程序:
exp init MemoryGame
完成后,它将创建一个名为MemoryGame的新文件夹。在其中导航并开始运行开发服务器:
cd MemoryGame
exp start
或者,您也可以使用 Expo XDE。这允许您通过 GUI 创建和运行 Expo 应用程序。您可以从 Expo GitHub repo下载安装程序。目前,它只支持 Windows 和mac。因此,如果您使用的是 Ubuntu 或 Linux,最好暂时使用命令行。
开发服务器运行后,您现在应该能够看到如下内容:

那是指向项目实时预览的二维码。在您的手机上打开 Expo 客户端应用程序并使用 QR 扫描仪扫描代码。此时,您现在应该能够查看默认屏幕。每次您在任何项目文件上按Control-S 时,预览应该会自动重新加载以反映更改。
您可以在其GitHub 存储库中找到该项目的完整源代码 。或者,如果您想尝试一下该应用程序,您可以查看 演示。只需选择二维码,然后使用 Expo 客户端应用程序在您的手机上扫描它。
编写应用程序
现在我们已经准备好编写应用程序了。在我们回过头来实现主要组件之前,让我们从一些 UI 组件开始。
标题组件
标题用于显示应用程序的标题。创建一个组件 文件夹。在其中,创建一个Header.js 文件并添加以下内容:
import React from 'react';
import { StyleSheet, Text, View } from 'react-native';

export default class Header extends React.Component {

  render() {
    return (
      <View style={styles.header}>
        <Text style={styles.header_text}>MemoryGame</Text>
      </View>
    );
  }

}

const styles = StyleSheet.create({
  header: {
    flex: 1,
    flexDirection: 'column',
    alignSelf: 'stretch',
    paddingTop: 20,
    paddingBottom: 5,
    backgroundColor: '#f3f3f3'
  },
  header_text: {
    fontWeight: 'bold',
    fontSize: 17,
    textAlign: 'center'
  }
});
这只是一个基本的 React Native 组件,具有一些样式以匹配我们应用程序的 UI。
分数组件
接下来是显示分数的组件(components/Score.js):
import React from 'react';
import { StyleSheet, Text, View } from 'react-native';

export default class Score extends React.Component {

  render() {
    return (
      <View style={styles.score_container}>
        <Text style={styles.score}>{this.props.score}</Text>
      </View>
    );
  }

}

const styles = StyleSheet.create({
  score_container: {
    flex: 1,
    alignItems: 'center',
    padding: 10
  },
  score: {
    fontSize: 40,
    fontWeight: 'bold'
  }
});
同样,只是一个带有文本视图和一些基本样式的简单显示组件。
卡片组件
卡片组件(components/Card.js)将显示卡片。这些卡片使用Expo 矢量图标集中的图标。这是您使用 Expo 时开箱即用的功能之一:它包括来自FontAwesome、Entypo和ionicons等图标集的图标。
在下面的代码中,您可以看到我们只使用了 FontAwesome。它有我们想要显示卡片默认状态的图标:问号。正如您稍后将在主应用程序组件中看到的那样,我们还将使用来自 Entypo 和ionic ons 的图标。对这些图标源的引用将传递给该组件,因此无需在此处指定它们:
import React from 'react';
import { StyleSheet, Text, View, TouchableHighlight } from 'react-native';
import { FontAwesome } from '@expo/vector-icons'; // use FontAwesome from the expo vector icons在render()方法内部,如果卡片打开,我们只使用作为道具传递的源和图标。默认情况下,它只会显示来自 FontAwesome 的问号图标。但如果卡片是打开的,它将使用作为道具传递的图标源、图标和颜色。
每张牌都可以被点击。点击后,该clickCard() 函数将运行,该函数也通过 props 传递。稍后您将看到该函数的作用,但现在,只需知道它会更新状态以显示卡片上的图标:
export default class Card extends React.Component {

  render() {

    let CardSource = FontAwesome; // set FontAwesome as the default icon source
    let icon_name = 'question-circle';
    let icon_color = '#393939';

    if(this.props.is_open){
      CardSource = this.props.src;
      icon_name = this.props.name;
      icon_color = this.props.color;
    }

    return (
      <View style={styles.card}>
        <TouchableHighlight onPress={this.props.clickCard} activeOpacity={0.75} underlayColor={"#f1f1f1"}>
          <CardSource
            name={icon_name}
            size={50}
            color={icon_color}
          />
        </TouchableHighlight>
      </View>
    );
  }
}
不要忘记添加样式:
const styles = StyleSheet.create({
  card: {
    flex: 1,
    alignItems: 'center'
  },
  card_text: {
    fontSize: 50,
    fontWeight: 'bold'
  }
});
帮手
我们还将使用一个名为shuffle(). 这允许我们以随机顺序对卡片数组进行排序,以便每次重置游戏时它们的顺序都不同:
Array.prototype.shuffle = function() {
  var i = this.length, j, temp;
  if(i == 0) return this;
  while(--i){
   j = Math.floor(Math.random() * (i + 1));
   temp = this[i];
   this[i] = this[j];
   this[j] = temp;
  }
  return this;
}
主要部件
主要组件 ( App.js ) 包含主要的应用程序逻辑并将所有内容组合在一起。首先包括我们将使用的 React 和 Expo 包。这次我们使用了 Expo 矢量图标中的所有图标源:
import React from 'react';
import { StyleSheet, View, Button } from 'react-native';
import { Ionicons, FontAwesome, Entypo } from '@expo/vector-icons';
接下来,包括我们之前创建的组件和助手:
import Header from './components/Header';
import Score from './components/Score';
import Card from './components/Card';

import helpers from './helpers';
在构造函数中,我们首先创建表示唯一卡片的数组。src 是图标来源,是图标的名称(如果你想使用其他图标,你可以在GitHub 上name 找到名称 ) ,自然是图标的颜色:color
export default class App extends React.Component {

  constructor(props) {
    super(props);
    // bind the functions to the class
    this.renderCards = this.renderCards.bind(this);
    this.resetCards = this.resetCards.bind(this);

    // icon sources
    let sources = {
      'fontawesome': FontAwesome,
      'entypo': Entypo,
      'ionicons': Ionicons
    };

    // the unique icons to be used
    let cards = [
      {
        src: 'fontawesome',
        name: 'heart',
        color: 'red'
      },
      {
        src: 'entypo',
        name: 'feather',
        color: '#7d4b12'
      },
      {
        src: 'entypo',
        name: 'flashlight',
        color: '#f7911f'
      },
      {
        src: 'entypo',
        name: 'flower',
        color: '#37b24d'
      },
      {
        src: 'entypo',
        name: 'moon',
        color: '#ffd43b'
      },
      {
        src: 'entypo',
        name: 'youtube',
        color: '#FF0000'
      },
      {
        src: 'entypo',
        name: 'shop',
        color: '#5f5f5f'
      },
      {
        src: 'fontawesome',
        name: 'github',
        color: '#24292e'
      },
      {
        src: 'fontawesome',
        name: 'skype',
        color: '#1686D9'
      },
      {
        src: 'fontawesome',
        name: 'send',
        color: '#1c7cd6'
      },
      {
        src: 'ionicons',
        name: 'ios-magnet',
        color: '#d61c1c'
      },
      {
        src: 'ionicons',
        name: 'logo-facebook',
        color: '#3C5B9B'
      }
    ];

    // next: add code creating the clone and setting the cards in the state
  }

}请注意,我们不是直接为每个对象指定src as 或FontAwesome, 而是使用对象中使用的属性名称 。这是因为我们需要创建卡片数组的副本,以便每张卡片都有一对。使用数组方法创建副本,例如将创建数组的副本,但问题是一旦在副本或原始对象中修改了单个对象,两个数组也会被修改。 EntypoIoniconssourcesslice()
cards 这将我们带到下面的解决方案,即通过将数组转换为字符串然后对其进行解析以将其转换回数组来创建一个全新的对象。这就是我们使用字符串的原因,因为函数不能转换为字符串。然后我们将两者结合起来得到数组,其中包含我们需要的所有卡片:
let clone = JSON.parse(JSON.stringify(cards)); // create a completely new array from the array of cards

this.cards = cards.concat(clone); // combine the original and the clone
接下来,遍历该数组并为每个数组生成一个唯一 ID,设置图标源,然后将其默认设置为关闭状态:
// add the ID, source and set default state for each card
this.cards.map((obj) => {
  let id = Math.random().toString(36).substring(7);
  obj.id = id;
  obj.src = sources[obj.src];
  obj.is_open = false;
});
随机排序卡片并设置默认状态:
this.cards = this.cards.shuffle(); // sort the cards randomly

// set the default state
this.state = {
  current_selection: [], // this array will contain an array of card objects which are currently selected by the user. This will only contain two objects at a time.
  selected_pairs: [], // the names of the icons. This array is used for excluding them from further selection
  score: 0, // default user score
  cards: this.cards // the shuffled cards
}该render()方法呈现标题、卡片、分数和重置当前游戏的按钮。它使用该renderRows()函数来呈现各个卡片行。屏幕将有六行,每行包含四张卡片:
render() {
  return (
    <View style={styles.container}>
      <Header />
      <View style={styles.body}>
        {
          this.renderRows.call(this)
        }
      </View>
      <Score score={this.state.score} />
      <Button
        onPress={this.resetCards}
        title="Reset"
        color="#008CFA"
      />
    </View>
  );
}这是该renderRows()函数的代码。这使用了该getRowContents()函数,该函数负责创建一个数组数组,每个数组包含四个项目。这允许我们渲染每一行,然后为函数的每次迭代使用另一个函数来渲染卡片map():
renderRows() {

  let contents = this.getRowContents(this.state.cards);
  return contents.map((cards, index) => {
    return (
      <View key={index} style={styles.row}>
        { this.renderCards(cards) }
      </View>
    );
  });

}这是getRowContents()功能:
getRowContents(cards) {
  let contents_r = [];
  let contents = [];
  let count = 0;
  cards.forEach((item) => {
    count += 1;
    contents.push(item);
    if(count == 4){
      contents_r.push(contents)
      count = 0;
      contents = [];
    }
  });

  return contents_r;
}接下来是renderCards()功能。这接受卡片对象数组并通过Card组件呈现它们。我们在这里需要做的就是将每个卡片对象的各个属性作为道具传递。然后使用它来呈现正确的图标,正如您在Card组件的代码中看到的那样。该clickCard()函数也作为道具传递。卡 ID 被传递给该函数,以便可以识别和更新唯一卡:
renderCards(cards) {
  return cards.map((card, index) => {
    return (
      <Card
        key={index}
        src={card.src}
        name={card.name}
        color={card.color}
        is_open={card.is_open}
        clickCard={this.clickCard.bind(this, card.id)}
      />
    );
  });
}在clickCard() 函数内部,我们获取所选卡的详细信息并检查是否应进一步处理:
clickCard(id) {
  let selected_pairs = this.state.selected_pairs;
  let current_selection = this.state.current_selection;
  let score = this.state.score;

  // get the index of the currently selected card
  let index = this.state.cards.findIndex((card) => {
    return card.id == id;
  });

  let cards = this.state.cards;

  // the card shouldn't already be opened and is not on the array of cards whose pairs are already selected
  if(cards[index].is_open == false && selected_pairs.indexOf(cards[index].name) === -1){

    // next: add code for processing the selected card

  }

}
现在让我们填写处理选定卡片的代码。
首先,我们打开卡片并将其添加到当前选择的卡片数组中:
cards[index].is_open = true;

current_selection.push({
  index: index,
  name: cards[index].name
});

// next: add code for determining whether the user has selected the correct pair or not一旦当前选择的卡片数组中有两个项目,我们检查图标名称是否相同。如果是,则意味着用户选择了正确的配对。如果它们不相同,则它是不正确的对。在这种情况下,我们关闭选择的第一张卡,然后在关闭第二张卡之前添加一点延迟。(这样用户可以在卡片恢复到关闭状态之前看到卡片图标。)
if(current_selection.length == 2){
  if(current_selection[0].name == current_selection[1].name){
    score += 1; // increment the score
    selected_pairs.push(cards[index].name);
  }else{
    cards[current_selection[0].index].is_open = false; // close the first

    // delay closing the currently selected card by half a second.
    setTimeout(() => {
      cards[index].is_open = false;
      this.setState({
        cards: cards
      });
    }, 500);
  }

  current_selection = [];
}

// next: add code for updating the state
我们需要在 click事件处理程序中做的最后一件事是更新状态以反映 UI 中的更改:
this.setState({
  score: score,
  cards: cards,
  current_selection: current_selection
});一个相关的功能是重置事件处理程序。当点击重置 按钮时,我们只需通过关闭所有卡片并洗牌来恢复默认状态。
resetCards() {
  // close all cards
  let cards = this.cards.map((obj) => {
    obj.is_open = false;
    return obj;
  });

  cards = cards.shuffle(); // re-shuffle the cards

  // update to default state
  this.setState({
    current_selection: [],
    selected_pairs: [],
    cards: cards,
    score: 0
  });
}
最后,我们将添加一些基本样式以使我们的应用程序看起来不错。
const styles = StyleSheet.create({
  container: {
    flex: 1,
    alignSelf: 'stretch',
    backgroundColor: '#fff'
  },
  row: {
    flex: 1,
    flexDirection: 'row'
  },
  body: {
    flex: 18,
    justifyContent: 'space-between',
    padding: 10,
    marginTop: 20
  }
});
测试应用程序
由于您的 Expo 开发服务器一直在运行,因此每个更改都应该通过实时重新加载推送到您的移动设备。试用该应用程序并确保它按预期工作。
结论
而已!在本教程中,您学习了如何使用 Expo XDE 快速连接 React Native 应用程序。Expo 是开始开发 React Native 应用程序的一种非常好的方式,因为它消除了安装大量软件的需要,而这通常是令人沮丧的原因,尤其是对于初学者而言。它还提供了一些工具,使在开发应用程序时预览应用程序变得非常容易
- 标题组件
- 分数组件
- 卡片组件
- 帮手
- 主要部件
- 测试应用程序




![如何删除Word中的空白页[4种简单方法] 如何删除Word中的空白页[4种简单方法]](https://www.weixiaolive.com/en/zb_users/upload/2023/07/20230702124855168827333590644.png)

