在本教程中,我们将学习如何在不使用 Bootstrap 之类的框架或第三方库的情况下构建 javascript 弹出模式(弹出窗口)。我们将从头开始构建整个东西,让我们完全控制它的工作方式和外观。
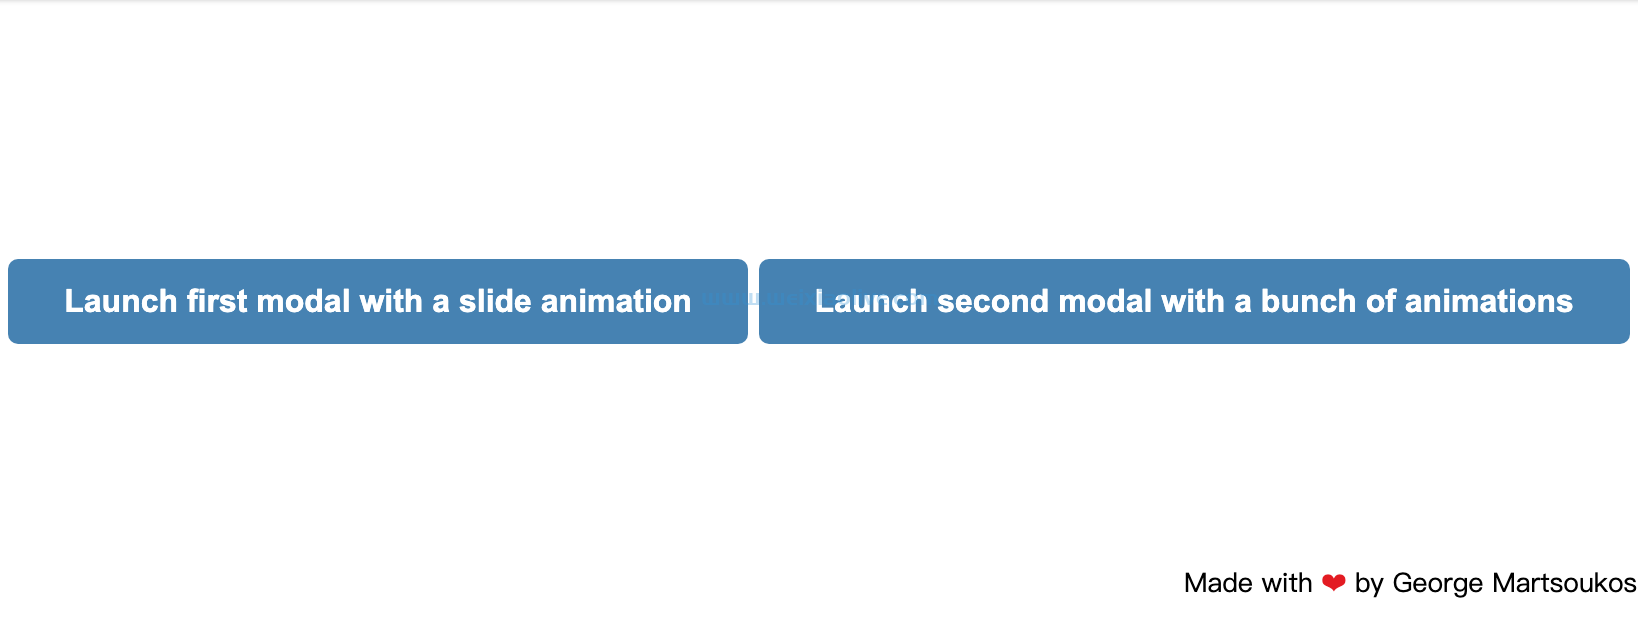
这是我们将要创建的演示:
See the Pen How to Build a Modal With HTML, CSS, & JavaScript by Envato Tuts+ (@tutsplus) on CodePen.
1. 从页面标记开始
首先,我们将创建一个模态。为此,我们将向.modal容器添加类和唯一 ID。接下来,我们将通过将 .modal-dialog 元素设置为.modal. 该对话框将保存模态内容。这可以是任何类型的内容,如文本、图像、灯箱、用户通知/警报等。
“弹出窗口(或模式)是一个小的 UI 元素,将出现在网站的前台,通常作为提示用户做某事而触发” – Adi Purdila
要打开模式,我们需要任何具有data-open属性的元素(通常是 a button)。此属性的值应该是所需模式的 ID。
默认情况下,如果我们在其边界之外单击或Esc按下键,模态框将关闭。但是如果我们单击任何具有该data-close属性的元素(通常是 a button),我们也可以关闭它。
最初,模态将出现/消失并带有淡入淡出效果。但是我们可以通过data-animation属性来调整对话框的动画效果。必须添加到的此属性的值.modal 可以是以下任何值:
slideInOutDown
slideInOutTop
slideInOutLeft
slideInOutRight
zoomInOut
rotateInOutDown
mixInAnimations
我们将在接下来的部分中仔细研究这些值。
现在,让我们熟悉表示单个模态所需的标记:
<button type="button" class="open-modal" data-open="modal1">...</button>
<div class="modal" id="modal1">
<div class="modal-dialog">
<header class="modal-header">
...
<button class="close-modal" aria-label="close modal" data-close>✕</button>
</header>
<section class="modal-content">...</section>
<footer class="modal-footer">...</footer>
</div>
</div>
2. 定义一些基本样式
准备好标记后,我们将设置一些 css 变量并重置样式:
:root {
--lightgray: #efefef;
--blue: steelblue;
--white: #fff;
--black: rgba(0, 0, 0, 0.8);
--bounceEasing: cubic-bezier(0.51, 0.92, 0.24, 1.15);
}
* {
padding: 0;
margin: 0;
}
button {
cursor: pointer;
background: transparent;
border: none;
outline: none;
font-size: inherit;
}
接下来,我们将水平和垂直居中页面内容。另外,我们将为负责打开模式的按钮提供一些样式:
/*CUSTOM VARIABLES HERE*/
body {
display: flex;
align-items: center;
justify-content: center;
height: 100vh;
font: 16px/1.5 sans-serif;
}
.btn-group {
text-align: center;
}
.open-modal {
font-weight: bold;
background: var(--blue);
color: var(--white);
padding: .75rem 1.75rem;
margin-bottom: 1rem;
border-radius: 5px;
}
在这一点上,我们将把注意力集中在模态样式上。
每个模态将具有以下 特征:
它将是固定位置的全屏显示。也就是说,它看起来像一个覆盖整个窗口宽度和高度的叠加层。
它将具有深色背景颜色。
默认情况下会隐藏。
对话框将水平和垂直居中。
/*CUSTOM VARIABLES HERE*/
.modal {
position: fixed;
top: 0;
left: 0;
right: 0;
bottom: 0;
display: flex;
align-items: center;
justify-content: center;
padding: 1rem;
background: var(--black);
cursor: pointer;
visibility: hidden;
opacity: 0;
transition: all 0.35s ease-in;
}
该对话框将具有最大宽度和最大高度。它的高度将是窗口高度的 80%。如果它的高度超过该值,将出现一个垂直滚动条:
/*CUSTOM VARIABLES HERE*/
.modal-dialog {
position: relative;
max-width: 800px;
max-height: 80vh;
border-radius: 5px;
background: var(--white);
overflow: auto;
cursor: default;
}
最后,我们将为各个内容部分定义一些简单的样式:
/*CUSTOM VARIABLES HERE*/
.modal-dialog > * {
padding: 1rem;
}
.modal-header,
.modal-footer {
background: var(--lightgray);
}
.modal-header {
display: flex;
align-items: center;
justify-content: space-between;
}
.modal-header .modal-close {
font-size: 1.5rem;
}
.modal p + p {
margin-top: 1rem;
}
3. 切换模态
一个页面可以有多个模式。但正如前面已经讨论过的,所有模式最初都将被隐藏。
打开模式
同样,一个页面可以有多个打开的触发器(具有data-open属性的元素)。每次单击触发器时,关联的模态都应该通过淡入动画变得可见。请记住,data-open属性值必须与模式的 ID 匹配。
这是显示模态的脚本:
const openEls = document.queryselectorAll("[data-open]");
const isVisible = "is-visible";
for(const el of openEls) {
el.addeventListener("click", function() {
const modalId = this.dataset.open;
document.getElementById(modalId).classList.add(isVisible);
});
}
以及相关的 CSS 类:
.modal {
visibility: hidden;
opacity: 0;
transition: all 0.35s ease-in;
}
.modal.is-visible {
visibility: visible;
opacity: 1;
}
关闭模式
在我们的实现中,一次只能出现一个模式(此代码不支持嵌套模式)。如上面的标记部分所述,有三种方法可以使用淡出效果隐藏它。
让我们回顾一下。
首先通过单击[data-close]位于模式内的自定义元素:
const closeEls = document.querySelectorAll("[data-close]");
const isVisible = "is-visible";
for (const el of closeEls) {
el.addEventListener("click", function() {
this.parentElement.parentElement.parentElement.classList.remove(isVisible);
});
}
其次,通过单击模态之外的所有内容:
const isVisible = "is-visible";
document.addEventListener("click", e => {
if (e.target == document.querySelector(".modal.is-visible")) {
document.querySelector(".modal.is-visible").classList.remove(isVisible);
}
});
在这种情况下,模态(覆盖)表现为一个巨大的关闭按钮。出于这个原因,我们给了它cursor: pointer。
最后按一下Esc键:
const isVisible = "is-visible";
document.addEventListener("keyup", e => {
if (e.key == "Escape" && document.querySelector(".modal.is-visible")) {
document.querySelector(".modal.is-visible").classList.remove(isVisible);
}
});
现在是查看我们迄今为止创建的内容的好时机:
See the Pen How to Build a Modal With HTML, CSS, & JavaScript: stage 1 by Envato Tuts+ (@tutsplus) on CodePen.
模态看起来不错!请注意,每次我们单击打开的触发器时,只会加载相应的模态。
让我们更进一步,研究一些动画对话的想法。
4.添加对话框动画
就像我们之前说的,模态框的默认行为是淡入淡出。但是可以选择调整弹出窗口的动画效果。
我已经创建了一堆动画效果,您可以将它们用作淡入淡出效果的替代品。为此,只需将data-animation="yourDesiredAnimation" 属性传递给.modal.
例如,如果您希望对话框显示从左到右的幻灯片动画,您将需要该 slideInOutLeft效果。
在幕后,有两条规则可以完成这个所需的动画:
/*CUSTOM VARIABLES HERE*/
[data-animation="slideInOutLeft"] .modal-dialog {
opacity: 0;
transform: translateX(-100%);
transition: all 0.5s var(--bounceEasing);
}
[data-animation="slideInOutLeft"].is-visible .modal-dialog {
opacity: 1;
transform: none;
transition-delay: 0.2s;
}
在此处检查具有此类动画的模态:
See the Pen How to Build a Modal With HTML, CSS, & JavaScript: stage 1 by Envato Tuts+ (@tutsplus) on CodePen.
您可以通过查看 最终演示项目的CSS选项卡来检查其余动画。根据动画的复杂性,我使用 CSS 过渡或动画来构建它们。
我还使用了cubic-bezier()为所有转换设置计时功能的功能。如果您不喜欢产生的反弹效果,请随意通过--bounceEasingCSS 变量将其更改为更平滑的效果。
在这里查看所有动画效果的最终演示:
See the Pen How to Build a Modal With HTML, CSS, & JavaScript by Envato Tuts+ (@tutsplus) on CodePen.
结论
就是这样,伙计们!在本教程中,我们学习了如何在不依赖任何前端框架的情况下构建自定义动画模式对话框。
我希望你喜欢最终的结果,并且构建它有助于刷新你的前端技能。
请记住,我们没有考虑可访问性,所以如果你想增强这个演示,那肯定是下一步。
一如既往,感谢您的阅读!
- 打开模式
- 关闭模式




![如何删除Word中的空白页[4种简单方法] 如何删除Word中的空白页[4种简单方法]](https://www.weixiaolive.com/en/zb_users/upload/2023/07/20230702124855168827333590644.png)

