Meteor项目是一个开源 Web 应用程序开发平台,使您能够创建完全用javascript编写的应用程序。
Meteor 为基本的 Web 应用程序需求提供开发工具,使其自然适用于一般的初创企业和新项目。它提供了一些功能,例如从一个代码库(ios、android、桌面)部署到许多设备,并支持开箱即用的热推送更新。
这意味着您可以在用户设备上更新应用程序,而无需等待 App Store 批准。通过 npm 和它自己的 Atmosphere 库提供的大量软件包使 Meteor 成为一个有趣的工具。
Meteor中的快速开发
三年前,我开始使用 Meteor 的主要原因之一是它必须能够在数小时内快速交付一个有效的 Web 应用程序。它使我能够满足客户的高期望和他们的首轮融资预算。
最后,有了这个网络框架,可以容纳伟大的想法和一个不起眼的开始,顶级的响应式移动网络应用程序在单人开发团队的范围内。
NPM + 氛围包
Meteor 中可以使用任何包npm,因此如果您喜欢使用 Grunt、Browserify、webpack、Bootstrap、react、jquery和 angular等工具,那么在 Meteor 中使用这些工具不会有任何问题。
要搜索新包:
对于 npm 包,请使用 npmjs.com。
对于 Meteor 包,请使用 大气js.com。
要在 Meteor 中安装 npm 包,只需运行:
$meteor npm install --save browserify
运行此命令将更新您 package.json 的依赖项,并将包下载到您的应用程序的本地 node_modules/ 目录中。
版本控制
重要说明:为了可移植性,我建议您不要将其提交 node_modules/ 到 git 中,而是在传递给新开发人员时要求他们运行 ,这将安装所有需要meteor npm install的软件包。
用户帐户
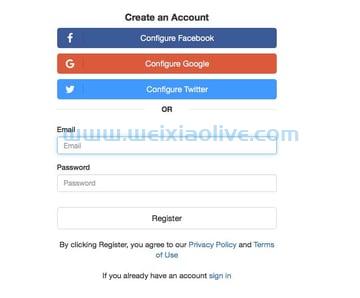
accounts-ui包使用户能够登录和注册应用程序,它还提供 oauth 支持,将其与 Meteor Accounts 接口 。
出于品牌和传播目的,自定义电子邮件验证 ( sendVerificationEmail) 或邀请 ( sendEnrollmentEmail) 以适应应用程序的整体主题是常见的请求。
在 Meteor 中处理 html 电子邮件的一个好方法是使用 yogiben 的漂亮电子邮件包。
meteor add yogiben:pretty-email
现在您只需几行即可更改验证电子邮件:
PrettyEmail.defaults.verifyEmail =
  heading: 'Yo - You Need to activate your account on mega mushrooms'
  buttonText: 'Activate'
  ...
对于您的公司信息,您可以PrettyEmail.options像这样配置:
PrettyEmail.options =
  from: 'support@mycompany.com'
  logoUrl: 'http://mycompany.com/logo.png'
  companyName: 'myCompany'
  companyUrl: 'http://mycompany.com'
  companyAddress: '123 Street, ZipCode, City, Country'
  companyTelephone: '+1234567890'
  companyEmail: 'support@mycompany.com'
  siteName: 'mycompany'
要发送电子邮件,请使用以下方法:
Accounts.sendVerificationEmail
Meteor.userId()Accounts.sendResetPasswordEmail
Meteor.userId()Accounts.sendEnrollmentEmail
Meteor.userId()
如果要添加模板,可以通过自定义以下选项来实现:
PrettyEmail.send 'call-to-action',
  to: 'myuser@myuser.com'
  subject: 'You got new message'
  heading: 'Your friend sent you a message'
  message: 'Click the button below to read the message'
  buttonText: 'Read message'
  buttonUrl: 'http://mycompany.com/messages/2314'
  messageAfterButton: "I come after the button!"
改变风格也很容易:
PrettyEmail.style =
  fontFamily: 'Helvetica'
  textColor: '#606060'
  buttonColor: '#FFFFFF'
  buttonBgColor: '#007FFF
以下是用户将在其电子邮件客户端中收到的激活电子邮件示例。

漂亮的电子邮件在社交、反向链接、页眉和页脚等方面有更多的选择——在 手册页上阅读更多内容。
棘轮、物化和引导支持
这些流行的前端库以及 ionic也有用户帐户包。每个都可以完全配置以满足您的需求。
棘轮:
meteor add useraccounts:ratchet离子:
meteor add useraccounts:ionic引导程序:
meteor add useraccounts:bootstrap实现:
meteor add useraccounts:materialize
用户界面
与用户帐户类似,有一些包可用于流行的前端库,如 Bootstrap、Angular、React 和 Blaze 模板引擎,以及许多其他库,如Semantic UI。
搜索大气会产生很多结果;这里有一些我的最爱:
角度包: angularui
语义 UI 集成: Semantic-UI-Meteor
Blaze Components(用于 blaze 的可重用组件): blaze-components
离子成分: 陨石:离子
棘轮框架: pcjpcj2:ratchet
反应 + 引导
你需要先安装 React npm 包:
$ npm install --save react react - dom
$ npm install --save react-bootstrap
现在,对于流星包,运行 meteor add universe:react-bootstrap.
你现在可以在你的 React jsx中使用Bootstrap 组件:
const buttonsInstance = (
  <div>
    <ButtonToolbar>
      <Button bsStyle="primary" bsSize="large">Large button</Button>
      <Button bsSize="large">Large button</Button>
    </ButtonToolbar>
    <ButtonToolbar>
      <Button bsStyle="primary">Default button</Button>
      <Button>Default button</Button>
    </ButtonToolbar>
    <ButtonToolbar>
      <Button bsStyle="primary" bsSize="small">Small button</Button>
      <Button bsSize="small">Small button</Button>
    </ButtonToolbar>
    <ButtonToolbar>
      <Button bsStyle="primary" bsSize="xsmall">Extra small button</Button>
      <Button bsSize="xsmall">Extra small button</Button>
    </ButtonToolbar>
  </div>
);

ReactDOM.render(buttonsInstance, mountNode);
页面转换
如果您使用的是 Iron Router,那么您可以使用meteor-transitioner包。在 Blaze 模板上工作,在 { 周围添加以下把手{yield}}:
{{#transitioner}}
  {{> yield}}
{{/transitioner}}
现在设置路线之间的过渡:
Transitioner.transition({
    fromRoute: 'fromRouteName',
    toRoute: 'toRouteName',
    velocityAnimation: {
        in: animation,
        out: animation
    }
})有关转换的更多信息,请查看自述文件。
蒙哥
为了在 Web 浏览器中编辑 mongo 数据库,Mongol工具是我用过的最好的工具之一。一旦你安装了蒙古语:
$ meteor add msavin:mongol
只需按下Control-M,您就可以通过浏览器内的完整 CRUD 支持访问您的收藏。
我发现在调试新应用程序或对现有应用程序的数据更改时使用 Mongol 非常有用。

浏览器扩展
对于在 chrome 中工作的用户,有一个名为MiniMongo的 Mongo 插件可用 ,它可以让您在开发人员工具窗格中浏览 Meteor 数据库。
如果您想自己构建源代码,可以在 GitHub 上找到MiniMongo Explorer 项目。
部署
使用出色的免费工具 ,您可以在几分钟内 mup将站点部署到 Digital Ocean vpn 。
配置非常简单,如果您想启用 HTTPS,您只需要拥有您的应用程序、SSH 凭据和 SSL 证书即可。
要设置mup,首先创建一个部署目录:
$ cd meteor-app
$ mkdir .deploy
$ cd .deploy
安装mup:
$ npm install -g mup
初始化目录:
$ mup init
现在您需要通过设置通过上一步创建的 mup.js 文件来配置部署。
module.exports = {
  servers: {
    one: {
      host: '1.2.3.4',
      username: 'root',
      // pem: '/home/user/.ssh/id_rsa',
      // password: 'password',
      // or leave blank to authenticate using ssh-agent
      opts: {
        port: 22,
      },
    }
  },

  meteor: {
    name: 'app',
    path: '../app',
    // lets you add docker volumes (optional)
    volumes: {
      // passed as '-v /host/path:/container/path' to the docker run command
      '/host/path': '/container/path',
      '/second/host/path': '/second/container/path'
    },
    docker: {
      // Change the image to 'kadirahq/meteord' if you
      // are using Meteor 1.3 or older
      image: 'abernix/meteord:base' , // (optional)
      imagePort: 80, // (optional, default: 80)

      // lets you add/overwrite any parameter on
      // the docker run command (optional)
      args: [
        '--link=myCustommongodb:myCustomMongoDB', // linking example
        '--memory-reservation 200M' // memory reservation example
      ],
      // (optional) Only used if using your own ssl certificates.
      // Default is "meteorhacks/mup-frontend-server"
      imageFrontendServer: 'meteorhacks/mup-frontend-server',
      // lets you bind the docker container to a
      // specific network interface (optional)
      bind: '127.0.0.1',
      // lets you add network connections to perform after run
      // (runs docker network connect <net name> for each network listed here)
      networks: [
        'net1'
      ]
    },

     // list of servers to deploy, from the 'servers' list
    servers: {
      one: {}, two: {}, three: {}
    },

    buildOptions: {
      // skip building mobile apps, but still build the web.cordova architecture
      serverOnly: true,
      debug: true,
      cleanAfterBuild: true, // default
      buildLocation: '/my/build/folder', // defaults to /tmp/<uuid>

      // set serverOnly: false if want to build mobile apps when deploying

      // Remove this property for mobileSettings to use your settings.json
      // (optional)
      mobileSettings: {
        yourMobileSetting: 'setting value'
      },
      server: 'http://app.com', // your app url for mobile app access (optional)
       // adds --allow-incompatible-updates arg to build command (optional)
      allowIncompatibleUpdates: true,
    },
    env: {
      // PORT: 8000, // useful when deploying multiple instances (optional)
      ROOT_URL: 'http://app.com', // If you are using ssl, this needs to start with https
      MONGO_URL: 'mongodb://localhost/meteor'
    },
    log: { // (optional)
      driver: 'syslog',
      opts: {
        'syslog-address': 'udp://syslogserverurl.com:1234'
      }
    },
    ssl: {
      // Enables let's encrypt (optional)
      autogenerate: {
        email: 'email.address@domain.com',
        domains: 'website.com,www.website.com' // comma separated list of domains
      }
    },
    deployCheckWaitTime: 60, // default 10
    // lets you define which port to check after the deploy process, if it
    // differs from the meteor port you are serving
    // (like meteor behind a proxy/firewall) (optional)
    deployCheckPort: 80,

    // Shows progress bar while uploading bundle to server (optional)
    // You might need to disable it on CI servers
    enableUploadProgressBar: true // default false.
  },

  mongo: { // (optional)
    port: 27017,
    version: '3.4.1', // (optional), default is 3.4.1
    servers: {
      one: {},
    },
  },
};现在设置服务器:
$ mup setup
并部署:
$ mup deploy
您将在终端中看到对流程每个步骤的确认。部署完成后,该应用程序现在在您的服务器上运行,您可以在浏览器中查看它。
有关 SSL 配置的更多信息,请参阅本指南。
缓存
Meteor 自带appcache,第一次加载后会缓存应用,但不能离线使用。
如果您想离线缓存,则需要使用GroundMeteor。这是一个仅适用于 LocalCollection 的客户端存储。
例如,我们可以监控一个集合并将其存储在本地:
local = new Ground.Collection('offlineCache');

local.observeSource(data.find());

Meteor.setTimeout(() => {
  // Stop observing - keeping all documents as is
  local.stopObserver();
}, 1000);在这里,Data.find() 出版物的内容将被缓存到离线地面集合中。
密钥存储缓存
对于内存 keystore 缓存,您可以使用memcache包或 redis 包 来使您能够访问服务器上的数据缓存。
该包假定 memcache 或 redis 服务器已经在运行,然后可以将 key 存储在 memcache 中。
var memcached = new Memcached( [ 'localhost:11211', 'localhost:11212'] );

  memcached.set( "key", "value", 2, function (err, res) {
    console.log("memcached set action response", err, res);
  });
或者在 Redis 集合中:
var redisCollection = new Meteor.RedisCollection("redis");

Meteor.publish("movies", function () {
  return redisCollection.matching("movies-*");
});
redis 的实现非常好,因为它可以通过 Meteor 的发布/订阅架构进行广播。
开发工具
除了已经提到的工具之外, Chrome for Meteor 中提供的类似 Firebug 的浏览器扩展 使调试变得更加容易。您可以在 DDP 选项卡中轻松监控从服务器传递到客户端的数据,并通过 Blaze 检查器查看您的 Blaze 模板。

IDE 工具
为了在 Sublime 文本编辑器中进行开发,Tern.js 包的自定义版本为 Meteor 提供了自动补全功能。在 GitHub 上下载。
JetBrains 提供 Meteor 项目与语法高亮和调试的自动集成。Atom 还为语法、代码片段和自动完成 提供了几个包。
锅炉板

如果您只是想快速使用已经设置好的应用程序,您可以查看yogiben 的启动器。 流星厨师也有一个很好的基础开胃菜。如果您想使用 React,您可以查看这个Yeoman 生成器作为起点。
为了进一步帮助启动您的应用程序, Meteor Kitchen将提供一个用于路线和配置的 GUI。
管理面板

如果您使用的是 Yogiben 的Meteor Starter,您还可以确保 他创建的管理面板可以正常工作。几乎所有其他使用 mongo 和 blaze 的项目都应该适用于此,尽管 React Router 应用程序可能与 Iron Router 有冲突。
管理面板的主题是可扩展的,您可以阅读 文档。
来自陨石的流星

在我们结束之前,让我给你一些 Meteor 项目的背景知识。Meteor 于 2012 年 1 月公开发布,这是 Y Combinator 孵化器项目的结果,该项目从风险投资公司 Andreessen Horowitz 获得了 1120 万美元的资金。
它最初是用一个名为 Meteorite 的包管理器(mrt 在 cli 上)启动的,可扩展性一直是 Meteor 的核心元素。随着 Meteor 0.9 的发布,随着 Atmosphere 包的推出,情况发生了翻天覆地的变化。
将包添加到 Meteor 应用程序变得像 meteor add mrt:moment.
随着该项目的持续发展,它引起了公众的兴趣,并被新老开发商广泛采用。我相信,实现这一点的核心驱动因素之一是能够在 JavaScript 中完全工作的灵活性——客户端和服务器。
最初,npm 包不可用,直到 Meteor 发布 1.3 版,这标志着迄今为止开发周期中的一个重要里程碑。
完全使用 javaScript 工作意味着 Meteor 现在能够与现有 JS 和 Node 库的庞大库进行交互,并集成了 npm. 这为 Meteor 提供了作为框架的前沿。
它提供了我们在 Web 开发方面取得进展的视角,当然要考虑 Meteor 的巨大威力, npm 以及它的氛围包提供给您的指尖。这与我们过去在 Flash、NotePad/Dreamweaver 和php 3的 pre-jQuery、pre-npm、pre-Bower 时代的工作方式相比有了很大的改变。我曾在超过十名员工制作的作品听起来并不荒谬,一两个开发人员在 Meteor 中可以在几周内完成。
有了这些工具供您使用,现在正是成为具有技术头脑的网络企业家的最佳时机。自己构建您梦想中的应用程序当然是触手可及的。
例如,今天早些时候,我将数据库支持的 CMS 与完整的用户系统和管理后台与 Facebook 和 Google+ oAuth 登录组合在一起。我把它部署到一个新的服务器上与人们共享调试,我可以看到实时更改的数据。
Meteor 的使用速度真的很快。表单验证已完成,只需八小时的开发时间,明天即可开始正确的数据输入工作。
结论
Meteor 是一个强大而强大的 Web 应用程序引擎,它可以让您在应用程序开发中领先一步。
希望这里提到的软件包和建议能让您立即制作您的应用程序。对我来说,在短时间内实现我的应用创意意味着创造力蓬勃发展,创新更容易。
您可以轻松地加快开发速度,因为在 Meteor 中几乎所有东西都有一个包,而且更多的重点是配置,这使得开发体验更好。
要获得有关特定项目问题的支持,您可能希望在 GitHub 上搜索该项目并在存储库中提出问题以供开发人员处理。
如果您正在寻找有关 Meteor 的更多建议, 官方论坛 总是一个很好的提问场所。
- 版本控制
- 棘轮、物化和引导支持
- 反应 + 引导
- 页面转换
- 浏览器扩展
- 密钥存储缓存
- IDE 工具
- 锅炉板
- 管理面板




![如何删除Word中的空白页[4种简单方法] 如何删除Word中的空白页[4种简单方法]](https://www.weixiaolive.com/en/zb_users/upload/2023/07/20230702124855168827333590644.png)

