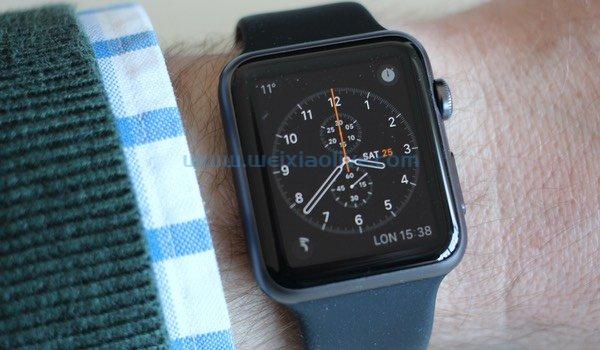
在执行快速、简单的任务时,可穿戴应用程序具有优势,因为戴在手腕上的智能手表总是比随身携带的智能手机或平板电脑更容易使用。
但是没有完美的小工具,没有人对他们的智能手表的电池寿命赞不绝口,或者声称它与他们的智能手机或平板电脑一样快速和强大。
为了提供最佳的用户体验,您需要发挥设备的优势。如果您正在为 Wear OS(以前称为 android-Wear 的操作系统)进行开发,那么您将处于一个独特的位置,可以从两种截然不同的设备中挑选出最佳功能。
基本上,您可以两全其美!
在本文中,我将向您展示如何通过打开两者之间的沟通渠道,充分利用 Android OS 和 Wear OS 所提供的一切。一旦您的手持应用程序和它的可穿戴应用程序聊天,您就可以根据最适合的设备委派任务——无论是将电池密集型任务卸载到手持设备,还是通过显示来确保您的应用程序的最重要信息始终易于访问在用户的手腕上。
在本文结束时,您将创建一个手持和可穿戴应用程序,可以通过可穿戴数据层和MessageClient api交换信息。
什么是可穿戴数据层?
可穿戴数据层提供对各种客户端类的访问,您可以使用这些类来存储和检索数据,而无需亲自处理数据序列化等技术细节。一旦这些信息在数据层上,手持设备和可穿戴设备都可以访问它。
在本文中,我们将重点介绍MessageClientAPI,它是一种单向通信机制,您可以使用它向可穿戴数据层发送信息。此 API 对于执行远程过程调用 (RPC) 特别方便,例如Activity在配对的手持或可穿戴设备上远程启动。
让我们看一个示例:假设您已经创建了一个导航应用程序。此应用程序需要 a) 检索位置更新日期,以及 b) 为用户提供指示。
监控设备的位置是一项密集型任务,可能会迅速耗尽典型可穿戴设备可用的有限电池。使用MessageClientAPI,您的可穿戴应用程序可以指示其手持设备执行这项工作。一旦手持设备完成了这项繁重的工作,它就可以通过数据层将生成的信息发送回可穿戴设备,这样您的应用程序就可以获取所需的信息,而无需消耗可穿戴设备的剩余电池电量。
一般来说,如果您的可穿戴应用程序需要执行需要大量电池或处理能力的任务,或者需要复杂的用户交互,那么您应该考虑将这项工作卸载到相应的手持应用程序上。相比之下,如果您的应用处理对时间特别敏感的信息,或者用户可能在旅途中访问的内容,那么您应该在可穿戴应用上显示这些信息。
在我们的导航应用示例中,将每组路线从手持设备推送到可穿戴设备可以更轻松地获取这些信息,特别是对于那些外出走动、迷路的人!
开箱即用的MessageClientAPI 是一种单向通信机制,但您可以通过在项目的手持和可穿戴模块中创建发送者和接收者来实现双向消息传递——这正是我们要做的。
创建可穿戴和手持模块
在本文中,我们将创建一个可穿戴应用程序,该应用程序将识别其手持设备何时向数据层发送新消息。然后,该可穿戴应用程序将通过检索此消息并将其显示为其 UI 的一部分来响应。
然后,我们将冲洗并重复,创建一个手持应用程序来监控数据层从其可穿戴设备发送的消息。
通过MessageClientAPI 发送的信息只能由创建它的应用程序访问。如果系统要将您的可穿戴设备和手持设备识别为属于同一应用程序,则它们需要具有相同的包名称、版本代码和签名证书。勾选所有这些框的最简单方法是创建一个包含可穿戴和手持模块的项目:
创建一个名为dataLayer的新项目。
在目标Android 设备屏幕上,选择Phone and Tablet and Wear。单击下一步。
对于您的手机和平板电脑模块,选择Empty Activity模板,然后单击Next。
对于您的可穿戴模块,选择Blank Wear Activity模板,然后单击Next,然后单击Finish。
创建您的手持应用程序
由于我们正在实现双向通信,我们的手持和移动模块都需要自己的监听器和发送器。让我们从在我们的手持应用程序中实现这个功能开始。
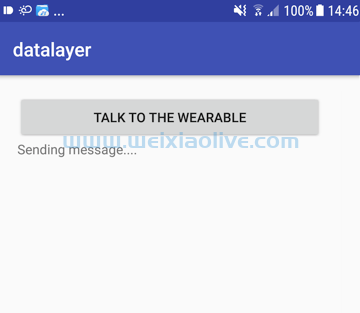
我将保持简单,并创建一个 UI,其中包含一个TextView显示从数据层检索到的各种消息的 UI,以及一个按钮,当点击该按钮时,它将向数据层发送自己的消息。
打开您的移动模块的activity_main.xml文件,并添加以下内容:
<LinearLayout xmlns:android="https://schemas.android.com/apk/res/android"
   xmlns:tools="http://schemas.android.com/tools"
   android:layout_width="match_parent"
   android:layout_height="match_parent"
   android:orientation="vertical"
   android:paddingBottom="@dimen/vertical_margin"
   android:paddingLeft="@dimen/horizontal_margin"
   android:paddingRight="@dimen/horizontal_margin"
   android:paddingTop="@dimen/vertical_margin"
   tools:context=".MainActivity">

   <Button
       android:id="@+id/talkButton"
       android:layout_width="match_parent"
       android:layout_height="wrap_content"
       android:text="Talk to the wearable"
       android:onClick="talkClick"/>

       <TextView
           android:id="@+id/textView"
           android:layout_width="match_parent"
           android:layout_height="match_parent"/>

</LinearLayout>
由于我们引用了一些dimens.xml值,我们需要为这些值提供定义:
Control -单击移动模块的res/values目录。
选择新建 > 值资源文件。
将此文件命名为 dimens.xml,然后单击OK。
添加以下内容:
<resources>
   <dimen name="horizontal_margin">20dp</dimen>
   <dimen name="vertical_margin">20dp</dimen>
</resources>
这为我们提供了以下用户界面:
添加您的依赖项
打开移动模块的build.gradle文件并添加以下依赖项:
dependencies {
   implementation fileTree(dir: 'libs', include: ['*.jar'])
   wearApp project(':wear')
   implementation 'com.android.support:appcompat-v7:26.1.0'
   implementation 'com.google.android.gms:play-services-wearable:+'

}
在 MainActivity 中显示和发送消息
在MainActivity中,我们需要执行以下操作:
让用户保持在循环中!
当用户点击Talk to the Wearable按钮时,需要发生两件事:
手持设备向可穿戴设备发送消息。我将使用“我收到来自手持设备的消息”。
手持设备提供消息已成功发送的视觉确认。我将使用“我向可穿戴设备发送消息”。
当用户点击手持设备的Talk to the Wearable按钮时,手持设备将尝试向数据层发送消息。系统仅在此消息排队等待传递到特定设备时才认为该消息已成功发送,这意味着至少需要有一个配对设备可用。
在最好的情况下,用户点击Talk to the Wearable,消息排队等待传递,我们的手持设备得意洋洋地宣称:“我刚刚向可穿戴设备发送了一条消息。”
但是,如果没有可穿戴设备可用,则消息不会排队,默认情况下,用户不会确认我们的应用甚至尝试发送消息。这可能会导致用户怀疑应用程序是否已损坏,因此我还将显示一条正在发送的消息……。通知,无论消息是否成功排队。
在测试此应用程序时,您可能还希望快速连续触发多条消息。为了明确每条消息何时排队等待传递,我为每条消息添加了一个计数器,因此我们的手持设备将显示I just sent a message to the wearable 2,I just sent a message to the wearable 3,等等上。在连接的另一端,我们的可穿戴设备将显示我刚刚收到来自手持设备 2 的消息,我刚刚收到来自手持设备 3 的消息,依此类推。
2.显示收到的消息
在下一节中,我们将创建一个MessageService监视数据层并检索消息的函数。由于我们的服务将在不同的线程上执行它的工作,它会将此信息广播到我们的MainActivity,然后负责更新 UI。
3.定义路径
您通过MessageClientAPI 传输的每条消息都必须包含一个路径,该路径是一个唯一标识消息并允许您的应用程序从连接的另一端访问它的字符串。
此路径始终以正斜杠开头(我使用的是/my_path),还可以包含可选的有效负载,以字节数组的形式。
4.检查你的节点!
在 Google Play 服务 7.3.0 及更高版本中,您可以将多个可穿戴设备连接到单个手持设备 - 例如,用户可能会在多个可穿戴设备之间进行切换或同时使用。Wear OS 设备在其生命周期内也可能连接到多个手持设备,例如,如果用户拥有 Android 智能手机和平板电脑,或者他们用闪亮的新智能手机替换旧智能手机。请注意,任何能够连接到数据层的设备都被称为应用程序代码中的节点。
在本文中,我将假设只有一个可用的可穿戴设备。或者,您可以使用GetConnectednodes或getLocalNode来选择向哪些设备发送消息。
让我们在我们的MainActivity:
import android.support.v7.app.AppCompatActivity;
import android.content.BroadcastReceiver;
import android.widget.Button;
import android.content.Context;
import android.content.Intent;
import android.content.IntentFilter;
import android.support.v4.content.LocalBroadcastManager;
import android.os.Bundle;
import android.os.Handler;
import android.os.Message;
import android.view.View;
import android.widget.TextView;

import com.google.android.gms.wearable.Node;
import com.google.android.gms.tasks.Task;
import com.google.android.gms.tasks.Tasks;
import com.google.android.gms.wearable.Wearable;

import java.util.List;
import java.util.concurrent.ExecutionException;

public class MainActivity extends AppCompatActivity  {

   Button talkbutton;
   TextView textview;
   protected Handler myHandler;
   int receivedMessageNumber = 1;
   int sentMessageNumber = 1;

   @Override
   protected void onCreate(Bundle savedInstanceState) {
       super.onCreate(savedInstanceState);
       setContentView(R.layout.activity_main);
       talkbutton = findViewById(R.id.talkButton);
       textview = findViewById(R.id.textView);

      //Create a message handler//

       myHandler = new Handler(new Handler.callback() {
           @Override
           public boolean handleMessage(Message msg) {
               Bundle stuff = msg.getData();
               messageText(stuff.getString("messageText"));
               return true;
           }
       });

//Register to receive local broadcasts, which we'll be creating in the next step//

       IntentFilter messageFilter = new IntentFilter(Intent.ACTION_SEND);
       Receiver messageReceiver = new Receiver();
       LocalBroadcastManager.getInstance(this).registerReceiver(messageReceiver, messageFilter);

   }

   public void messageText(String newinfo) {
       if (newinfo.compareTo("") != 0) {
           textview.append("\n" + newinfo);
       }
   }

//Define a nested class that extends BroadcastReceiver//

   public class Receiver extends BroadcastReceiver {
       @Override

       public void onReceive(Context context, Intent intent) {

//Upon receiving each message from the wearable, display the following text//

           String message = "I just received a message from the wearable " + receivedMessageNumber++;;

           textview.setText(message);

       }
   }

   public void talkClick(View v) {
       String message = "Sending message.... ";
       textview.setText(message);

//Sending a message can block the main UI thread, so use a new thread//

       new NewThread("/my_path", message).start();

   }

//Use a Bundle to encapsulate our message//

   public void sendmessage(String messageText) {
       Bundle bundle = new Bundle();
       bundle.putString("messageText", messageText);
       Message msg = myHandler.obtainMessage();
       msg.setData(bundle);
       myHandler.sendMessage(msg);

   }

   class NewThread extends Thread {
       String path;
       String message;

//constructor for sending information to the Data Layer//

       NewThread(String p, String m) {
           path = p;
           message = m;
       }

       public void run() {

//Retrieve the connected devices, known as nodes//

           Task<List<Node>> wearableList =
                   Wearable.getNodeClient(getApplicationContext()).getConnectedNodes();
           try {

               List<Node> nodes = Tasks.await(wearableList);
               for (Node node : nodes) {
                   Task<Integer> sendMessageTask =

//Send the message//

                           Wearable.getMessageClient(MainActivity.this).sendMessage(node.getId(), path, message.getBytes());

                   try {

//Block on a task and get the result synchronously//

                       Integer result = Tasks.await(sendMessageTask);
                       sendmessage("I just sent the wearable a message " + sentMessageNumber++);

 //if the Task fails, then…..//

                   } catch (ExecutionException exception) {

                       //TO DO: Handle the exception//

                   } catch (InterruptedException exception) {

                //TO DO: Handle the exception//

                   }

               }

           } catch (ExecutionException exception) {

               //TO DO: Handle the exception//

           } catch (InterruptedException exception) {

               //TO DO: Handle the exception//
           }

       }
   }
}
创建监听服务
此时,我们的掌上电脑可以将消息推送到数据层,但是由于我们要实现双向通信,它还需要监听到达数据层的消息。
在本节中,我们将创建一个执行以下操作的服务:
监控数据层的事件
您可以通过实现DataClient.OnDataChangedListener接口或扩展来监控数据层WearableListenerService。我选择后者,因为扩展WearableListenerService. 首先,WearableListenerService它在后台线程上工作,因此您不必担心阻塞主 UI 线程。其次,系统管理WearableListenerService生命周期以确保它不会消耗不必要的资源,并根据需要绑定和取消绑定服务。
缺点是WearableListenerService即使您的应用程序没有运行,它也会监听事件,如果它检测到相关事件,它将启动您的应用程序。如果您的应用程序只需要在它已经运行时响应事件,那么WearableListenerService可能会不必要地耗尽设备的电池。
2.覆盖相关数据回调
WearableListenerService可以***一系列数据层事件,因此您需要为您有兴趣处理的事件覆盖数据事件回调方法。在我们的服务中,我正在实现onMessageReceived,它将在从远程节点发送消息时触发。
3.检查路径
每次向数据层发送消息时,我们的应用程序都需要检查它是否具有正确的my_path标识符。
4. 广播消息到MainActivity
由于WearableListenerService在不同的线程上运行,它不能直接更新 UI。要在我们的应用程序中显示消息,我们需要将其转发到MainActivity,使用LocalBroadcastManager.
要创建服务:
确保您选择了移动模块。
从 Android Studio 工具栏中选择新建 > 服务。
命名此服务MessageService。
添加以下内容:
import android.content.Intent;
import android.support.v4.content.LocalBroadcastManager;
import com.google.android.gms.wearable.Messageevent;
import com.google.android.gms.wearable.WearableListenerService;

//Extend WearableListenerService//

public class MessageService extends WearableListenerService {

   @Override
   public void onMessageReceived(MessageEvent messageEvent) {

//If the message’s path equals "/my_path"...//

       if (messageEvent.getPath().equals("/my_path")) {

//...retrieve the message//

           final String message = new String(messageEvent.getData());

           Intent messageIntent = new Intent();
           messageIntent.setAction(Intent.ACTION_SEND);
           messageIntent.putExtra("message", message);

//Broadcast the received Data Layer messages locally//

         LocalBroadcastManager.getInstance(this).sendBroadcast(messageIntent);
       }
       else {
           super.onMessageReceived(messageEvent);
       }
   }

}
最后,打开并在条目中Manifest添加一些信息:MessageService
<?xml version="1.0" encoding="utf-8"?>
<manifest xmlns:android="http://schemas.android.com/apk/res/android"
   package="com.jessicathornsby.datalayer" >

   <application
       android:allowBackup="true"
       android:icon="@mipmap/ic_launcher"
       android:label="@string/app_name"
       android:theme="@style/AppTheme" >
       <activity
           android:name=".MainActivity"
           android:label="@string/app_name" >
           <intent-filter>
               <action android:name="android.intent.action.MAIN" />
               <category android:name="android.intent.category.LAUNCHER" />
           </intent-filter>
       </activity>

       //Add metadata for Google Play Services//

       <meta-data
           android:name="com.google.android.gms.version"
           android:value="@integer/google_play_services_version" />

       <service
           android:name=".MessageService"
           android:enabled="true"
           android:exported="true" >

//Add the gms.wearable.MESSAGE_RECEIVED intent filter//

           <intent-filter>
               <action android:name="com.google.android.gms.wearable.MESSAGE_RECEIVED" />

//Specify your path, and a host for the filter. Here, I’m using a wildcard host//

               <data android:scheme="wear" android:host="*" android:pathPrefix="/my_path" />
           </intent-filter>
       </service>
   </application>

</manifest>
如前所述,系统仅在消息排队等待传递时才认为消息已成功发送,这仅在有一个或多个可穿戴设备可用时才会发生。
您可以通过在兼容的智能手机或平板电脑或 Android 虚拟设备 (AVD) 上安装移动模块来看到这一点。单击与可穿戴设备交谈按钮,应用程序将仅显示正在发送消息...文本。我刚刚发送的可穿戴设备……文本不会出现。
如果我们的消息要排队等待传递,那么我们需要在项目的可穿戴模块中实现另一组发送器和接收器组件。
创建您的可穿戴应用程序
我们的可穿戴应用程序将具有与其手持应用程序类似的功能,因此我将跳过我们已经介绍过的所有代码。
再一次,让我们从创建应用程序的用户界面开始。打开wear模块的activity_main.xml文件,添加以下内容:
<?xml version="1.0" encoding="utf-8"?>

//Wrap the layout in BoxInsetLayout so it displays correctly on both square and round watches//

<android.support.wear.widget.BoxInsetLayout
   xmlns:android="http://schemas.android.com/apk/res/android"
   xmlns:app="http://schemas.android.com/apk/res-auto"
   xmlns:tools="http://schemas.android.com/tools"
   android:layout_width="match_parent"
   android:layout_height="match_parent"
   tools:context=".MainActivity"
   tools:deviceIds="wear">

   <LinearLayout
       android:layout_width="match_parent"
       android:layout_height="match_parent"
       android:gravity="center_horizontal"
       android:orientation="vertical"
       app:boxedEdges="all">

       <Button
           android:id="@+id/talkClick"
           android:layout_width="wrap_content"
           android:layout_height="wrap_content"
           android:text="Talk to the handheld"/>

       <TextView
           android:id="@+id/text"
           android:layout_width="wrap_content"
           android:layout_height="wrap_content"/>
   </LinearLayout>
</android.support.wear.widget.BoxInsetLayout>
此时,您的用户界面应如下所示:
 打开你的build.gradle并添加以下依赖项:
dependencies {
   compile fileTree(dir: 'libs', include: ['*.jar'])
   provided 'com.google.android.wearable:wearable:2.2.0'
   implementation 'com.google.android.support:wearable:2.2.0'
   implementation 'com.google.android.gms:play-services-wearable:12.0.1'
   implementation 'com.android.support:wear:26.1.0'
}
现在,我们需要将消息发送到数据层:
import android.content.BroadcastReceiver;
import android.os.Bundle;
import android.widget.Button;
import android.content.Context;
import android.content.Intent;
import android.content.IntentFilter;
import android.support.v4.content.LocalBroadcastManager;
import android.support.wearable.activity.WearableActivity;
import android.widget.TextView;
import android.view.View;

import com.google.android.gms.tasks.Task;
import com.google.android.gms.tasks.Tasks;
import com.google.android.gms.wearable.Wearable;
import com.google.android.gms.wearable.Node;

import java.util.List;
import java.util.concurrent.ExecutionException;

public class MainActivity extends WearableActivity {

   private TextView textView;
   Button talkButton;
   int receivedMessageNumber = 1;
   int sentMessageNumber = 1;

   @Override
   protected void onCreate(Bundle savedInstanceState) {
       super.onCreate(savedInstanceState);
       setContentView(R.layout.activity_main);
       textView =  findViewById(R.id.text);
       talkButton =  findViewById(R.id.talkClick);

//Create an OnClickListener//

       talkButton.setOnClickListener(new View.OnClickListener() {
           @Override
           public void onClick(View v) {
               String onClickMessage = "I just sent the handheld a message " + sentMessageNumber++;
               textView.setText(onClickMessage);

//Use the same path//

               String datapath = "/my_path";
               new SendMessage(datapath, onClickMessage).start();

           }
       });

//Register to receive local broadcasts, which we'll be creating in the next step//

       IntentFilter newFilter = new IntentFilter(Intent.ACTION_SEND);
       Receiver messageReceiver = new Receiver();

       LocalBroadcastManager.getInstance(this).registerReceiver(messageReceiver, newFilter);

   }

   public class Receiver extends BroadcastReceiver {
       @Override
       public void onReceive(Context context, Intent intent) {

//Display the following when a new message is received//

           String onMessageReceived = "I just received a message from the handheld " + receivedMessageNumber++;
           textView.setText(onMessageReceived);

       }
   }

   class SendMessage extends Thread {
       String path;
       String message;

//Constructor for sending information to the Data Layer//

       SendMessage(String p, String m) {
           path = p;
           message = m;
       }

       public void run() {

//Retrieve the connected devices//

           Task<List<Node>> nodeListTask =
                   Wearable.getNodeClient(getApplicationContext()).getConnectedNodes();
           try {

//Block on a task and get the result synchronously//

               List<Node> nodes = Tasks.await(nodeListTask);
               for (Node node : nodes) {

//Send the message///

                   Task<Integer> sendMessageTask =
                           Wearable.getMessageClient(MainActivity.this).sendMessage(node.getId(), path, message.getBytes());

                   try {

                       Integer result = Tasks.await(sendMessageTask);

//Handle the errors//

                   } catch (ExecutionException exception) {

//TO DO//

                   } catch (InterruptedException exception) {

//TO DO//

                   }

               }

           } catch (ExecutionException exception) {

//TO DO//

           } catch (InterruptedException exception) {

//TO DO//

           }
       }
   }
}
接下来,我们需要创建一个监听器来监控数据层的传入消息,并在收到新消息时通知 MainActivity:
确保选择磨损模块。
从 Android Studio 工具栏中选择新建 > 服务。
将此服务命名为MessageService,然后添加以下内容:
import android.content.Intent;
import com.google.android.gms.wearable.MessageEvent;
import android.support.v4.content.LocalBroadcastManager;
import com.google.android.gms.wearable.WearableListenerService;

public class MessageService extends WearableListenerService {

   @Override
   public void onMessageReceived(MessageEvent messageEvent) {

//If the message’s path equals "/my_path"...//

       if (messageEvent.getPath().equals("/my_path")) {

//...retrieve the message//

           final String message = new String(messageEvent.getData());
           Intent messageIntent = new Intent();
           messageIntent.setAction(Intent.ACTION_SEND);
           messageIntent.putExtra("message", message);

//Broadcast the received Data Layer messages locally//

           LocalBroadcastManager.getInstance(this).sendBroadcast(messageIntent);
       }
       else {
           super.onMessageReceived(messageEvent);
       }
   }

}
打开模块Manifest,并为 : 创建一个意图过滤器WearableListenerService:
<?xml version="1.0" encoding="utf-8"?>
<manifest xmlns:android="http://schemas.android.com/apk/res/android"
   package="com.jessicathornsby.datalayer" >

   <uses-feature android:name="android.hardware.type.watch" />

   <application
       android:allowBackup="true"
       android:icon="@mipmap/ic_launcher"
       android:label="@string/app_name"
       android:theme="@android:style/Theme.DeviceDefault" >
       <activity
           android:name=".MainActivity"
           android:label="@string/app_name" >
           <intent-filter>
               <action android:name="android.intent.action.MAIN" />
               <category android:name="android.intent.category.LAUNCHER" />
           </intent-filter>
       </activity>
       <service android:name=".MessageService">

//Add the gms.wearable.MESSAGE_RECEIVED intent filter//

           <intent-filter>
               <action android:name="com.google.android.gms.wearable.MESSAGE_RECEIVED" />

//Specify your path, and a host for the filter. Again, I’m using a wildcard//

               <data android:scheme="wear" android:host="*" android:pathPrefix="/my_path" />

           </intent-filter>
       </service>
   </application>

</manifest>
您可以从 GitHub 下载完整的项目。
测试你的应用
此时,您有两个可以通过数据层交换消息的应用程序,但如果您要测试这些通信技能,您需要将您的项目安装在手持设备和可穿戴设备上。
如果您是一名 Android 开发人员,那么您可能至少拥有一部 Android 智能手机或平板电脑,但可穿戴设备仍然是一种相对较新的小众产品,因此您可能还没有投资智能手表。
如果您确实决定进行 Wear OS 开发,那么您应该在某个时候冒险购买智能手表,因为在真正的 Android 设备上测试您的应用程序是无可替代的。但是,如果您只是在试验 Wear OS,那么您可以创建一个模拟可穿戴设备的 AVD,就像创建一个模拟智能手机或平板电脑的 AVD 一样。然后,您可以使用端口转发让您的 AVD 和您的物理 Android 设备通话。
第一步是创建一个可穿戴的 AVD 并在这个模拟设备上安装你的穿戴模块:
从 Android Studio 工具栏中选择工具 > Android > AVD 管理器。
单击创建虚拟设备...
从左侧菜单中选择磨损。
选择您要模拟的可穿戴设备,然后单击Next。
选择您的系统映像,然后单击下一步。
为您的 AVD 命名,然后单击完成。
从 Android Studio 工具栏中选择运行 > 运行...。
在出现的小弹出窗口中,选择Wear…
选择您刚刚创建的可穿戴 AVD。片刻之后,AVD 将在您已安装可穿戴组件的情况下启动。
接下来,在您的智能手机或平板电脑上安装手持模块:
将您的物理 Android 设备连接到您的开发机器。
从 Android Studio 工具栏中选择运行 > 运行...。
出现提示时选择移动设备。
最后,我们需要让我们的物理 Android 设备和我们的 AVD 对话:
确保您的手持设备上启用了蓝牙(设置 > 蓝牙),并且它已通过 USB 电缆连接到您的开发机器。
在您的手持设备上,打开 Play 商店并下载Wear OS by Google应用(以前称为 Android Wear)。
启动 Wear OS 应用程序。
在您的模拟可穿戴设备上,单击随附按钮条中的主页按钮(光标位于以下屏幕截图中),然后打开设置应用程序。

选择系统 > 关于并重复单击内部版本号,直到您看到您现在是开发人员消息。
单击两次“返回”按钮返回主设置菜单。您应该注意到一个新的开发者选项项目;点击一下。
选择ADB 调试。
在您的开发机器上,打开一个新的命令提示符 (Windows) 或终端 (mac),然后更改目录( cd),使其指向 Android SDK 的平台工具文件夹。例如,我的命令如下所示:
cd /Users/jessicathornsby/Library/Android/sdk/platform-tools
/.adb devices通过运行该命令,确保 ADB(Android 调试桥)能够识别模拟器和您连接的智能手机或平板电脑。它应该返回两个独立设备的代码。
通过在终端/命令提示符窗口中运行以下命令,将 AVD 的通信端口转发到连接的智能手机或平板电脑:
./adb -d 转发 tcp:5601 tcp:5601
在您的掌上电脑上,启动 Wear OS 应用程序。浏览任何介绍性对话,直到您到达 Wear OS 主屏幕。
打开左上角的下拉菜单,然后选择Add a new watch。
点击右上角的虚线图标,然后选择与模拟器配对。片刻之后,手持设备应该连接到您的模拟器。

您现在可以测试您的应用了!在您的模拟器上启动 Wear 组件,在您的掌上电脑上启动移动组件,然后通过点击不同的Talk...按钮进行实验。
当您在手持设备上点击与可穿戴设备通话时,应显示以下消息:
掌上电脑: “我刚刚给掌上电脑发了一条信息。”
可穿戴设备: “我刚刚收到来自手持设备的消息。”
 当您点击可穿戴设备上的与手持设备通话时,应显示以下消息:
可穿戴设备: “我刚刚给手持设备发了一条信息。”
手持设备: “我刚收到可穿戴设备的消息。”
结论
在本文中,我们研究了如何通过可穿戴数据层在手持设备和可穿戴应用程序之间交换消息。
- 创建您的手持应用程序
- 添加您的依赖项
- 在 MainActivity 中显示和发送消息
- 创建监听服务
- 创建您的可穿戴应用程序
- 测试你的应用




![如何删除Word中的空白页[4种简单方法] 如何删除Word中的空白页[4种简单方法]](https://www.weixiaolive.com/en/zb_users/upload/2023/07/20230702124855168827333590644.png)

