在我的使用 Expo 更轻松地开发 react Native 帖子中,您了解了 Expo 如何让初学者更轻松地开始使用 React Native 创建应用程序。您还了解到,由于不再需要设置android Studio、Xcode 或其他开发工具,Expo 允许开发人员更快地开始并运行开发 React Native 应用程序。
但正如您也看到的,Expo 并不支持应用程序可能需要的所有本机功能。尽管 Expo 团队一直 在努力支持更多的原生功能,但最好学习如何将现有的 Expo 项目转换为标准的原生项目,以便在需要时轻松转换。
分离到 ExpoKit
为了分离到 ExpoKit,您首先必须编辑 app.json 和 package.json 文件。
在 app.json 文件中,确保 name 已设置 a。platforms 应该是您要构建的平台。
{
  "expo": {
    "name": "ocdmom",
    "platforms": [
      "ios",
      "android"
    ],
如果要为 iOS 构建,则必须指定 ios 选项:
"ios": {
  "bundleIdentifier": "com.ocd.mom"
},
如果你想支持 Android,那么还要指定以下选项:
"android": {
  "package": "com.ocd.mom"
}
exp 创建项目时,命令行工具还预先填充了其他选项 。但唯一重要的是 bundleIdentifier iOS 和 package Android。这些将是应用程序发布到 Apple 或 Play 商店后的唯一 ID。分离需要这些细节,因为它实际上会为要在设备上运行的应用程序生成本机代码。您可以在 Expo 文档中找到有关 app.json 文件 的不同配置选项的更多信息。
您可以 在 GitHub 存储库中查看文件的完整内容。
接下来,打开 package.json 文件并添加项目名称:
"name": "ocdmom"
这应该是您使用创建项目时使用的名称 exp init。它们相同非常重要,因为 在编译应用程序时会使用您在package.jsonname中 指定的 内容。此名称不一致会导致错误。
现在我们准备好分离到 ExpoKit。在项目目录的根目录下执行以下命令:
exp detach
这将在本地下载适用于 Android 和 iOS 的原生 Expo 包。
如果成功,您应该会看到类似于以下内容的输出:
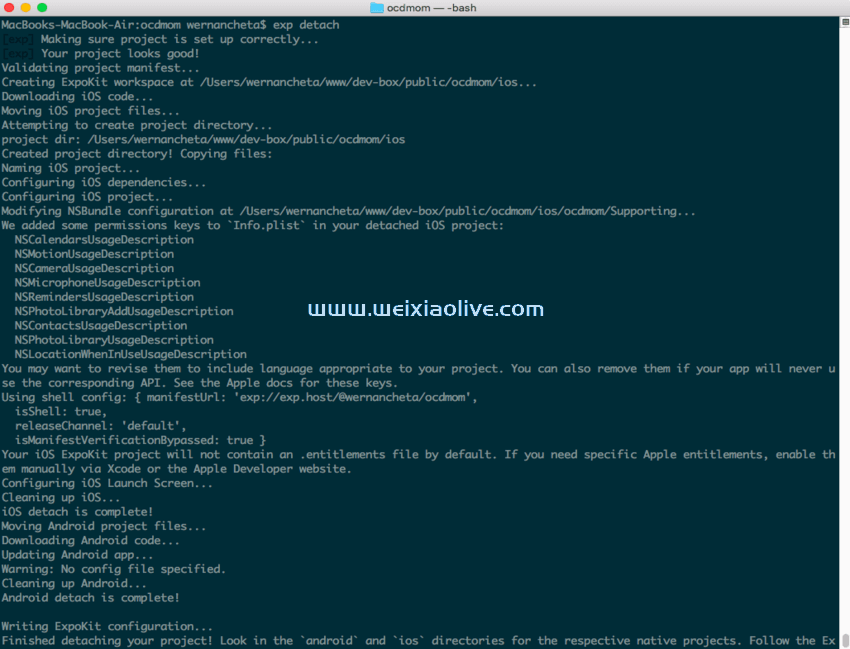 如果要部署到 iOS,则需要安装最新版本的 Xcode。在编写本教程时,最新版本是 9。接下来,通过执行 sudo gem install cocoapods. 这允许您安装项目的本机 iOS 依赖项。完成后,导航到项目的 ios 目录并执行 pod install 以安装所有本机依赖项。
安装自定义本机包
现在我们已经分离了,我们现在可以像在标准 React Native 项目中一样安装原生包。
对于这个应用程序,我们需要 React Native background Timer 和 Pusher 包。
首先,安装 Pusher 包,因为它更简单:
npm install --save pusher-js
这使我们能够与您之前创建的 Pusher 应用程序进行通信。
接下来,安装 React Native后台Timer。这允许我们根据特定的时间间隔定期执行代码(即使应用程序在后台):
npm install --save react-native-background-timer
与 Pusher 包不同,这需要将本机库(iOS 或 Android)链接到应用程序。执行以下命令会为您执行此操作:
react-native link
完成后,它还应该在 android/app/src/main/host/exp/exponent/MainApplication.java上初始化模块。但只是为了确保,检查该文件中是否存在以下内容:
import com.ocetnik.timer.BackgroundTimerPackage; // check this

public List<ReactPackage> getPackages() {
    return Arrays.<ReactPackage>asList(
      new BackgroundTimerPackage() // also check this
    );
}
如果您正在为 iOS 构建,请打开 ios目录 中 的Podfile 并确保在 声明之前添加以下内容:post_install
<uses-permission android:name="android.permission.ACCESS_NETWORK_STATE" />
<uses-permission android:name="android.permission.INTERNET" />
<uses-permission android:name="android.permission.ACCESS_COARSE_LOCATION" />
<uses-permission android:name="android.permission.ACCESS_FINE_LOCATION" />
完成后, pod install 在 ios 目录中执行以安装本机模块。
对于 Android,当您使用 Android Studio 运行应用程序时,这已经自动完成。
更新Android清单文件
如果您正在为 Android 构建,请打开 Android 清单文件 ( android/app/src/main/AndroidManifest.xml ) 并确保添加了以下权限:
<uses-permission android:name="android.permission.ACCESS_NETWORK_STATE" />
<uses-permission android:name="android.permission.INTERNET" />
<uses-permission android:name="android.permission.ACCESS_COARSE_LOCATION" />
<uses-permission android:name="android.permission.ACCESS_FINE_LOCATION" />
这允许我们请求 Pusher 访问互联网和 Expo 的权限,以获取用户在 Android 设备上的当前位置。
运行应用程序
我们还没有完成,但最好现在运行该应用程序,这样您就可以看到它是否有效。这样,您还可以在我们开发应用程序时看到更改。
运行应用程序的第一步是 exp start 从项目的根目录执行。这将启动开发服务器,以便您对源代码所做的任何更改都会反映在应用预览中。
如果您正在为 Android 构建,请打开 Android Studio 并选择 Open an existing Android Studio project。在显示的目录选择器中,选择 Expo 项目中的android文件夹。选择文件夹后,它应该索引该文件夹中的文件。此时,您现在应该能够通过 从顶部菜单中选择Build > Rebuild Project来重建项目。完成后,通过选择 Run > Run 'app'来运行应用程序。
Android Studio 可以在连接到您的计算机的任何 Android 设备上、在您通过 Android Studio 安装的模拟器之一或通过 Genymotion(Android Studio 自动检测正在运行的模拟器实例)上运行该应用程序。对于这个应用程序,我建议您使用 Genymotion 模拟器,因为它有一个不错的 GPS 模拟小部件,可让您通过 Google 地图界面更改位置:
 (如果您在设备上运行应用程序时遇到问题,请务必查看 有关让 Android Studio 识别您的设备的Stack Overflow问题。)
完成后,使用 Xcode 打开 ios/ ocdmom .xcworkspace 文件。一旦 Xcode 完成对文件的索引,您应该能够点击那个大播放按钮,它会自动在您选择的 iOS 模拟器上运行应用程序。
Xcode 还允许您模拟位置,但仅当您构建应用程序以在模拟器中运行时。更改代码并让开发服务器刷新应用程序实际上不会更改位置。要更改位置,请单击发送图标并选择您要使用的位置:

继续编写应用程序
现在我们已准备好继续为应用程序编写代码。这一次,我们将添加在应用程序处于后台时运行一些代码的功能。
添加后台任务
导入您之前安装的 Pusher 和 Background Timer 包:
import BackgroundTimer from 'react-native-background-timer';
import Pusher from 'pusher-js/react-native';
为您之前创建的 Google 项目的 Google api键设置值:
const GOOGLE_API_KEY = 'YOUR GOOGLE PROJECT API KEY';
使用 Expo 的 Location and Permissions API:
const { Location, Permissions } = Expo;Expo 的 API 跨平台工作——这与标准的 React Native 项目没有什么不同,您必须安装像 React Native Permissions这样的包 才能访问跨平台工作的权限 API。
接下来,设置用于跟踪用户当前位置的代码将执行的时间间隔(以毫秒为单位)。在这种情况下,我们希望它每 30 分钟执行一次。请注意,在下面的代码中,我们使用 location_status 变量的值来检查是否授予了访问用户当前位置的权限。安装组件后,我们将在稍后设置此变量的值:
var interval_ms = 1800 * 100; // 1800 seconds = 30 minutes, times 100 to convert to milliseconds
var location_status = null; // whether accessing the user's location is allowed or not

BackgroundTimer.runBackgroundTimer(() => { // run the background task

  if(location_status == 'granted'){ // if permission to access the location is granted by the user

    // next: add code for getting the user's current location

  }

},
interval_ms);
获取当前位置
使用 Expo 的 Location API获取当前位置:
Location.getCurrentpositionasync({ // get the user's coordinates
  enableHighAccuracy: true // enable fetching of high accuracy location
})
.then((res) => {

  let { latitude, longitude } = res.coords; // extract the latitude and longitude values

  // next: add code for getting the address based on the coordinates
});
接下来,使用 Google Maps Geocoding API,通过提供纬度和经度值向反向地理编码端点发出请求。这将返回基于这些坐标的格式化地址:
fetch(`https://maps.googleapis.com/maps/api/geocode/json?latlng=${latitude},${longitude}&key=${GOOGLE_API_KEY}`)
  .then((response) => response.json())
  .then((responseJson) => {
    let addr = responseJson.results[0].formatted_address;

    // next: send the location with Pusher

  })
  .catch((error) => {
    console.error(error);
  });
使用推送器发送位置
下一步是使用 Pusher 发送位置。稍后,我们将创建将作为身份验证端点的服务器,同时显示显示用户当前位置的页面。
更新构造函数以设置 Pusher 实例的默认值:
constructor() {
  /*
  the code for generating unique code from earlier
  */
  this.pusher = null;
}
当组件被挂载时,我们要初始化 Pusher。您现在可以从之前创建的 Pusher 应用程序的设置中提供 Pusher API 密钥和集群:
componentWillMount() {
  this.pusher = new Pusher('YOUR PUSHER APP KEY', {
    authEndpoint: 'YOUR AUTH SERVER ENDPOINT (TO BE ADDED LATER)',
    cluster: 'YOUR PUSHER CLUSTER',
    encrypted: true // whether the connection will be encrypted or not. This requires https if set to true
  });
}
接下来,您现在可以添加用于发送当前位置的代码。在 Pusher 中,这是通过调用 trigger() 方法来完成的。第一个参数是被触发事件的名称,第二个参数是一个包含您要发送 的数据的对象。
稍后,在服务器中,我们将订阅相同的频道,一旦组件被挂载,我们将订阅该频道。然后我们将绑定到该 client-location 事件,以便每次从某个地方触发它时,服务器也会收到通知(尽管只有当它所服务的页面也订阅了同一频道时):
fetch(...)
  .then(...)
  .then((responseJson) => {
    let addr = responseJson.results[0].formatted_address;

    current_location_channel.trigger('client-location', {
      addr: addr,
      lat: latitude,
      lng: longitude
    });

  })
  .catch(...);
我们唯一一次请求访问用户当前位置的权限是在组件安装时。然后,我们将 location_status 根据用户的选择进行更新。该值可以是“授予”或“拒绝”。
请记住,用于检查用户当前位置的代码会定期执行。这意味着 location_status 变量的新值也将在稍后执行函数时使用。之后,我们还想订阅将发送位置更新的 Pusher 频道:
componentDidMount() {
  try {
    Permissions.askAsync(Permissions.LOCATION).then(({ status }) => {
      location_status = status;
    });
  }catch(error){
    console.log('err: ', error);
  }
  // subscribe to the Pusher channel
  current_location_channel = this.pusher.subscribe('private-current-location-' + this.state.unique_code);
}
创建服务器
现在我们准备好创建服务器了。首先,在应用程序的项目目录之外创建您的工作目录 ( ocdmom -server )。在该目录内导航并执行 npm init. 只需按 Enter 直到它创建 package.json 文件。
接下来,安装我们需要的包:
npm install --save express body-parser pusher
以下是每个包的功能的概述:
express: 用于创建服务器。这负责提供跟踪页面以及响应身份验证端点。
body-parser: Express 中间件,它解析请求正文并将其作为javascript对象提供。
pusher:用于与您之前创建的 Pusher 应用程序通信。
完成后,您的 package.json 文件现在应该如下所示:
{
  "name": "ocdmom-server",
  "version": "1.0.0",
  "description": "",
  "main": "server.js",
  "scripts": {
    "test": "echo \"Error: no test specified\" && exit 1",
    "start": "node server.js"
  },
  "author": "",
  "license": "ISC",
  "dependencies": {
    "body-parser": "^1.18.2",
    "express": "^4.16.2",
    "pusher": "^1.5.1"
  }
}
创建一个 server.js 文件并导入我们刚刚安装的包:
var express = require('express');
var bodyParser = require('body-parser');
var Pusher = require('pusher');
将服务器配置为使用该 body-parser 包并将公用文件夹设置 为 静态文件目录:
var app = express();
app.use(bodyParser.json()); // set middleware to parse request body to JavaScript object
app.use(bodyParser.urlencoded({ extended: false })); // for parsing URL encoded request body
app.use(express.static('public')); // specify the directory where the static files like css, JavaScript and image files lives
初始化推送器。此处提供的值将来自环境变量。我们稍后会在部署服务器时添加它们:
var pusher = new Pusher({
  appId: process.env.APP_ID,
  key: process.env.APP_KEY,
  secret:  process.env.APP_SECRET,
  cluster: process.env.APP_CLUSTER,
});
访问基本 URL 时提供跟踪页面:
app.get('/', function(req, res){
  res.sendFile(__dirname + '/public/tracker.html');
});
接下来,创建用于响应对 auth 端点的请求的路由。每次应用程序初始化与 Pusher 的连接以及访问跟踪页面时都会触发此事件。这样做是对用户进行身份验证,以便他们可以直接从客户端与 Pusher 应用程序通信。
请注意,这实际上并没有任何安全措施。这意味着任何人只要有权访问您的 Pusher App 密钥,就可以向您的身份验证端点发出请求。在生产应用程序中,您需要更强大的安全性!
app.post('/pusher/auth', function(req, res) {
  var socketId = req.body.socket_id;
  var channel = req.body.channel_name;
  var auth = pusher.authenticate(socketId, channel);
  var app_key = req.body.app_key;
  var auth = pusher.authenticate(socketId, channel);
  res.send(auth);});
最后,让服务器监听环境变量中指定的端口。默认情况下,它是端口 80,但我们也将其设置为备用值,以防万一它不存在:
var port = process.env.PORT || 80;
app.listen(port);
追踪页面
跟踪页面显示每次 client-location 从应用程序触发事件时都会更新的地图。不要忘记提供您的 Google API 密钥:
<!DOCTYPE html>
<html>
  <head>
    <meta name="viewport" content="initial-scale=1.0, user-scalable=no">
    <meta charset="utf-8">
    <title>OCDMom Tracker</title>
    <script src="https://js.pusher.com/4.2/pusher.min.js"></script> <!-- the pusher library -->
    <link rel="stylesheet" href="css/style.css">
  </head>
  <body>
    <div id="map"></div>

    <script src="js/tracker.js"></script> <!-- the main JavaScript file for this page -->

    <script async defer
    src="https://maps.googleapis.com/maps/api/js?key=YOUR-GOOGLE-API-KEY&callback=initMap">
    </script> <!-- the google maps library -->
  </body>
</html>
接下来,创建一个 public/js/tracker.js 文件并添加以下内容:
function getParameterByName(name, url) {
    if (!url) url = window.location.href;
    name = name.replace(/[\[\]]/g, "\\$&");
    var regex = new RegExp("[?&]" + name + "(=([^&#]*)|&|#|$)"),
        results = regex.exec(url);
    if (!results) return null;
    if (!results[2]) return '';
    return decodeURIComponent(results[2].replace(/\+/g, " "));
}
上面的函数从 URL 中提取查询参数。在浏览器上访问服务器的基本 URL 时,需要将唯一代码(应用程序中显示的代码)作为查询参数包含在内。这使我们能够跟踪用户的位置,因为它会为我们订阅与应用订阅的频道相同的频道。
接下来,初始化 Pusher。代码与之前服务器中的代码类似。唯一的区别是我们只需要指定 Pusher 应用密钥、auth 端点和集群:
var pusher = new Pusher('YOUR PUSHER APP KEY', {
  authEndpoint: 'YOUR PUSHER AUTH ENDPOINT',
  cluster: 'YOUR PUSHER CLUSTER',
  encrypted: true
});
检查是否 code 作为查询参数提供,并且仅在提供时订阅 Pusher 通道:
var channel = null;

if(getParameterByName('code') == null){
  alert('Make sure that the code is supplied as a query parameter, then refresh the page.');
}else{
  channel = pusher.subscribe('private-current-location-' + getParameterByName('code'));
}
添加初始化地图的功能。这将显示地图以及指向我们指定的默认位置的标记:
var map = null;
var marker = null;

function initMap(){
  var myLatLng = { // set the default location displayed on the map
    lat: -25.363,
    lng: 131.044
  };

  map = new google.maps.Map(document.getElementById('map'), {
    zoom: 16,
    center: myLatLng
  });

  marker = new google.maps.Marker({
    position: myLatLng,
    map: map
  });
}
绑定到 client-location 事件。每当应用程序触发一个 client-location 与用户作为查询参数提供的具有相同唯一代码的事件时,都会执行回调函数:
if(channel){
  channel.bind('client-location', function(data) {
    console.log('message received: ', data);
    var position = new google.maps.LatLng(data.lat, data.lng); // create a new Google maps position object
    // set it as the position for the marker and the map
    marker.setPosition(position);
    map.setCenter(position);
  });
}
接下来,添加跟踪页面的样式(public/css/style.css):
#map {
  height: 100%;
}

html, body {
  height: 100%;
  margin: 0;
  padding: 0;
}
部署服务器
我们将使用 Now 来部署服务器。它对 开源项目是免费的。
立即全球安装:
npm install now
安装后,您现在可以将 Pusher 应用程序凭据添加为 secrets。如前所述,Now 对开源项目是免费的。这意味着一旦部署了服务器,其源代码将在 /_src 路径中可用。这不是很好,因为每个人都可以看到您的 Pusher 应用程序凭据。所以我们要做的就是将它们添加为秘密,以便可以将它们作为环境变量进行访问。
还记得 之前服务器代码中的process.env.APP_ID or 吗?process.env.APP_KEY这些通过秘密被设置为环境变量。 pusher_app_id 是分配给密钥的名称, YOUR_PUSHER_APP_ID 是您的 Pusher 应用程序的 ID。执行以下命令将您的 Pusher 应用凭据添加为机密:
now secret add pusher_app_id YOUR_PUSHER_APP_ID
now secret add pusher_app_key YOUR_PUSHER_APP_KEY
now secret add pusher_app_secret YOUR_PUSHER_APP_SECRET
now secret add pusher_app_cluster YOUR_PUSHER_APP_CLUSTER
添加这些后,您现在可以部署服务器。 APP_ID 是环境变量 pusher_app_id 的名称,是您要访问的密钥的名称:
now -e APP_ID=@pusher_app_id -e APP_KEY=@pusher_app_key -e APP_SECRET=@pusher_app_secret APP_CLUSTER=@pusher_app_cluster
这是完成部署后的外观。它返回的 URL 是服务器的基本 URL:
 将该网址复制到 App.js 文件 并保存更改:
this.pusher = new Pusher('YOUR PUSHER APP KEY', {
  authEndpoint: 'https://BASE-URL-OF-YOUR-SERVER/pusher/auth',
  cluster: 'YOUR PUSHER APP CLUSTER',
  encrypted: true
});
此时,应用程序现在应该可以正常运行了。
结论
而已!在这个由两部分组成的系列中,您学习了如何将现有的 Expo 项目分离到 ExpoKit。ExpoKit 是在您的应用程序已转换为标准原生项目时使用 Expo 平台提供的一些工具的好方法。这允许您将现有的本地模块用于 React Native 并创建您自己的模块。
- 添加后台任务
- 获取当前位置
- 使用推送器发送位置
- 追踪页面




![如何删除Word中的空白页[4种简单方法] 如何删除Word中的空白页[4种简单方法]](https://www.weixiaolive.com/en/zb_users/upload/2023/07/20230702124855168827333590644.png)

